Ravellings on the knitted
sleeve
Part II - Creating a set-in sleeve for
a sleeveless body
The whys and wherefores
of set-in sleeves
Depending on the intended
style of a garment, a drop shoulder or modified
drop shoulder is simply less desirable or
attractive. For certain styles, such as tailored
and close-fitting styles, a set-in sleeve
is the most appropriate sleeve to use. To
understand why a set-in sleeve succeeds where
other styles fail, we need to examine why
the set-in sleeve is shaped the way it is.
Parts of the archetypal set-in sleeve
Like any other sleeve, the
forearm and upper arm is covered by a main
portion that extends from the wrist (if the
sleeve is long) to the biceps line, which
can be considered the beginning of the underarm.
The remainder of the set-in sleeve -- the
cap -- extends from the biceps line to the
shoulder and has a generally bulbous shape.
Following the outline of the cap from the
biceps line to the shoulder, you can see that
the slope of the outline changes. At the biceps
line and shoulder, the slope is pretty much
horizontal; between the biceps line and the
shoulder, the angle of the cap is first shallow,
then steep, then becomes shallow again.
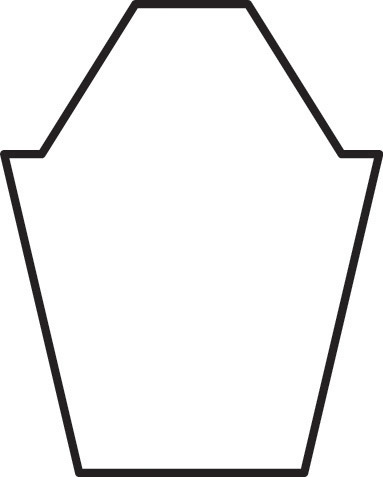
 |
| The garden-variety set-in
sleeve. At the left, the front and back
of the tailored sleeve cap are shaped
with more accuracy than is usually applied
in knitting; the back is cut larger to
accommodate the shoulder blade. Finely
tailored sleeves may also be fitted at
the elbow with darts or ease. In typical
knitted set-in sleeves, right, the front
and back halves of the sleeve are mirror
images, with no differences in dimension,
and no special shaping at the elbow. |
The perimeter of the sleeve
cap is sized to fit into the armscye (armhole)
of the body, either exactly or with a little
excess fabric in the cap that needs to be
distributed along the armscye seamline. In
a properly fitted garment, particularly in
garments sewn from woven cloth, the sleeve
cap is shaped differently towards the front
and back of the body, and the armscye cut
into the body is cut deeper in front than
in the back. This difference accommodates
the shape of the shoulder blade better than
a perfectly symmetric sleeve and armscye.
Optionally -- and this was a more common feature
in women's clothing until the mid-twentieth
century or so -- shaping can be added at the
elbow to conform to the arm's natural shape.
However, as you've probably
noticed, in hand knitting the typical set-in
sleeve does not have quite such sophisticated
shaping. The top of the sleeve is finished
with a horizontal edge (the final bind-off
row). Most set-in sleeves are completely symmetric;
there is no elbow shaping, and the back and
front halves of the sleeve cap are identical.
And since hand-knit fabric usually stretches,
we can take advantage of a small degree of
forgiveness in the garment shape, and skip
the step of precisely tailoring sleeve and
armscye. In fact, some set-in sleeve caps
are shaped with a constant slope. Normally,
hand knit set-in sleeve tops are still sufficiently
loose fitting that the lack of asymmetry goes
unnoticed.
Why does a set-in
sleeve work?
The key to a properly fitting
garment is that it has enough ease to allow
you to move as you wish. In a loose-fitting
garment, that ease is all over the place;
there's lots of room in the tubes that act
as sleeves, and lots of room in the tube that
serves as a body, as well. But in a closer-fitting
top, the ease has to be distributed strategically
to provide space without excess fabric. In
a set-in sleeve, the key is in the cap.
Have you ever tried on a
top (either purchased or laboriously knitted
by you) and felt a "binding" sensation
under the arm? Did the shoulders feel tight?
This might have been due to insufficient wearing
ease in the shoulder area. For example, the
distance from your neck to your elbow, over
your shoulder, is shorter when your muscles
contract and your arm is extended straight
out from your side. When your shoulder is
relaxed, with your arm hanging down in the
usual position, the distance over your shoulder
from your neck to your elbow is longer. The
difference in distances isn't large, but it
contributes to the binding feeling of a too-tight
armscye and sleeve. A garment with sleeves
needs to accommodate these little changes
in body dimension as the wearer moves his
or her arms.
In a really loose-fitting
garment, like a drop-shoulder sweater, there's
so much space between the garment and body
that there's no need to tweak the sleeve/shoulder
area to make this accommodation. But in a
tight-fitting garment, something's got to
give. If there isn't enough fabric to fit
or stretch around the body, the result is
that tight, binding feeling.
If a typical modified-drop-shoulder
pullover is designed to be close-fitting,
you may run into that binding problem, particularly
with thicker knit fabrics. If you design the
pullover to fit your body in the pullover's
"relaxed" position -- that is, with
the sleeves extending at right angles from
the body -- it may fit you perfectly as long
as you pose like a woolly board. But when
you lower your arms, you'd find you need more
space for your shoulders. The obvious place
to build in that extra space is, of course,
the upper part of the sleeve -- the sleeve
cap. If the pullover was not so close fitting,
then that binding may not occur at all, meaning
there is sufficient space for your shoulders.
This suggests that a closer-fitting sleeve
needs a deeper sleeve cap.
Also, compare the way you
typically stand and move with the typical
shape of a drop-shoulder or modified-drop-shoulder
garment. Normally, your hands are down by
your sides, or at least, your upper arm is
not extended at right angles to your body.
This suggests that a better-fitting garment
would reflect the relative position of your
arms to your body in real life, something
far less than a right angle to the body. Also,
as mentioned earlier, in a drop or modified-drop-shoulder
garment (assuming the fit is not close or
tight), when the arms are lowered, excess
fabric builds up in the underarm area. This
means that, rather than having a sleeve cap
that is perpendicular to the armscye, the
sleeve will fit better if the cap meets the
body at an angle smaller than a right angle.
This suggests that a closer-fitting sleeve
cap needs to be angled, rather than boxy.
Finally, the practicality
of fitting square pegs in round holes should
be considered. If a sleeve is designed to
have a deep, angled cap, it would probably
look like this:
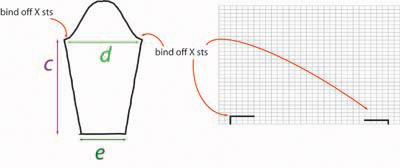
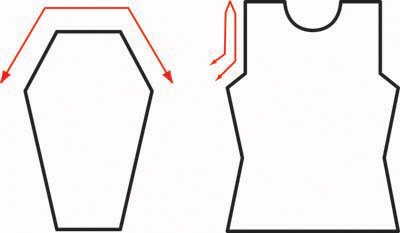 |
| A first draft
of a fitted sleeve, and the armscye it
would fit. |
While the total perimeter
of the sleeve cap is still equal to the perimeter
of the armscye, that bind-off distance across
the top, unlike the drop or modified-drop-shoulder
sleeve, is no longer equal to the vertical
drop of the armscye. Those two corners in
the sleeve cap fabric would have to be sewn
somewhere to the vertical portion of the armscye
-- not an easy thing to do, and not particularly
attractive. This suggests that to have a smoothly
fitting sleeve, the sleeve cap should
be gently curved from underarm to shoulder
point, rather than abruptly angled.
And of course, the human
figure isn't rectangular; it's curvy. The
imaginary line demarcating the body-arm boundary
isn't a box, so why knit one? A more refined
sleeve and body, then, would look something
like this:
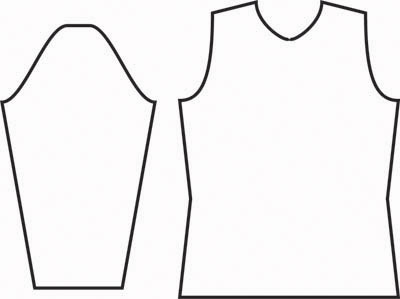 |
| A second
draft of the fitted sleeve, and the armscye
it would fit. |
And we've arrived at the
familiar set-in sleeve shape.
A little more theory
By merely inspecting the
respective shapes of the armscye and sleeve
cap, it's easy to see that the method of calculating
set-in sleeve shaping must be more involved
than a simple drop shoulder or modified-drop
shoulder. The geometry is more advanced; the
curved or sloped sides of the sleeve cap must
fit into the straight edge of the armscye,
and some fixed number of stitches at the very
end must be bound off without creating corners
of fabric that are too troublesome to sew
into the armscye. As for the main part of
the sleeve itself, sufficient ease must be
built into the sleeve, but not so much or
so little that the sleeve looks disproportionate
to the garment body; and the length, including
the depth of the cap, must be chosen to hit
the wrist (in the case of a long sleeve) at
just the right point.
In fact, different designers
and pattern drafters have different techniques
for calculating set-in sleeves to fit a given
armscye, and follow different rules of thumb
for:
-
determining the height
of a sleeve cap;
-
deciding whether the
sleeve cap shaping should have a constant
slope or a varying slope;
-
deciding how many stitches
to bind off at the top of the sleeve cap.
These different rules of
thumb vary according to what numbers are fixed
or calculated first. Some designers establish
the height of the sleeve cap first, while
others fix the number of stitches to be bound
off before considering the height or the slope.
As a general rule, however, the shaping and
fit of a plain set-in sleeve is dictated by
the shaping and fit of the body: if the body
is close fitting, the sleeve is close fitting
and the sleeve cap is proportionately deeper;
if the body is loose fitting, the sleeve is
loose fitting and the sleeve cap is shallower.
Exceptions are made, of course, for sleeve
style variations, such as pleated or gathered
caps.
Other matters, such as how
the biceps measurement, circumference of the
wrist, length of the sleeve, or location of
the underarm are determined, are sometimes
handled differently by various designers,
but the end result is the same.
Begin with taking
measurements
The sleeve design is premised
on certain dimensions:
 |
| Measurements
for drafting a set-in sleeve pattern. |
| Working
from an existing sleeveless top pattern
If
you are starting from a sleeveless top
pattern, choose a design with armholes
that approximate the shaping of a set-in
sleeve top:
-
an
armscye beginning within an inch
or two of the wearer's underarm
(more, if the garment is loose fitting)
curving as it emerges from the underarm
until it forms a more-or-less vertical
line over the shoulder; and
-
shoulder
coverage extending from the shoulder
line, or near the shoulder line,
towards the neck (the amount of
shoulder coverage depends on the
width of the neckline).
A
halter top does not have the same amount
of shoulder coverage, and the armscye
is often always angled towards the neck.
Strappy and strapless tops don't have
an armscye at all, although if the straps
of a strappy top are positioned near
the shoulder line, you can treat the
underarm-strap assembly as an armscye
for a set-in sleeve. (You may find that
skinny straps positioned so close to
the shoulder will tend to slip off,
making them useless for holding up a
set-in sleeve. In that case, consider
widening the straps to cover more of
the shoulder and adding means to fix
the garment straps to the straps of
your underpinnings.) |
a) the armscye depth on
the garment body;
b) the armscye perimeter
on the garment body;
c) the length of the arm
from armscye to wrist (if the sleeve is meant
to be that long);
d) the width of the sleeve
at the biceps line; and
e) the circumference at
the wrist (or the circumference at the lower
edge of the sleeve, if the sleeve is not wrist
length).
With the exception of the
armscye dimensions a and b, these measurements
are based on actual body measurements, plus
or minus ease. The amount of ease depends
on the overall style and fit of the garment.
Often, the body fit and design has already
been established, so the amount of sleeve
ease will be determined based on the body
ease.
Let's assume you are starting
from an existing sleeveless top pattern. From
its schematics, or from counting the rows
in the armscye, you can work out the depth
of the armscye, a. Make
a note of that value. Although measuring the
perimeter of the top's armscye is likely not
possible without some trigonometric number
crunching or drawing the pattern schematic
to scale, you can at least make a note
of the number of stitches bound off at the
beginning of the armscye on one side
and arrive at a rough estimate of the total
perimeter of the armscye. You can also verify
the fit of the armscye by comparing the measured
depth a with your actual body measurement.
In a standard fitting garment, the armscye
ends about 1 inch below the actual armpit--more,
if the yarn is bulky or you intend to wear
loose shirts underneath the garment. Also
make a note of the distance between the
actual armpit and the lower edge of the armscye.
This value will be used to determine the length
of the sleeve.
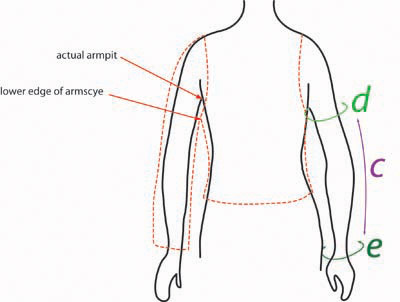 |
| The distance
between the actual armpit and the lower
edge of the armscye will be used to calculate
the length of the sleeve. |
A word of caution about
working from an existing sleeveless top pattern:
the set-in sleeve seam is typically expected
to lie across the shoulder point, and the
armscye perimeter is generally loose enough
to allow for comfortable wear and freedom
of movement. However, sleeveless tops are
often cut to expose a little more shoulder,
and a little less armpit. This means that
you may need to adjust your existing pattern
to decrease fewer stitches at the armscye
shaping so that the upper back width is equal
to your shoulder-to-shoulder measurement,
and to drop the lower edge of the armscye
so that there will be sufficient ease to fit
a sleeve.
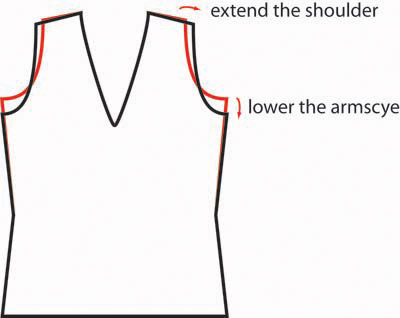 |
| Some sleeveless
top patterns may need adjusting (from
the red outline to the black outline)
if a set-in sleeve is to be added. |
The length of the sleeve
from armscye to wrist, c,
is not the same as the total length of the
sleeve from the top of the sleeve cap to wrist.
This particular measurement is measured essentially
from the garment's "armpit" to the
wrist. For this value, measure from the
wrist, over a slightly bent elbow, and up
to your actual armpit, and then subtract the
distance you measured above, between the actual
armpit and the lower edge of the garment armscye.
Also from the existing pattern
schematic for the top, make a note of the
total ease around the bust or chest (that
is, the difference between the actual body
measurement and the garment measurement at
the widest point at the chest. For a plain
set-in sleeve, the width of the sleeve
at the biceps line, d, will
be the circumference of the upper arm at its
widest point plus about 50-100% of the body
ease. This 50-100% of the body ease,
in a "standard fitting" garment,
is typically 1 or 2 inches. For a styled sleeve,
like a puffed or gathered sleeve, the width
at the biceps line may be far greater than
this amount.
| Ease
varies over time
If
you consult a number of reference books,
the amount of ease in the body will
fluctuate according to the silhouettes
in vogue at the time the book was published.
Sweaters
from the 1980s and early 1990s, for
example, had loose, easy-fitting styles,
and consequently an "average"
fitting sweater would have at least
4 inches of ease. In the late 90s and
early 00s, a fashionista would have
chosen a closer fit as an "average"
fitting sweater.
This
means, when reading garment descriptions,
you should be aware that a "classic"
or "standard" fit may not
be what you consider to be your classic
or standard. In this article, "classic"
is assumed to be 2 inches of ease. |
Finally, the wrist circumference
e is generally taken to be
either the actual wrist measurement plus 1
inch, or a measurement sufficient to pass
over a closed fist.
Sketch your schematic
and write in the measurements you know
Sketch a large schematic
of the sleeve, approximating the shape
of the sleeve cap. If you are using proportional
graph paper, don't bother graphing the entire
sleeve to scale--the main part of the sleeve
is quite straightforward. Save the graph paper
for sketching the cap alone. Make a note of
your stitch and row gauge (number of stitches
and rows per inch) on your schematic, as well
as some of the measurements you've taken so
far: the length of the sleeve c,
the width of the sleeve at the biceps line
d, and the circumference at the wrist
e.
Convert the numbers
you have to stitches and rows
With your knitting gauge,
convert the measurements you've written
on the schematic to stitch and row counts,
adding a selvedge stitch or two. At this point,
you'll be able to work out the increases for
the main part of the sleeve, just as the sleeve
shaping was calculated in last
issue's article. In this article, we'll
skip the addition of a cuff, and just work
straight up from the wrist.
Also, at this point, at
the start of the sleeve cap, make a note
of how many stitches to bind off the first
two rows of the sleeve cap. One of the
more constant rules of thumb in knitwear design
is that the number of stitches bound off at
the beginning of the garment armscye equals
the number of stitches bound off at the beginning
of the first two rows of the set-in sleeve
cap.
If you are using proportional
graph paper, now's the time to mark off the
beginning of the sleeve cap, and the first
two rows of the cap shaping.
 |
| The schematic
so far, left; and the proportional graphed
sketch so far, right. |
Design the sleeve
cap to fit the armscye
Next, the sleeve cap shaping
needs to be determined. This is where the
design technique can vary. Some designers
will proceed in the following order:
-
Fix the height of the
sleeve cap.
-
Fix the number of stitches
for the final bind-off of the sleeve cap.
-
Decide how to work the
decreases to fit between the initial bind-offs
and the final bind-off, so that the sleeve
cap fits the perimeter of the armscye.
This particular sequence
is likely to be followed if you choose to
follow the rule of thumb that a sleeve cap
should have a particular height. In her book,
Designing Knitwear, Deborah Newton
recommends that a sleeve cap for a "classic"-fitting
garment have a height equal to about two-thirds
of the depth of the armscye, a; for a loose-fitting
garment, this height should be less, and for
a closer-fitting garment, the height should
be greater (note that this fits in with the
theory discussed above, that a closer-fitting
sleeve needs a deeper sleeve cap).
The final bind-off of the
sleeve cap is often fixed between 2 and 6
inches; less for smaller sizes, more for larger
sizes, and less for closer-fitting garments,
more for looser-fitting garments. If the corners
produced by the bind-off are to be softened
by a few sets of bind-off rows, choose a narrower
final bind-off.
When the rest of the sleeve
cap is drafted, the aim is to have a sleeve
cap perimeter that is at least the same measurement
as the armscye perimeter. The sleeve cap perimeter
may be about 1 inch greater than the armscye
perimeter without causing any difficulties
in sewing up, so don't worry about being precise;
the extra fabric can be eased in invisibly.
Just don't design a sleeve cap that is too
small to fit within the armscye perimeter.
There is obviously some
uncertainty or at least some recursive tweaking
done with sleeve cap decreases to get the
sleeve to fit the armscye properly. This method
is most easily accomplished if graph paper
ruled to match the knitting gauge is used
-- the outline of the sleeve cap can be sketched,
then measured with the edge of a measuring
tape to confirm the sleeve cap perimeter measurement.
The outline can then be converted to actual
knitted stitches by tracing over the closest
gridlines.
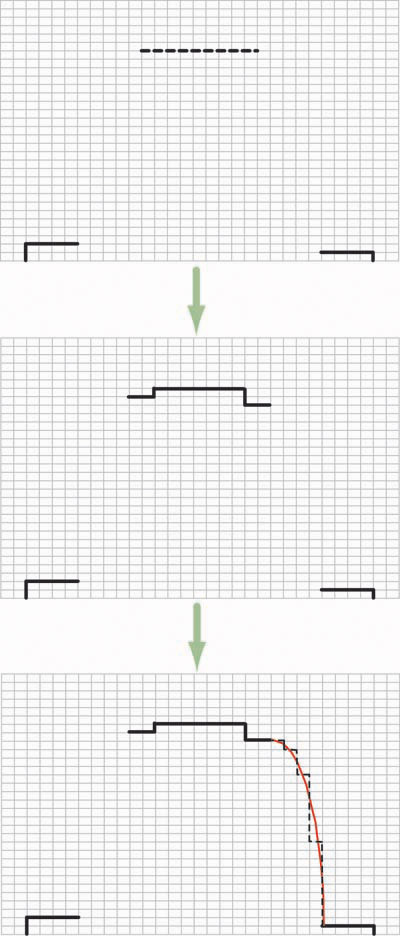 |
| The height-first
method. First, the height is chosen based
on the armscye depth; then the final bind-off
row(s) is (are) added; then the remaining
part of the sleeve cap is sketched by
hand to fit the armscye perimeter. Once
the sketched perimeter measurement matches
the armscye perimeter, the outline is
resolved according to the gridmarks. |
Other designers might follow
this order:
-
Fix the number of stitches
for the final bind-off of the sleeve cap.
-
Decide how to work the
decreases to fit between the initial bind-offs
and the final bind-off so that the sleeve
cap fits the perimeter of the armscye.
In this case, the final
height of the sleeve cap is an unknown variable,
and the designer doesn't really care what
it is, as long as the sleeve cap perimeter
fits and looks like a sleeve cap. The final
bind-off rows are chosen in accordance with
the same rules of thumb as the first method.
If this second method were
to be applied to graph paper, then it would
probably wind up being implemented the same
way as the first method -- a cap height would
have to be chosen first, otherwise the graphing
step would not make much sense. Designers
who implement this second method likely do
not use proportional graph paper at all, but
rather use trigonometry to design a sleeve
cap with the desired bell or angular shape:
since the perimeter of the sleeve cap provided
by the initial and final bind-offs is known,
the remaining perimeter must be provided by
a series of decrease rows. The number of required
decrease rows is determined using a little
trigonometry -- a little more trigonometry
is required if the sleeve cap is to have a
bell shape, with varying rates of decreases.
 |
| The variable-height
method. First, the final bind-off row(s)
is (are) determined; then, given the target
measurement for the remainder of the sleeve
cap, a set of decrease rows is devised
using one or more sets of calculations
to fit the remainder. |
Still another order of operations
is:
-
After the first two
bind-off rows in the sleeve cap, decrease
according to a set formula until the perimeter
of the sleeve cap fits the perimeter of
the armscye.
-
Bind off the remaining
stitches.
This method is effectively
the "live" method of knitting a
sleeve cap -- rather than engage in calculations
or graphs beforehand, once the first two bind-off
rows are worked, the knitter simply wings
it until the sleeve cap looks like it will
fit. The height of the sleeve cap is unknown,
and so is the width of the final bind-off.
However, there is less work to do in computing
the decreases since it follows a set formula,
typically decreasing one stitch at either
end of every other row. This means the shape
of the sleeve cap is a simple trapezoid, rather
than a bell curve. This method is safer for
looser-fitting garments, since the fit to
the body is imprecise and the width of the
final bind-off could be relatively wide.
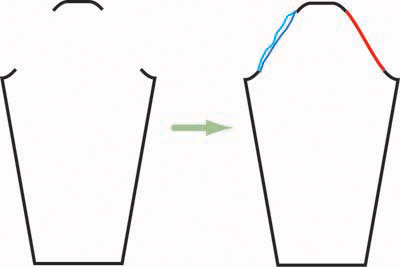
|
| TThe final
shape of a set-in sleeve with a cap shaped
using the "live" method. Once
the initial bind-off rows are worked,
the cap is decreased at a constant rate
until the perimeter equals the armscye
perimeter. |
You can check the length
of the sleeve by measuring your total
"wingspan" -- that is, the measurement
from a first wrist, over a first slightly
bent elbow, up the arm, over the shoulder,
across the back neck, and down the other side
following the same path. Your total wingspan
should be equal to the total sleeve length
of the first sleeve (including cap), plus
the upper back width, plus the total sleeve
length of the second sleeve.
If desired, write out the
schematic or graph as knitting instructions
If the sleeve cap was designed
using the first or second method, then this
will be fairly straightforward. If you used
the third, "live" method, then you
will have to write out your instructions as
you knit.
Final notes on set-in
sleeve construction
First, if you tend to knit
your sleeves before the body, this is one
situation where it is probably better to knit
the body first. It's easier to test the fit
of the sleeve cap in the armscye if the armscye
is completed first; if it doesn't fit, only
some or all of the sleeve cap needs to be
ripped out and reknit. If the body is already
constructed, you can even test the fit of
the sleeve cap and estimate the shaping of
the remainder of the cap as you are knitting.
If the sleeve was completed first and it turned
out that the armscye did not fit the sleeve
cap, you would be faced with the choice of
ripping back the sleeve cap, or ripping back
the upper body.
On the other hand, if you
are married to the method of using your sleeves
as a giant gauge swatch, just knit the sleeves
up to the beginning of the sleeve cap. Let
them wait on waste yarn or a stitch holder
until the body is completed.
Secondly, for your first
attempt at designing set-in sleeves, it's
easier to work in flat pieces, knit from the
wrist up. It is possible to knit set-in sleeves
from the armscye downwards by using short
rows to shape the sleeve cap, and it's a rather
clever strategy. However, it's easier to understand
this technique (for example, as described
in Barbara Walker's Knitting from the
Top) once you understand how the flat
pieces fit together.
You might also wonder about
selvedge stitches: should they be included
in your calculations in the sleeve cap? Generally,
if you have built in a single-stitch or half-stitch
selvedge into your garment bust measurement
and sleeve width, you can pretty much ignore
the effect of the selvedge when you are attempting
to fit the sleeve cap to the armscye. The
overall fit along that seamline will not be
affected.
Finally, what's to stop
you from simply making up a sleeve cap as
you go along, if you're designing from scratch?
Is it necessary to engage in all the computation
and sketching? No, if you don't mind knitting
and ripping repeatedly to get a sleeve cap
to fit, by all means, do it. However, if you're
trying to design for a range of sizes, you're
unlikely to want to knit a series of sleeves
and you'd probably save time by hauling out
the calculator and graph paper.