-- a simple way to make
your own patterns
Anyone who read the
title and thought "Oh, I can't do that,"
go slap yourself.
Now, then.
In the dark and mysterious
past, knitters didn't have Debbie Bliss or
Elsebeth Lavold telling them "cast on
fifty stitches, work in pattern..." For
most of knitting's history, the idea of a
written pattern would have been strange and
foreign. What our ancestors did was use a
system of proportions and percentages to help
them create a knitted garment. Cast on enough
stitches to go around the chest, knit until
it was long enough, bind off one-third the
width on each side for shoulders, and leave
the middle third for a neck. Knit some sleeves,
slash the arm holes, sew them in. There's
your traditional knitted gansey. Nothing to
it.
NOTHING TO IT? Yes.
If they did it, we can do it.
To make matters even
simpler, several master knitters over the
years have taken pity on the rest of us and
codified the proportions even more exactly.
Elizabeth Zimmermann was the first to take
the mystery out of the old traditional knitting
methods and explain about seamless sweaters,
percentage systems, and figuring things out
for yourself.
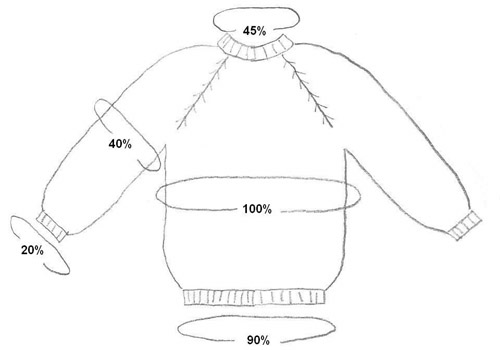
As you can see, 100%
is the chest measurement, and then everything
else is a portion of that. You can knit yourself
a well-fitted sweater following these guidelines
on your first time out. A couple sweaters
for practice, and you'll be throwing in cables
and fancy colors in no time.
Just to convince you
it's easy, I'll walk you through your first
one.

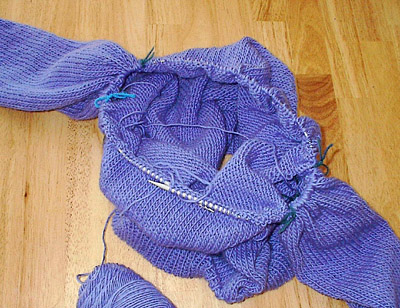
This is your prototype.
It's knit with the percentage system and hardly
planned at all as I went. I used Brown Sheep's
Lamb's Pride Worsted and turned the thing
out in about two weeks, doing most of my knitting
while watching television or studying geography
(I aced the test on China, too.) The color
is M-59, Periwinkle, if you find it pretty.
I'm not too wild about it, myself; I think
I'm unloading the sweater on a friend. Holidays
coming up, after all.
| I
used a US size 10 needle, even though
the yarn label said to use a US size 8.
I like the way the fabric drapes better
on a US 10. Since this is MY SWEATER with
MY GAUGE, it doesn't matter. I can do
whatever I want. Ahahahaha. |
Step one is a swatch.
No, you don't have to do a swatch; only if
you want the sweater to fit. No, you don't
have to wash the swatch before you measure
it, assuming you're never going to wash the
sweater, either. For the rest of you, cast
on 30 stitches on a circular or double-point
needle.
DO NOT KNIT BACK AND
FORTH. You aren't knitting the sweater back
and forth -- why would you knit the swatch
back and forth? Push the stitches over to
the right side of the needle, loop the yarn
across the back, and knit back across the
swatch. Smoosh the stitches back over to the
right again, loop the yarn, and knit across.
Do this for about 20 rows, then bind off loosely.
This will look like a giant I-cord with really
messy yarn strands across the back. Cut the
yarn strands in the middle, neaten up the
edges (you can tie pairs of the yarn ends
together, but you really don't have to), and
wash the swatch.
Oh, quit whining.
You can do this in a couple hours while watching
a movie.
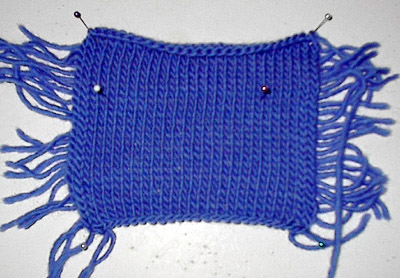
Once it's dry, pin
the thing out on a foam-backed board (like
my photo ^ up there) or a couch cushion (like
I usually do), and get a ruler. Lay the ruler
across the swatch and shove some pins in,
four inches apart. I've got two tips for you
here: put one of the pins between two stitches,
neatly, so you have somewhere to start counting,
and MAKE SURE THE PINS ARE BOTH IN THE SAME
ROW. I once measured a swatch diagonally across
a couple rows and spent the next month knitting
a sweater that didn't fit.
Count up your stitches,
including half stitches (you can count quarters,
too, but that's a bit extreme unless the final
result is supposed to be close fitting), divide
this number by 4, and you've got your gauge.
This is how many stitches per inch this yarn
knits at, for you, on those needles. (If you
actually label this and keep it, the next
time you knit a sweater with this yarn and
needles, you can skip the swatch process.)
In my case, I got 3.5 stitches per inch.
Time for the math.
A calculator (hint) makes it almost brainless.
What you need is your
chest measurement. The easiest way to get
this is to get your favorite-fitting sweatshirt
and measure how wide it is through the chest.
When I did that, I got 46 inches. 46 inches
x 3.5 stitches per inch = 161 stitches. I
bumped it up to 162 because I like working
with even numbers.
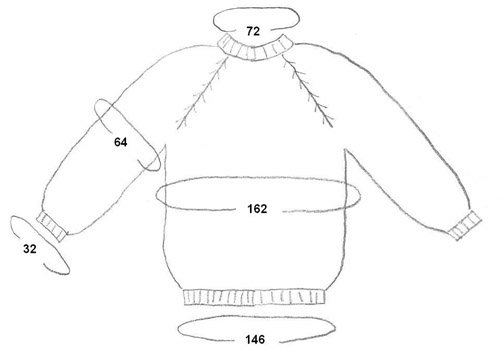
Using 162 as the magic
number, it's simple to figure backward for
all the other percentages in your sweater.
Get your calculator.
162 x 90% = 145.8
Bump it over to 146 and you've got the number
of stitches to cast on.
162 x 20% = 32.4
Round it down to 32 and you've got your start
for the sleeve.
Working through the
chart gives you all your relevant numbers:
So here we go. You
either need a couple circular needles, or
some yarn, or some stitch holders, because
we're going to have a bunch of active stitches
on hold from time to time. Cast on 146 stitches
and knit a couple inches of ribbing. Increase
to 162 stitches evenly across the row, (that's
knit 9, make 1) and knit the body up to the
underarms. Length is a matter of personal
taste, but i like it around 16 inches. Put
the body aside, just leave it for now with
all the stitches raw, on a needle, and knit
two sleeves: Cast on 32 stitches, knit in
ribbing for a couple inches, then at the underarm,
increase 2 stitches every 3 or 4 rows until
you have 64 stitches (that's 40%), and knit
until you like the length. Knit a duplicate
sleeve for the other side. To avoid the embarrassing
cliché of a sweater with sleeves two
different lengths, make sure you've got the
exact number of rows in each sleeve (hint:
row counter).
At this point, we
have three separate pieces of knitting. One
body and two sleeves.
Put 8% -- 13 stitches
in this case -- on stitch holders at the underarms,
both on the body and the sleeves. On the body,
that would mean you'd have 68 stitches for
the front of the body, 13 stitches at the
armpit on a holder, 68 stitches for the back
of the body, and 13 stitches at the other
armpit on a holder. (68+13+68+13=162 Subtract
the armpit stitches -- 26 total -- then divide
what is left by 2, to get front and back.)
MAKE SURE THE ARMPITS ARE OPPOSITE EACH OTHER.
That's the only thing you can potentially
screw up on this stage. Put 13 armpit stitches
at the underarm of each sleeve on holders,
leaving you 51 active stitches per sleeve.
Put the sleeves and
body on one circular needle, with everything
aligned as it would be on the body: sleeve,
body front or back, sleeve, other half of
body, other sleeve. (I do this by just knitting
it all onto the needle -- I knit my way across
the back, knit on the stitches of the sleeve,
knit across the front, and knit on the stitches
for the other sleeve.) You should now have
238 stitches on your needle: 68 back stitches,
51 sleeve stitches, 68 front stitches, 51
sleeve stitches = 238 stitches total. Make
sure there are stitch markers at the four
places where sleeve and body meet. (Those
are known as armpit corners at my house.)
The hard part is done.
In fact, making sure your sleeves are on opposite
sides of your body is about the only hard
part to this method of knitting.
Knit an inch or two
plain. The more you knit plain, the deeper
the arm holes will be. Up to you.
Once you've got your
arm holes deep enough, begin the raglan decreasing.
Decrease TWO STITCHES at EACH MARKER, EVERY
OTHER ROW. The decrease used on my sweater
was slip-slip knit, move marker, knit 2 together.
You could alternately use slip 1, knit 2 together,
pass the slipped stitch over, or, heck, any
double decrease or pair of decreases, so long
as you get the numbers right. That means you
do a row where you decrease 8 stitches (2
at each of 4 markers), then a row plain. Then
another decrease row, then another plain row...that's
it.
Decrease until you
get to about 72 stitches (162 x 45% = 72.9
stitches), knit an inch or so of ribbing,
and bind off. If you want, you can put in
a short row or two across the back of the
neck to make it fit better, but it's not vital.
All you've got left to do is graft together
your armpits. That's all the finishing there
is; no real seams.
Congratulations. You've
just made up your very own pattern. Now go
do another one, but put in colors, or a cable,
or something.
Anyone who said "I
can't do that" is grounded!