... but will it fit?
Introduction
At the first blush of the
romance, your heart races and your mind blossoms
with the possibilities of what might be.
During the honeymoon, you
settle into complacency; while you remember
the heady rush you first felt at the initial
encounter, for the time being you're content
to plod along, unthinking, and not particularly
caring what the future might hold.
And in the twilight of the
relationship, you stare into the mirror and
realize: it's just not right. It has to
end now.
And as you tear the sweater
off your body and hurl it into the corner,
uttering unrepeatable oaths, you vow: the
next time I knit something, I swear it's going
to fit.
Knitting mistakes happen,
both on small and grand scales. Minor mistakes
are dropped stitches and miscrossed cables,
and can be easily fixed or ignored, depending
on your personal level of obsessive-compulsiveness.
Major mistakes are errors in judgment, like
choosing the wrong yarn, picking the wrong
style for your body, or knitting the wrong
size. They're a little harder to ignore.
Nobody's perfect, and even
experienced knitters who claim to know better
can still knit up a garment that looks better
on the blocking board than the body. But with
a little bit of thinking in advance, you can
avoid disappointment by developing realistic
expectations of your next major knitting project,
and planning a garment that fits the way you
expect it to fit. Some of that thinking involves
choosing
the right yarn for the right project,
particularly if you're not using the same
yarn recommended by the pattern. Some of the
realistic expectations come from understanding
the type of fabric you'll be creating, which
you'll hopefully learn from a gauge swatch,
and from understanding how
different clothing styles look and fit.
And of course, some of that planning involves
picking the right pattern size for your body.
This article deals specifically
with learning how to pick the best pattern
size before you pick up the needles. Of course,
getting a perfect fit doesn't end there; patterns
can't be written for a continuous spectrum
of sizes, so designers and publishers typically
choose a specific finished bust measurement,
then increment or decrement that measurement
by a fixed amount to create other pattern
sizes. Because patterns can't be sized to
fit the infinite number of body shapes and
sizes that exist, it's normal to have to make
some tweaks to somebody else's pattern to
get the optimum fit for yourself. Those tweaks,
though, will have to wait for a future issue;
before you get that that point, you need to
pick the right starting size first.
Picking your
style
Part of developing realistic
expectations about a garment is understanding
what styles look best on you. This article
isn't meant to provide fashion or style advice.
There are lots of other places to find that
kind of information: books, magazines, websites,
and television shows. And just because you're
knitting your clothing doesn't mean you should
restrict yourself to knitting books when looking
for style advice. If a V-neck t-shirt looks
good on you, then you'd probably look good
in a V-neck sweater too. If purchased tops
with turtlenecks or funnel necks make your
chest look far too big, the problem won't
be fixed by knitting a turtleneck or funnel
neck instead.
In other words, the style
logic that applies to store-bought clothes
applies to clothes you make yourself. If you
fall in love with a sweater with horizontal
stripes or empire waist detailing, remind
yourself about how you think you look when
you're wearing horizontal lines that visually
divide your body into strips before you commit
to the knitting.
|
If
you're planning to knit a garment
with styling that doesn't resemble
anything that's already in your
wardrobe, consider doing a little
shopping. Try to locate a garment
that has similar design lines
to the one in the pattern, so
that you can try it on and get
an idea about how it might look
on your body.
|
Assuming that you're not
a candidate for a clothing makeover show,
you can survey your own wardrobe and do a
little shopping to figure out what hand-knit
designs would look best on your body, or at
least the designs that you think
will look best and make you feel good.
Starting with your existing
wardrobe, pull out the tops that make you
feel attractive and confident. Now, the majority
of the clothing you wear probably isn't hand
knit, and is made of far thinner fabric than
hand-knit material, so don't rely on your
everyday clothes to provide an accurate gauge
of the amount of ease (space) you want to
incorporate in your knitting. However, you
can examine these clothes to identify some
common style themes: do you find a lot of
crew necks, scoop necks, V-necks, turtlenecks?
Are the sleeves set-in sleeves, three-quarter
length sleeves, raglan sleeves? Do the hems
of tops and jackets hit you at the waist,
high hip, or mid-thigh? If you can spot some
common style themes, then you can train yourself
to look for them when perusing knitting patterns.
Moving on to the sweater
and cardigan-like garments in your wardrobe
-- the ones that you've knit, or could
have been hand knit by you, and are made at
knitting gauges similar to what you'd knit
--pick your favourites and try to evaluate
why they're your favourites. Where
do the hems hit your body: high hip, waist,
mid-thigh? Are the necks high and fitted,
or lower and looser? Is there a lot of space
at the underarm to allow you to wear loose
t-shirts underneath, or do they fit too closely
for that? If you plan to knit something that
differs significantly from the common elements
you detect in your existing wardrobe, it sometimes
helps to go shopping and try on garments that
resemble what you're planning to make before
you decide to go ahead.
The camera never lies
When you do peruse knitting
patterns, try to train yourself to look at
the clothes, not the model or the
setting. Knitting publications that have bigger
production budgets spend more on photography,
stylists, and models. This can add up to distracting
accessories and unintentionally misleading
poses.
|
Is
what you see what you get?
Magazine
and book photography stylists have tricks
to make garments fit differently than
they really do in real life, or to hide
flaws in the garment's design. They
may not use these tricks, but it's good
to be aware of them.
Often,
professional models (read: non-typical
body types) are used to display the
clothing -- thinking probably borrowed
from other parts of the publishing industry.
This means the clothes won't hang the
same way on the model as they will on
the typical body. The sample garment
might appear to be much looser-fitting
than it really is since the model is
so much smaller than average. Or the
stylist might make hidden adjustments
[often with clothespins at the back
of a garment] to make the garment behave
closer to the way it was intended or
to make a more appealing photograph.
Even if the garment fits the model as
the designer intended, without alteration,
the pose itself can alter the look of
the garment. The
more natural the model's pose in the
photograph, the more you can rely on
the photograph to provide information
about the fit of a garment. Be wary
of poses where the model is:
- sitting
(this disguises the actual length
of the garment);
- standing,
sitting, or lying down with both her
arms raised above shoulder height
(this makes the body and sleeves appear
shorter);
- stretching
or scrunching the garment fabric (this
distorts the garment shape); or
- nonexistent
(for example, a photograph of a sweater
lying flat with no reference as to
size).
If
the only photographs available feature
one of these distracting poses, it's
even more important to examine the pattern
schematics or draw your own to analyze
before knitting.
|
For example, a sweater on
a seated model can appear longer than it actually
is when the model's standing. Consider Rosebud
from the Spring 2004 issue of Knitty. The
designer thoughtfully included photographs
both sitting and standing, so you can get
an accurate picture of where the garment hem
is intended to fall. Many knitting publications,
however, don't have room for multiple views,
so what would happen if the editor had decided
to pick the sitting shot? You wouldn't be
certain how long the garment was meant to
be.
Add to that the fact that
many sample garments for knitting publications
are worked up in "real world" sizes, while
the model's body shape is likely far from
average. The clothing may have been knit to
fit the designer herself, or at least to match
one of the pattern sizes; but if the model
has one of those typically skinny model figures,
the photograph probably won't represent the
garment the way the designer intended, or
the way it will fit on you. Without information
about the model's actual dimensions, and the
dimensions of the garment she's wearing, you
likely won't be able to use a photograph by
itself to accurately predict what the finished
product will look like when you're actually
wearing it. The photograph gives you some
clues, but you'll get more information from
the pattern details.
Picking your
size
If you've been knitting
sweaters and cardigans for a while, you've
probably figured out that the typical small-medium-large
sizing that's followed in patterns is often
inconsistent, not only between different publishers
or yarn companies, but also between different
patterns published by the same company. Knitters
are often frustrated to discover that, while
they're roughly a medium when they purchase
clothing, that rule doesn't always carry over
to knitting patterns; and even if they're
a "medium" in patterns published by one yarn
company, they're a "large" or a "small" in
patterns published by somebody else. Even
within a single publication -- especially
ones with a number of contributing designers
--the "S-M-L" sizing can vary.
Some of that frustration
may be due to a lack of standardization of
sizes across the industry, but in cases where
the publication does adhere to consistent
sizing (and unfortunately, this often isn't
clear unless the publisher uses a visibly
obvious standard, like the Craft
Yarn Council of America's (CYCA) sizing standards),
it may be caused by confusion between the
"finished" sizes and dimensions that are often
given alongside the pattern's "S-M-L" sizing.
| Remember
that when knitting pattern sizes
are given as dimensions rather
than "S-M-L", those numbers usually
represent the measurement around
the fullest
part of the bust, not
clothing size (which can vary
from country to country) or bra
size. |
The typical knitting
pattern these days describes the sizes
of the garment in terms of "finished"
measurements as well as "S-M-L" sizing.
Because knitters, as consumers, expect
"S-M-L" sizing to be standardized (which
is a reasonable expectation), they sometimes
think that the "finished" numbers are
meant to represent dimensions under
the standard as well. That's not quite
true.
Consider, for example, Belle
Epoque from the last issue of Knitty.
The pattern says that it's written for sizes
small, medium, large, and extra-large, and
gives corresponding finished bust dimensions
of 40, 43.5, 48, and 51.5 inches. Now, a knitter
with a 33-inch bust who consults the CYCA's
standards for women's
sizes and identifies herself as a standard
"small", might then turn to the pattern and
think, This can't be right! The finished
small is 40 inches, yet the pictures show
it's not loose around the bust; it won't look
right on me! when, in fact, the pattern
is right.
Why the confusion? It's
all about ease.
Ease is the difference
in measurements between your body and the
garment, or in other words, the extra "space"
available. In sewing, ease is typically defined
as the sum of wearing ease and design ease,
where wearing ease is the minimum amount of
ease needed for a comfortable fit, and design
ease is anything extra that was added by the
designer in order to achieve a certain look.
The design ease can thus vary widely from
pattern to pattern, whereas the wearing ease
is assumed to be (but isn't necessarily) fairly
constant. Ease values are usually measured
and calculated for the major fitting points
on the body, in particular the bust and the
hips. For tops, jackets, coats, and sweaters,
when we refer to "ease" we usually mean the
ease at the fullest part of the bust or the
widest point of the chest. Sometimes the ease
around the upper arm is considered as well.
Hand-knit designs make use
of wearing ease and design ease as well, but
unfortunately the distinction between wearing
ease and design ease is not widely understood,
for example by our hypothetical Belle Epoque
knitter. Reading through the pattern, you
can see that at the finishing stage, there
are two options for wearing the garment: either
a ribbon band is fastened on to create an
empire waist that cinches in the garment to
create a closer fit, or elastic is fastened
inside under the bust to gather the fullness
at the back. Either way, the hypothetical
Belle Epoque knitter probably would have been
happy with the extra "space", which was in
fact due to the design ease in the pattern.
If she chose to wear it without the elastic
or belt, however, it would not have the same
finished appearance.
To further confound the
sizing issue, the amount of wearing ease necessary
to achieve a functional, comfortable garment
varies depending on the fabric and the type
of garment. Consider the two sweaters in this
picture:
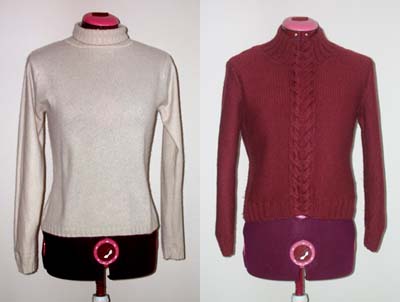 |
| Different thicknesses
of fabric need different ease allowances
to have the same effect. These two sweaters,
shown on a mannequin a 33-inch bust measurement,
actually appear to have the same general
fit and silhouette when worn on the body.
But in fact, the sweater on the left only
has half an inch of ease, while the sweater
on the right has three inches of ease. |
The turtleneck on the left
is a purchased cashmere sweater machine knit
at a gauge of about 14 stitches over 1 inch.
At its widest point, it measures 33.5 inches
around. The turtleneck on the right is a hand-knit
sweater in Rowan Magpie at 4.5 stitches over
1 inch that measures 36 inches around at the
widest point. That's a difference of 2.5 inches.
When worn by a body with a 33-inch bust, this
means that the sweater on the left has only
0.5 inches of ease, while the right-hand sweater
has 3 inches. Yet, when worn, the sweaters
appear to have approximately the same fit
and silhouette, and the wearer feels like
she has about the same amount of breathing
room.
The difference in ease
in these two sweaters is due to the thickness
of the fabric. The fabric knit at 14 stitches
per inch is quite thin and, in this case,
has more drape and malleability than the fabric
knit at 4.5 stitches per inch. A fabric knit
at 4.5 stitches per inch is usually fairly
thick --about 1/8 of an inch or more, depending
on the type of yarn. Part of that ease in
the Rowan Magpie sweater, when worn, is actually
taken up by the thickness of the fabric itself.
If we assume that the Magpie fabric was about
3/16 inches thick, then in fact the internal
measurement of the sweater will be about 35
inches -- an inch of that 36-inch measurement
is lost already. (This explains why close-fitting
tops knit in mega-gauge yarns make anybody
look chunky. The fabric adds width to the
wearer!) If the sweater has particularly thick
side seams, this will eat up a bit of ease
as well. The rest of that extra ease provides
the freedom of movement that's already accommodated
in the machine-knit sweater because of its
more fluid fabric.
Some oft-quoted advice on
picking a pattern size is to take a pullover
or cardigan out of your wardrobe and measure
it to determine its finished chest measurement,
then choose a pattern size with a finished
measurement that matches this number. So,
for example, if you have a 37-inch bust and
you have a favorite sweater that measures
44 inches, you'll always pick the pattern
size that's closest to a finished measurement
of 44 inches. It's also sometimes advised
to use some standard guidelines on ease (whether
from a design book or other source), and to
always make sure that you apply those numbers
when choosing a size. In that case, if you
read somewhere that the average ease for a
"standard" fitting sweater was about 4 inches
and you measured 42 inches around the bust,
you'd always choose the pattern size closest
to 46 inches for a "standard" sweater.
But as we just saw, it's
entirely possible that different amounts of
ease are necessary to create a "standard"
fitting sweater (whatever "standard" means)
depending on the chosen yarn. If the pattern
size for the Magpie sweater above had been
chosen based on the measurements of the machine
knit sweater, the result would have been disappointing
and rather uncomfortable to wear.
In other words, don't
assume that all clothing should have
a predetermined ease, like two inches
or four inches or six inches for three reasons:
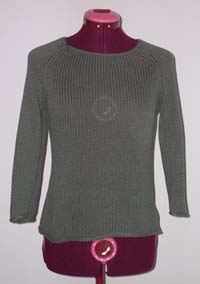 |
|
| This sweater actually
has negative ease: it measures
32 inches at the bust, while the
wearer (as represented by the mannequin)
measures 33 inches. The nature of
the knitted fabric still makes this
a comfortable fit. |
|
- The minimum
amount of ease necessary to even have
a comfortable fit can vary widely
depending on the type of fabric, its
thickness, and its drape. As a general
rule, the thicker or stiffer the fabric,
the more wearing ease is needed for
a comfortable fit. The more drape
the fabric has, the closer fit it
can have and still be comfortable.
The sweater on the left is knit from
a cotton ribbon yarn, and is therefore
rather fluid in terms of gauge--on
a hanger, its gauge is about 4.5 stitches
per inch; relaxed and lying flat,
it's about 4 stitches per inch, but
when worn it can reach 3.5 stitches
per inch and still not look like it's
being unduly stretched out. This particular
sweater has negative ease, being one
inch smaller than the wearer;
however, it does not look tight, and
the wearer is not constrained the
fabric. If this sweater had been knit
from a stiff, thick wool at the same
relaxed gauge of 4 stitches per inch
and with negative ease, it would have
been uncomfortable.
- Over the
decades, clothing silhouettes have
changed, so the fitting advice
changed too. A knitting or sewing
book published in the 1950s advocated
less ease than a book published in
the 80s or 90s. But women's clothing
during the earlier era tended to hug
the figure. Towards the end of the
century, clothing became looser, and
so did ease recommendations.
- Regardless
of the era, different styles of
clothing call for different amounts
of ease in order to maintain the
flow and silhouette that the designer
intended. They also need different
amounts of ease depending on the intended
function of the clothing. Not all
sweaters and cardigans are are meant
to be worn over loose t-shirts or
as outerwear. Sweaters and cardigans
meant to be worn over something else
obviously need more ease than tops
meant to be worn over nothing but
undergarments.
After all this discussion
about the uncertainty about ease, how do you
figure out which size you should
be knitting?
|
If
you want to measure an existing
garment in order to figure out
what size garment you should be
knitting from a pattern, be sure
to choose an existing garment
that matches the pattern design
as closely as possible in silhouette,
drape, and function. Don't use
a thickly cabled Aran jacket to
figure out the ease you need for
a trim vintage-style cardigan,
and don't use a raglan sweater
to calculate the right size for
a summer top.
|
First of all, don't look
at the pattern sizing right away. Look
first at the pictures of the garment itself.
Keeping in mind the potential pitfalls in
relying exclusively on a photograph of a model
wearing a sample garment, ask yourself how
the designer intended garment to fit. Is it
loose fitting or tight fitting, or something
in between? Does it lightly skim over the
body, or does it hug every curve?
Second, check the
pattern description to see what it
says about the fit -- the next clue about
the designer's intentions.
Third, move on to
the actual pattern sizing. If the
pattern gives sizes in a standardized
S-M-L system, then using that standard you
can figure out which size the designer intended
you'd wear. If the pattern sizing is given
in terms of the wearer's full bust measurement,
then you can identify the size meant for you
with even more certainty. And if the pattern
sizing includes ease recommendations, then
you can add your own full bust measurement
to the recommended ease amount to determined
what the finished garment size should be,
and choose the appropriate size.
If you are choosing a size
to fit a bra cup measurement that is deeper
than a B-cup size, don't be tempted to add
extra ease, or choose a larger size, simply
to accommodate the bust. If you need extra
fabric to cover the bust, chances are what
you need is length, not extra width.
That extra length is often best added by incorporating
short rows, where
possible, to the front of the garment. [Editor's
note: for a good example of short rows added
to a pattern accommodate bust size, see Mariposa
in this issue.]
By this point, you will
have narrowed your choices down to a single
size, or to two possible sizes if you fall
in between them. Now is to time to make a
few checks to see if you've picked the right
size(s):
-
Take a look at the finished
dimensions for those sizes you've chosen,
and satisfy yourself that they're
accurate. In other words, read through
the pattern to determine the number of
stitches at the widest point of the chest,
and multiply it by the stitch gauge for
the pattern stitch used at that point
to make sure that the dimensions reported
in the pattern matches what you've calculated.
You never know -- there could be an inadvertent
error in the sizing.
- From the pattern size
you've chosen, and given the garment's dimensions
and your dimensions at the fullest bust
point, you can calculate the amount of ease
built into the garment (the difference between
the space in the garment and you). With
this information and knowledge about the
garment style and the type of knitted fabric
it's made of, you can look for an existing
garment with a similar style, fabric, and
ease to try on. If you like the look and
the fit, then you've found the right pattern
size. If it could stand to be a bit larger
or smaller, look to the other pattern sizes.
If this seems laborious, compare the hour
or two of shopping with the days or weeks
you'd spend knitting something that's potentially
the wrong size.
- Don't try to guess the
right pattern size based on the length of
the sleeves or body; some designers are
short, and others are tall, and they might
inadvertently bias these lengths to favor
their own torso and arm length.
- For set-in
sleeve styles, you can make an even
more accurate determination of the correct
size by examining the pattern schematics
-- not for the bust size, but for the shoulder
width. Set-in sleeved garments are usually
designed so that the shoulder seam crosses
the shoulder point itself or somewhere nearby.
This dimension is not significantly affected
by changes in design or wearing ease. Measure
yourself from shoulder to shoulder (see
the CYCA's instructions on "How
to Measure") and compare your measurement
to the shoulder-to-shoulder measurement
in the pattern schematics. Choose the size
that has a cross-shoulder measurement not
more than one inch longer or shorter than
your own. (If the pattern doesn't have schematics,
it's a very good idea to sketch them out
yourself.) This step doesn't always work
for modified drop shoulder sleeves, unless
you can tell from the photographs that the
shoulder seam should lie at or near the
shoulder point, and it doesn't work for
set-in sleeve styles that have shoulder
detailing like gathers or shirring. It also
doesn't work for sleeveless tops, because
the shoulder line is often cut in towards
the neck to expose more of the shoulder
joint. If the garment is meant to be a loose-fitting,
outerwear garment, then set-in sleeve shoulders
need to be extended a bit more to accommodate
the clothing underneath -- look for a shoulder
width that's no more than about two inches
longer than your own cross-shoulder measurement,
unless the shoulders are meant to be a bit
exaggerated.
Other styles are a little
more forgiving than others if you choose the
wrong size. For example, raglan sleeved garments,
which do not have a seam running over the
shoulder, are quite accommodating of various
sizes; the amount of design ease will change,
but it will still be a pretty good fit. An
extreme example is this slouchy-fitting sweater.
It was intended to be extremely loose, with
a huge amount of ease; however, it fits quite
nicely over a range of sizes. Raglans and
drop shoulder styles, in particular, make
the tasks of multi-sizing and choosing the
correct size easier for both the designer
and knitter.
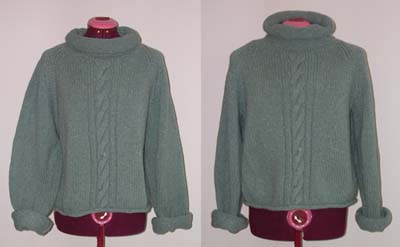 |
| How do you want the sweater
to look on you? Some sweater
designs, such as loosely fitting raglans,
can accommodate a range of sizes, so you
can take more liberties with the ease
measurements and pattern sizes if you
want the finished garment to fit your
differently. This sweater was originally
intended to fit very loosely: above, on
the left, it's modelled by a dressform
with a 33 inch bust (15 inches of ease).
On the right, the dressform's measurement
was increased to 39 inches (9 inches of
ease). |
Let's apply these steps
to another pattern --
Tempting, from the last issue of Knitty.
Let's assume that a hypothetical Tempting
wearer has a 39-inch bust measurement, as
measured around the fullest part of the chest.
What size does she need?
First, we look at the photographs.
As with most Knitty patterns, we have the
benefit of seeing the top that was actually
sized for the person who's modelling it, so
we know we don't have to take the photographs
with a grain of salt. What we can see, from
the pictures, is that the whole garment is
ribbed and that it's rather fitted. In fact,
we can see that the garment fits around the
waist, which suggests that the fabric must
be stretched a little bit around the midriff.
The fabric is definitely stretched around
the bust and below the waist, as we can see
that the ribbing is stretched out even more.
The conclusion? Tempting is a tight-fitting
garment, to the point that it should stretch
to fit around the body with no extra fabric
bagging anywhere. This suggests that whatever
ease is necessary is going to be very small
indeed.
Next, we look at the pattern
itself. The text description doesn't tell
us anything about the fit itself, except to
note that there is no need for "added shaping,"
meaning there must not be any increasing or
decreasing to make Tempting fit the body.
And in fact, by reviewing the pattern instructions,
we can see that the body is simply a tube
knit in knit 2, purl 2 ribbing, with no increases
or decreases to fit.
The pattern sizing tells
us that it fits five sizes: small, medium,
large, extra large, and extra extra large,
with a finished chest measurement of 32, 36,
40, 44, or 48 inches respectively. Now, if
we make assumptions about the sizing -- for
example, that size medium has a 36- to 38-inch
bust measurement, and size large is 40 to
42 inches (again, using CYCA standard numbers)
-- we might be able to deduce that our hypothetical
Tempting knitter is between the medium and
large sizes. So we need to do some more thinking
before picking a size. (If we didn't make
this assumption about the meaning of a medium
or large size, then based on the other information
we've gathered so far we could conclude that
we need a rather close fit across the bust,
and concluded that something between the 36-
and the 40-inch finished sizes would have
been appropriate anyway.)
We take a look at the pattern
to determine if the reported dimensions of
the garment are correct. Tempting doesn't
have a schematic, but we can tell by reading
the instructions that it's a tube, knit in
the round. For the medium size, 180 stitches
are cast on and worked in rib, and there will
be 180 stitches still when we reach the bust.
For the large size, we knit around on 200
stitches.
The gauge information specifies
18 stitches over 4 inches in stockinette,
which translates to a medium-sized tube with
a 40-inch circumference, or a large-sized
tube with a 44.4-inch circumference. Hang
on -- we've already figured out this is going
to be a close fit with some stretching over
the bust, and both of these numbers are larger
than our hypothetical knitter's bust measurement.
In this case, there's another piece of information
to process: we know that we're knitting in
ribbing, and we know, from experience, that
ribbing pulls in the fabric. So in fact, while
the finished dimension of the medium size
might be reported as 40 inches, we now know
that this measurement was based on a stockinette
gauge, not the ribbed gauge. When the top
is knit up, it will appear to be a lot smaller
than 40 inches. We can safely assume, though,
that based on typical ribbing characteristics,
it will at least stretch out to match the
reported finished dimension of 40 inches,
which is certainly enough stretch to accommodate
a 39-inch bust.
Now, putting these pieces
of information together:
- this is a tight-fitting
top that needs to stretch around the body;
- it's knit in rib, so
it will appear to be smaller than the necessary
finished dimensions, but it will stretch
to the reported finished dimensions; and
- we don't want any excess
fabric.
These factors suggest that
this is a design where one should err on the
side of too small, rather than too loose.
Of our two potential sizes, the medium is
the size to choose. And just in case, we know
that the number of stitches we'll be using
can probably stretch up to 40 inches, at least.
And let's take Rosebud
as another example. Again, our hypothetical
Rosebud wearer has a 39" bust. Which size
does she need?
Examining the photographs,
we see that the bodice of Rosebud fits smoothly
over the bust, without appearing too tight
-- the fabric over the bust doesn't look particularly
stretched, as it did in Tempting. Because
the top flares out beneath the empire waist,
we won't look at those measurements to try
to pick a size; we'll concentrate on the upper
part. The sleeve style is set-in, so we know
that we can also look at the cross-shoulder
measurement later to confirm the size we've
picked. The yarn chosen is a wool blend, which
seems soft without being too drapey; while
it fits the body smoothly and the fabric falls
in soft folds in the sitting shot, the flared
sleeves look a little stiff.
The pattern description
itself doesn't say much about the upper body
fit, although there's a clue in the description
of Rosebud as recapturing the "feminine" feeling
of impending motherhood: "feminine" confirms
that to replicate the intended silhouette,
we don't want to hide the curves of the bust
by draping excess fabric over them.
Moving on to the pattern
sizing, we can see that the body sizes were
expressed as full bust measurements. Clearly,
our Rosebud wearer, with a bust that measures
39 inches over the fullest part, falls in
between the two largest sizes. Now, which
one?
Looking at the finished
measurements, the bust at the fullest point
is 39 inches for the second-largest size (exactly
our wearer's dimension), and 41.5 inches for
the largest size. We can satisfy ourselves
that the finished dimensions given are accurate,
based on the pattern instructions and the
gauge, and we can tell from the sizing that
the designer intended to provide a small amount
(1 inch) of ease. But for our hypothetical
Rosebud wearer, the second-largest size has
zero ease, and the largest size has 2.5 inches
of ease. That's two and a half times as much
space as the designer intended; is that going
to be too much?
|
If
you're knitting for yourself,
don't succumb to the temptation
of choosing the next larger pattern
size just to be "safe" without
trying to figure out if you really
need that extra space first.
If
you're knitting for someone else
who isn't available for try-ons
or consultation, be "safe" if
you wish, but try to include some
extra insurance to make
alterations easier.
|
At this point, the wearer
can go out and try on some sweaters knit to
a similar gauge in a wool blend, to decide
whether zero ease or 2.5 inches of ease is
better for her. We can also look at the cross-shoulder
measurements. If our wearer measures 15 inches
across the shoulders, it looks like either
size will fit; but looking again at the photos,
it really does seem like a closer fit is better
than a looser fit. The conclusion? The right
starting size is probably the second-largest
size, with the finished 39 inch measurement;
but because this allows for absolutely no
ease, some tweaking will be necessary to add
the additional space around the bust.
Extra insurance
Now, even if you did choose
the best starting pattern size to the best
of your ability, and even if you did a little
tweaking to the size (which we're saving for
later instalments), you may still wind up
with a wonky fit or a misjudgment of length,
despite your best intentions. In those cases,
there are some other precautions you might
be able to take to make any post-try-on ripping
and fixing a little more bearable.
Knit in the logical
fitting order. Some knitters break
the monotony of knitting large garment pieces
by doing them "out of order", so to speak:
knitting the sleeves before tacking the body,
or perhaps first knitting the back, then a
sleeve, then the front, and another sleeve.
Knitting the sleeves, for some, is also a
clever way of getting around the obligatory
gauge swatch: if the first four inches or
so of the first sleeve block to the right
gauge, fine; if the sleeve isn't the right
size, then it's less painful to rip back and
start over.
However, if you're concerned
about the fit, don't start with a
sleeve. Knit the gauge swatch, and once you've
got gauge, knit the body first so that you
can block, sew, and try it on first. Then,
you can ask yourself questions like:
- Is the neck flattering
and will it fit over your head?
- If this is a set-in sleeve
garment, will the shoulder seam lie in the
right place? If it seems like it's too far
away from the shoulder, you might want to
rip both the front and back down to the
armscye decreases, and decrease less. If
the shoulder looks like it has flanges that
protrude far too much, then rip the front
and back to the armscye decreases, and decrease
more to make the shoulders narrower.
- Does the armscye allow
enough room for your arm to move around,
even when the bulk of a sleeve is added?
If not, you may wish to undo the shoulders
and lengthen the straight portion of the
armscye.
- If the garment is sleeveless,
is the armscye high enough to cover the
underarm area you want to cover? If not,
you can rip back the shoulders or straps
until they're short enough to raise the
armscye to the level you want.
- Do you need to rip the
front to add short row bust shaping?
For this try-on, you really
don't have to seam and finish the body pieces
the way you would for the finished garment.
Once blocked to the right dimensions, you
can simply baste the front and back together
at the sides and shoulders with a running
stitch and a smooth, contrasting yarn. The
seams won't lie flat the way they would using
mattress stitch or grafting techniques, but
you'll get a good idea of the fit.
If possible, knit
in the direction that makes it easiest to
make adjustments. You may wish to
consider knitting from the top down rather
than the bottom up to gain two distinct advantages:
first, if the garment is knit in the round,
then you can pull it over your head periodically
to check the fit and catch problems while
they're still easy to solve; and secondly,
knitting from the top obviates the problem
of knitting sleeves and bodies to the right
length.
This tip applies most obviously
to yoked or raglan designs, because turning
the neck-to-underarm shaping upside down (working
increases instead of decreases) is easily
done; working from the bottom up, yoke or
raglan decreases are evenly spaced and worked
at regular intervals, and therefore when working
from the top down, increases are worked instead
of decreases, and are still evenly spaced
and worked at regular intervals. It's not
quite as easy, but still possible, to apply
this reasoning to garments with set-in sleeves
or drop shoulders, although they're usually
knit flat.
Start blocking early.
If you're knitting a garment in pieces, block
the first piece as soon as it's finished.
This is the first step towards doing that
first basting and try-on, mentioned above,
and it also gives you a good idea if the fabric
is working into the type of fabric you want:
if your knitting seemed stiff coming off the
needles, did blocking help loosen it up? Is
your gauge true?
Starting the blocking early
also helps catch gross errors in gauge judgment
before you've gone too far. Sometimes, you
can't get an accurate picture of the final
knitted fabric from a small gauge swatch,
and the real fabric might "grow" a lot more
than expected. Better to catch it after knitting
the back of a sweater, than after knitting
the back, front, and two sleeves.
Don't anchor your
yarn tails so securely that they can't be
picked out again--particularly if
you're working with a wool blend.
Perhaps you won't discover
a fitting problem until you or the intended
recipient has worn the garment once or twice.
Or perhaps you might just want to recycle
the yarn into something else. Either way,
you'll curse yourself for fixing the yarn
tails so securely that you can't find them
or pick them out of the seams.
Wool-blend yarns are usually
"grabby" enough that the yarn tails will stay
anchored with an inch or two of weaving in
and out of the selvedges. And unless the yarn
ends show through to the right side of the
garment, or are particularly tickly inside,
you can also leave a short tail after anchoring
the yarn--you don't have to trim it down to
the surface of the fabric. With these yarns,
you seldom need to tie knots or pierce the
yarn with your sewing-up needle to ensure
that the seams won't undo themselves, because
the yarn tails will likely felt a bit to the
fabric after a few washes (although tying
knots is a great time-saving device).
If you pierce the yarn or work in the yarn
tail so it's completely hidden, you'll find
it more difficult to unpick the seams at a
later date.
With non-wool yarns, such
as smooth synthetics, cottons, ribbons, and
even alpaca, you might have to fix the yarn
tails down a little more forcefully. Some
of theseyarns simply don't want to hold a
knot, or require very long tails to be woven
in. In those cases, you may have to pierce
the selvedge yarn or the yarn tail with your
needle while sewing up in order to ensure
that the yarn tail will stay put. If that's
the case, try to fix your yarn tails consistently,
and use the same fastening technique for all
of them. This might eliminate some guesswork
later when you're trying to unpick all those
ends.
And in the same vein, if
your garment yarn is particularly bumpy or
loopy, donÍt use it to seam your garment unless
you really have no choice. Find a smooth,
matching yarn with similar fibre qualities
and use that as your seaming yarn: not only
does it make sewing up easier, it makes ripping
the seam out easier, too.


