| 

  by
Gunilla Leavitt by
Gunilla Leavitt

I found this awesome, soft
viscose yarn on sale, and knew I wanted to make
something for my daughters. Problem: I hate
sewing pieces together! So I decided to design
something that required NO sewing!
It really is an easy piece
to knit. You start at the bottom, working up
the front, but instead of binding off at the
shoulders you continue over the shoulders and
down the back. People may wonder about your
long piece of knitting with a hole in the middle,
but you'll have the last laugh when you don't
have to do any sewing! As an added bonus, the
side panels and "seams" are very decorative!
There are many, many variations
you can make: longer sleeves, wider sides, etc.
You can make the whole piece longer or shorter
with ease – it would also look cute as
a belly-baring shirt! |
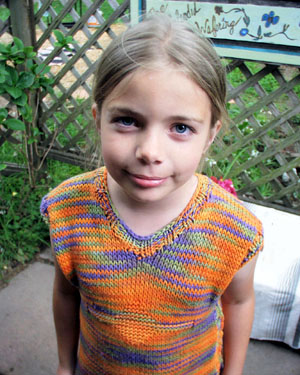
|  models:
Lynnaea & Lynessa
photo:
Gunilla Leavitt
models:
Lynnaea & Lynessa
photo:
Gunilla Leavitt |
| 7 years [9 years] |
| |
Chest: 14.5[15.5] inches
Length: 17.5[18.5] inches |
| |
| |
|
KFI Rio [100% viscose; 93yd
per 100g skein]; color: 02[01]; 4[4]
skeins
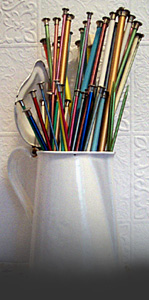
1 set US #10/6.5 mm straight needles
1 29-inch US #10/6.5mm circular needle |
| |
| 14sts/20 rows
= 4" in stockinette stitch |
| |
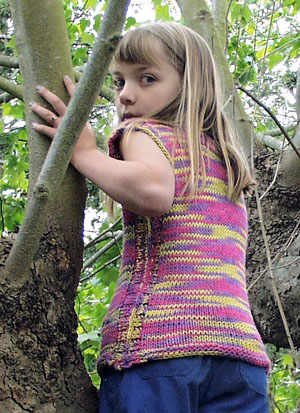
This yarn lends itself especially
well to geometric patterns (squares, diamonds,
etc) made by simply knitting on the wrong
side and purling on the right. You can see
a diamond with a line going through it on
the sweater below. Let your imagination be
your guide!
Front
and back
Holding two straight
needles together, cast on 40[50] sts.
Pull one needle out and start knitting with
your circular needle.
Note: You'll be working back and forth on
your circular, not in the round.
Work 5 rows in garter st (knit all rows),
then start working in St st.
When piece measures
9 inches, start pattern if desired.
Making the V-neck
Note: Here you'll
be knitting from two balls while making the
hole for the head, and then rejoining in the
back when the hole is big enough.
When
work measures 14[14.5] inches, K 17[22]
sts.
K the next st, and place it back on the left
needle.
Slip the next st over it and then put the
18th[23rd] st back on the right needle --
like a backwards bind off.
K the next st, and voila -- you have decreased
1 to begin the neck.
Now start another ball
of yarn and k 1 st.
Lift the next st onto the right needle, k
the 3rd one, and then slip the 2nd off over
the third (as to bind off), and you've mirrored
what you just did on the first part.
Finish the row normally.
P the next row on both pieces, and then repeat
this little number with the last three and
the first three sts respectively, then purling
a row plain until you have decreased 10 times
and are left with 15 sts for each shoulder.
Work 5 rows without decreases, and then start
increasing at the neck.
From the right side, k to 4 sts from end of
row.
K in front and back of the next st, k1, k
in and front and back of the next st, k1.
On the left piece make increases in the first
3 sts as follows: K in front and back of next
st, k1, k in front and back of next st, k
to end of row.
On the WS, p all sts.
Repeat RS inc row and purled WS row 3 more
times.
Next row: Make increases as above on right
side, then continue onto left side making
increases but using yarn from the right side
to join the two halves. Cut off yarn from
the second ball and weave in end.
Continue down the back until you are 14/14.5
inches from where you joined.
Work 5 rows in garter st, then bind off loosely.
Sides and armholes
On the RS, with a long
circular needle, pick up 150[174] sts along
one side [if you end up picking up a different
number of stitches, it's fine, as long as
it's NOT a
multiple of 4].
Work the next row in *p2, k2*.
Work 3 rows, knitting the knit sts and purling
the purl sts.
|
|  Joining
and binding off Joining
and binding off
Grab a straight needle
for binding off. Position your sts on the circular
needles so that when you hold the two tips together
facing the same way ["fold" the needle],
you can k 1 st from each point at the same time.
Bind off with a three-needle
bind off in this manner:
With the straight needle,
K1 by going through 1 st from each point of
the circular needle. K another the same way
so you have 2 sts on the right [straight] needle.
Slip the 1st over the 2nd and off the needle
- i.e. standard binding off.
BO 56 sts in this manner
[or until you reach the point you would like
the armhole to start]. Let go of the rear needle
and continue binding off along the armhole,
over the shoulder, until you get to the end.
Cut your yarn, pull the tail through the last
st to secure it and then weave in your end.
Do the same on the other
side, and presto! Side seams and armholes all
at once!
Variations: if you want the
sleeves to stick out a little further, knit
a few more rows after joining the sides, but
before binding off the last stitches. You can
knit long sleeves, too, if you don't mind sewing
up the sides once you're done.
Neck
Starting in the middle
of the back, pick up 56 sts around the neck
opening.
Work back and forth if you want it open in the
back; work in the round if you're using short
circulars.
K2, p2 for 2 rows.
On the next row, decrease 5 evenly separated,
by knitting (or purling) 2 sts together. This
looks best when done on the sts that are purled
on the right side.
On the next row, decrease 2 evenly spaced.
You should be on the WS now, so work one more
row and BO fairly loosely.
This yarn does not have a lot of give, so you'll
need to pay attention that you don't make the
hole too small!
|
 Gunilla
is an expatriate Swedish babe, dwelling in faraway
Santa Cruz, California, and frightfully homesick. Gunilla
is an expatriate Swedish babe, dwelling in faraway
Santa Cruz, California, and frightfully homesick.
She learned to knit
from her grandmother at a young age, usually
knits on the fly, and is trying to figure out
exactly how grandma made those neat mohair shrugs.
Writing her patterns down is completely new
and alien, but curiously cool!
When not knitting, Gunilla
is very craftsy, working relentlessly to lead
her daughters down the path of rubber stamping,
scrapbooking, and whatnot (especially whatnot).
She's a webdesigner,
a fourth-generation goldsmith, and loves getting
e-mail. |
| Pattern &
images © 2003 Gunilla Leavitt. Contact Gunilla. |
|