 These
socks are knit from the toe up, beginning with the
larger toe cap (holds all toes except big toe).
These
socks are knit from the toe up, beginning with the
larger toe cap (holds all toes except big toe).
Using CC and Crochet Cast On method, CO 11[13]
sts.
Work 4 rows back and forth in stockinette st,
beginning with a k row.
Round 1: K all sts on needle, pick up and
k 2 sts along edge of work; remove waste yarn from
CO and place live sts on a spare needle, k these
sts using a second needle, then pick up and k 2
sts along remaining edge of work. 26[30] sts.
Place safety pin or split ring marker in work
to indicate beginning of round; move this marker
up as work progresses.
Rearrange sts as follows on 3 double-point needles:
Needle 1: Last st from second needle of
previous round, first 12[14] sts from first needle
of previous round
Needle 2: Last st from first needle of
previous round, first 5[6] sts from second needle
of previous round
Needle 3: Remaining 7[8] sts from second
needle of previous round
K 1 round.
Next Round: Kfb, k to last st of Needle 1,
kfb; kfb, k to end of Needle 2; k to last st of
Needle 3, kfb. 4 sts increased.
Repeat these 2 rounds once more. 34[38] sts.
K 1 round.
Next Round: Kfb, k to end of Needle 1; k
all sts on Needle 2; k to last st of Needle 3, kfb.
2 sts increased.
Repeat these 2 rounds 4 times more. 44[48] sts.
K 1 round. Try on toe cap to check length; if
it does not reach to base of toes (especially base
of second toe, next to big toe), continue in stockinette
st until it is long enough.
Slip first 18[20] sts of round to one stitch holder,
slip next 8 sts to waste yarn, slip remaining 18[20]
sts to second stitch holder. Remove marker and break
yarn.
Big Toe Cap
Using CC and Crochet Cast On method, CO 5[6] sts.
Work 4 rows back and forth in stockinette st, beginning
with a k row.
Round 1: K all sts on needle, pick up and
k 2 sts along edge of work; remove waste yarn from
CO and place live sts on a spare needle, k these
sts using a second needle, then pick up and k 2
sts along remaining edge of work. 14[16] sts.
Place safety pin or split ring marker in work
to indicate beginning of round; move this marker
up as work progresses.
Rearrange sts as follows on 3 double-point needles:
Needle 1: Last st from second needle of previous
round, first 6[7] sts from first needle of previous
round
Needle 2: Last st from first needle of previous
round, first 3 sts from second needle of previous
round
Needle 3: Remaining 3[4] sts from second
needle of previous round
K 1 round.
Next Round: Kfb, k to last st of Needle 1,
kfb; kfb, k to end of Needle 2; k to last st of
Needle 3, kfb. 4 sts increased.
Repeat these 2 rounds once more. 22[24] sts.
K 1 round.
Next Round: Kfb, k to end of Needle 1; k
all sts on Needle 2; k to last st of Needle 3, kfb.
2 sts increased.
Repeat these 2 rounds twice more. 28[30] sts.
K 5 rounds. Try toe cap on to check length; if
it does not reach to base of toe, continue in stockinette
st until it is long enough.
Join Toe Caps:
Remove 8 sts of first toe cap from waste yarn and
place on spare needle.
Joining Round 1: K first 10[11] sts of
round, join next 8 sts of round to 8 sts from first
toe cap (sts on spare needle) using Three Needle
Bind Off, work remaining 10[11] sts of Big Toe Cap.
Note: When working the second joining round
below, the needles will be designated and arranged
differently for the right foot and left foot.
Right Foot
Joining Round 2: K first 10[11] sts of Big
Toe Cap, pick up and k 2 sts along edge of join,
k 18[20] sts from one stitch holder, this needle
will be designated Needle 2; using another needle,
k first 15[17] sts from second stitch holder, this
needle will be designated Needle 3; using another
needle k remaining 3 sts from stitch holder, pick
up and k 2 sts along edge of join, k remaining 10[11]
sts of Big Toe cap, this needle will be designated
Needle 1. 60[66] sts. Proceed to directions for
Foot.
Left Foot
Joining Round 2: K first 10[11] sts of Big
Toe Cap, pick up and k 2 sts along edge of join,
k first 3 sts from one stitch holder, this needle
will be designated Needle 3; k remaining 15[17]
sts from stitch holder, this needle will be designated
Needle 1; k 18[20] sts from second stitch holder,
pick up and k 2 sts in edge of join, k remaining
10[11] sts from Big Toe Cap, this needle will be
designated Needle 2. 60[66] sts.
Proceed to directions for Foot.
Foot
Note: Both feet are worked in the same way from
this point, until the intarsia section begins.
K 5 more rounds, ending last round at point between
Needle 1 and Needle 3.
Break CC, and move stitch marker to point between
Needle 1 and Needle 3; this will now be beginning
of round.
Using MC, work in stockinette st until work measures
2 inches less than desired length to back of heel.
Heel
Note: Heel is worked using CC. Do not break MC;
just set ball of MC to the side while working heel.
Next Round: Using MC, k to end of Needle
2; using CC, k all sts of Needle 3 and Needle 1
onto one needle. Heel will be worked back and forth
on the stitches on this needle only. 30[33] sts
on needle.
Turn work so WS of work on second needle (needle
with sts from Needle 1 and Needle 3) is facing.
P to last st on needle, w&t.
K to last st on needle, w&t.
P to last 2 sts on needle, w&t.
K to last 2 sts on needle, w&t.
P to last 3 sts on needle, w&t.
K to last 3 sts on needle, w&t.
P to last 4 sts on needle, w&t.
K to last 4 sts on needle, w&t.
P to last 5 sts on needle, w&t.
K to last 5 sts on needle, w&t.
P to last 6 sts on needle, w&t.
K to last 6 sts on needle, w&t.
P to last 7 sts on needle, w&t.
K to last 7 sts on needle, w&t.
P to last 8 sts on needle, w&t.
K to last 8 sts on needle, w&t.
Note: While working the rows which follow,
when you come to a wrapped st, pick up the wrap,
and knit (or purl) it together with the stitch it
had wrapped. When turning the short rows that follow,
you will be wrapping stitches which have already
been wrapped once.
P to last 7 sts on needle, w&t.
K to last 7 sts on needle, w&t.
P to last 6 sts on needle, w&t.
K to last 6 sts on needle, w&t.
P to last 5 sts on needle, w&t.
K to last 5 sts on needle, w&t.
P to last 4 sts on needle, w&t.
K to last 4 sts on needle, w&t.
P to last 3 sts on needle, w&t.
K to last 3 sts on needle, w&t.
P to last 2 sts on needle, w&t.
K to last 2 sts on needle, w&t.
P to last st on needle, w&t.
K to last st on needle, w&t.
P all sts. Break CC, turn work.
Divide stitches between Needle 1 and Needle
3 as follows:
Women's Size:
15 sts each on Needle 1 and Needle 3.
Men's Size:
Right Foot: 16 sts on Needle 1, 17 sts on
Needle 3.
Left Foot: 17 sts on Needle 1, 16 sts on
Needle 3.
Replace marker between these two needles to indicate
beginning of round.
Leg
MC is currently attached to end of Needle 2; using
MC, pick up and k 2 sts in space between Needle
2 and Needle 3, k all sts on Needle 3; k all sts
on Needle 1, pick up and k 2 sts in space between
Needle 1 and Needle 2, k to end of round. 64[70]
sts.
Next Round: K to last 2 sts on Needle 1,
k2tog; k all sts on Needle 2; ssk, k to end of Needle
3. 2 sts decreased.
K 1 round.
Repeat these 2 rounds once more. 60[66] sts.
K 5 rounds more.
Note: If you want your sock to be longer than
the one shown, work a few more rounds at this point.
The good thing about knitting toe up is that you
can try your work on as you go, to check the fit.
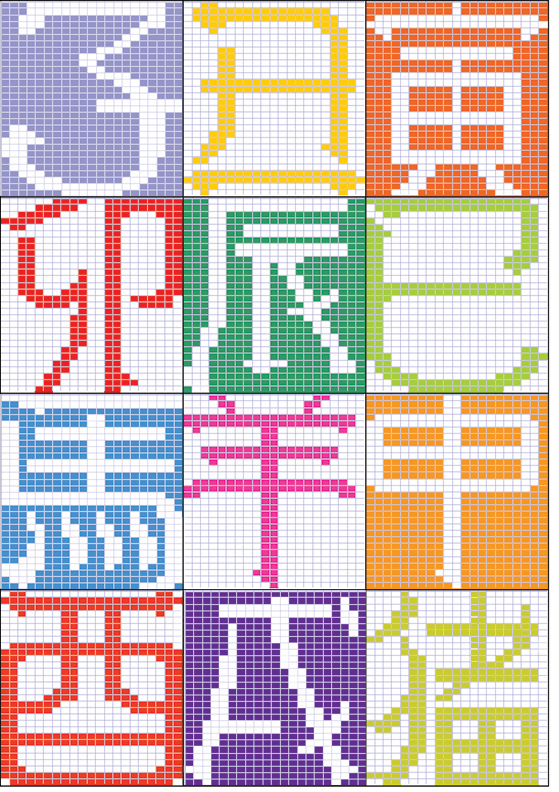
On next round, intarsia motif is begun, and work
is divided to form back placket opening. Because
of intarsia motif placement, next round is worked
differently for right foot and left foot. Right
half of placket overlaps left half for both feet.
Please read ahead before beginning.
Right Foot
Next Round: K all sts on Needle 1,
k first 18[22] sts on Needle 2, work first
row of chosen intarsia motif over next 21 sts, k
to end of Needle 3; pick up and k 1 st in
front of stitch each of next 3 sts on Needle
1. Turn work to that WS is facing.
Left Foot
Next Round: K first 6[7] sts of Needle 1,
work first row of chosen intarsia motif over next
21 sts, k to end of Needle 3; pick up and k 1 st
in front of stitch each of next 3 sts on Needle
1. 63[69] sts. Turn work to that WS is facing.
Both Feet Continue Here
Next Round: K6, p to last 3 sts, working
intarsia pattern as set; k 3, pick up and k 3 sts
in purl bumps of sts below next 3 sts on Needle
3. 66[72] sts. Turn work.
 Leg
will now be worked back and forth in rows. Garter
stitch bands will be worked at ends of each row,
forming an overlapping placket.
Leg
will now be worked back and forth in rows. Garter
stitch bands will be worked at ends of each row,
forming an overlapping placket.
Continue as follows, working intarsia pattern
as set:
Next Row [RS]: K all sts, working intarsia
pattern as set.
Next Row [WS]: K6, p to last 6 sts, k6,
working intarsia pattern as set.
Continue in pattern as set until all rows of intarsia
pattern have been worked. Break CC.
Work 6 more rows in pattern as set.
Next Row [RS]: K2[3], [p2, k2] to last
4[5] sts, p2, k2[3].
Next Row [WS]: P2[3], [k2, p2] to last 4[5]
sts, k2, p2[3].
BO all sts loosely in pattern.