Grandma Knitty Home
Knitty: little purls of wisdom
what's the editor up to lately?feature articlesKnitty's generous selection of patternsKnittyspinČarchive of previous issuesMeet other Knitty readers and chat in our coffeeshop!sign up for the free Knitty newsletterLooking for an ad fromone of our advertisers? Click here!Our tiny, perfect online shopping mallGet yourself a little Knitty treat!read the behind-the-scenes news at Knitty


Find exactly what you're looking for

The answer to your question about Knitty is probably here!

Take home something Knitty today

Advertise with Knitty

Get your cool stuff reviewed in Knitty

Full information about how  to get published in Knitty

Read exactly what FREE PATTERNS really means...respect our designers and authors rights [and thank you]

Knitty is produced in a pro-rabbit environment

© Knitty 2002-2006. All rights reserved. Unauthorized reproduction prohibited. This means you.


fetchingcarpathiaperditamuffknucksreptilianrpmwiddershins
baudelairelickety splitdancing ladytulip toeslacanauhalfdomemaze
crosspatchsock monkeyklein bottleswelljuliemanresaalletelilies
universal toe-up sock formula

"The calla lilies are in bloom again. Such a strange flower -- suitable to any occasion."
(Katherine Hepburn in Stage Door - 1937)

Although calla lilies (also known as Arum lilies or Zantedeschia) should be in bloom in much of the world when the Summer issue goes live, these lilies will always be in bloom.

These lilies came about as the result of a mistake made while knitting class samples. The triangle was supposed to lie flat but my misread and misknit resulted in a cone that was oddly reminiscent of a lily. I did a few short rows before binding off and setting the oops aside for later investigation. When I looked at the cone again, I saw a calla lily.

Each is about the size of a mini-calla lily; a popular choice for "clutch" bridal bouquets. Pick a white, gilded or Goth lily to add just a bit of personality to a bouquet or knit up an entire bouquet. They can also act as an interesting bracelet/corsage or hair ornament.

model: Ella, heather photos: Kristi Porter, heather broadhurst, Greg McKenna

FINISHED MEASUREMENTS

Width: approx. 2.5 inches at widest point of blossom
Length: approx. 4.5 inches (flower only)

 
MATERIALS

Note: Less than a ball of each color is required. Each flower requires approx. 25yd/23m, each stamen requires approx. 5yd/4.5m, and each 12-inch stem requires approx. 34yd/31m of yarn.

Colors used are listed below; MC is flower color, CC1 is stamen color, and CC2 is stem color.

Goth Lily
DMC Senso [100% Cotton; 150yd/137m per 50g skein]
[MC] #1012 Black
[CC] #1009 Anise Green
NOTE: for Goth Lily, CC is used for both CC1 and CC2.

White Lily
DMC Senso [100% Cotton; 150yd/137m per 50g skein]
[MC] #1001 White
[CC1] #1003 Sunflower Yellow
[CC2] Plymouth Wildflower DK [51% Cotton, 49% Acrylic; 137yd/125m per 50g skein]; color: #49 Green

Gilded Lily
[MC] Twilley's Goldfingering [80% Viscose/20% Metallised Polyester; 110yd/100m per 25g skein]; Color: #WG2 Gold
[CC1] DMC Senso [100% Cotton; 150yd/137m per 50g skein]; color: #1001 White
[CC2] Plymouth Wildflower DK [51% Cotton, 49% Acrylic; 137yd/125m per 50g skein]; color: #49 Green

1 set US #1 /2.5mm double-point needles (I used Skacel glove needles) OR SIZE NEEDED TO OBTAIN GAUGE
18-gauge green floral cloth wire stem, 18 inches/47cm for each lily
Blunt tapestry needle
Small amount of floral stem wrap tape (optional)

 
GAUGE
32 sts/60 rows = 4 inches in stockinette stitch
PATTERN NOTES

[Knitty's list of standard abbreviations and techniques can be found here]

Each lily is worked in one piece, beginning with an I-Cord stem.

The blossom is worked in two layers: an outer layer and an inner layer. The work is first increased to form the cup of the outer blossom, then short rows are worked to form the triangular point of the blossom, then the work is decreased to form the cup of the inner blossom.

Finally, the stamen is worked, and the inner layer of the blossom is turned to the inside, with the stamen emerging from the cup of the blossom.

S2KP: Slip next 2 sts as if to knit them together, knit next stitch, pass slipped stitches, together, over stitch just knit. Forms a centered double decrease.

DIRECTIONS

Stem
Using CC2, CO 4 sts.

Work I-Cord for 12 inches, or to desired length.

Next Row: [K1, kfb] twice. 6 sts.
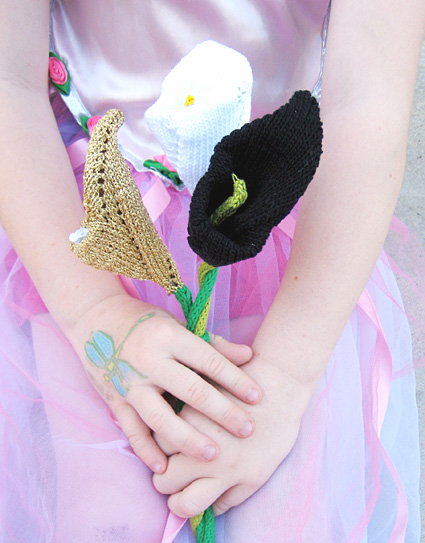
Blossom
Next Round: Using MC, k all sts, knitting 2 sts onto each of 3 needles. Break CC2, leaving a 6-inch tail.

K 1 round more.

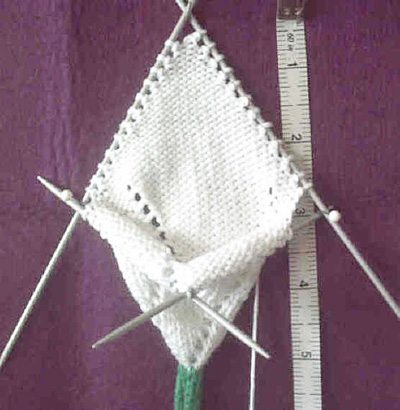
Shape Outer Blossom:
Round 1: [YO, k to end of needle] 3 times. 3 sts increased.

Round 2: K all sts.

Repeat these 2 rounds 13 times more. 48 sts; 16 sts on each needle.

Shape Point
Note: When working the short rows that follow, do not wrap stitches at turning points; simply turn the work. The turning points will form the edges of the triangular portion of the blossom, once Outer and Inner blossom portions have been turned and joined.

Row 1 [RS]: K36, turn.
Row 2 [WS: P23, turn.
Row 3 [RS]: K22, turn.
Row 4 [WS: P21, turn.
Row 5 [RS]: K20, turn.
Row 6 [WS: P19, turn.
Row 7 [RS]: K18, turn.
Row 8 [WS: P17, turn.
Row 9 [RS]: K16, turn.
Row 10 [WS: P15, turn.
Row 11 [RS]: K14, turn.
Row 12 [WS: P13, turn.
Row 13 [RS]: K12, turn.
Row 14 [WS: P11, turn.
Row 15 [RS]: K10, turn.
Row 16 [WS: P9, turn.
Row 17 [RS]: K8, turn.
Row 18 [WS: P7, turn.
Row 19 [RS]: K6, turn.
Row 20 [WS: P5, turn.
Row 21 [RS]: K4, turn.
Row 22 [WS: P3, turn.
Row 23 [RS]: K2, turn.
Row 24 [WS: P1, turn.
Row 25 [RS]: K1, turn.
Row 26 [WS: P2, turn.
Row 27 [RS]: K3, turn.
Row 28 [WS: P4, turn.
Row 29 [RS]: K5, turn.
Row 30 [WS]: P6, turn.
Row 31 [RS]: K7, turn.
Row 32 [WS]: P8, turn.
Row 33 [RS]: K9, turn.
Row 34 [WS]: P10, turn.
Row 35 [RS]: K11, turn.
Row 36 [WS]: P12, turn.
Row 37 [RS]: K13, turn.
Row 38 [WS]: P14, turn.
Row 39 [RS]: K15, turn.
Row 40 [WS]: P16, turn.
Row 41 [RS]: K17, turn.
Row 42 [WS]: P18, turn.
Row 43 [RS]:K19, turn.
Row 44 [WS]: P20, turn.
Row 45 [RS]: K21, turn.
Row 46 [WS]: P22, turn.
Row 47 [RS]: K23, turn.
Row 48 [WS]: P24, turn.
Row 49 [RS]: K36.
Short rows are complete; resume working in the round.

Shape Inner Blossom:
Round 1: [Ssk, k to end of needle] 3 times. 3 sts decreased.
Round 2: K all sts.
Repeat these 2 rounds 13 times more. 6 sts remain.
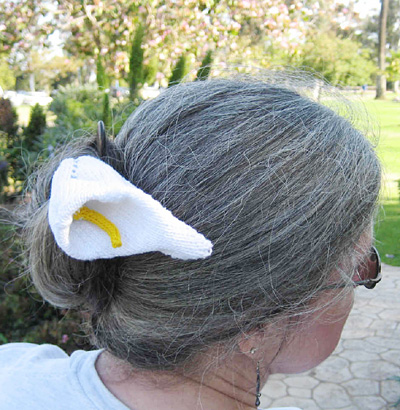
Stamen
Next Row: Using CC1, work all sts onto one needle as follows: [ssk, k1] twice. 4 sts.
Break MC, leaving a 6-inch tail.
Work 1 inch in I-Cord.

Next I-Cord Row: Ssk, k2. 3 sts.
Next I-Cord Row: S2KP. 1 st.
Break yarn, leaving a 6-inch tail; draw tail through last st and pull tight.

FINISHING

Tie together the two yarn tails (MC & CC) at the base of the stamen. Thread both tails onto a tapestry needle draw them down through the blossom, to the base of the blossom, at the top of the stem. Thread yarn tail at top end of stamen onto needle and draw it down through the length of the stamen, through blossom to base of blossom.

Fold Inner blossom to inside of work, so that Stamen protrudes (see photos). Pull yarn tails and tie in a small knot to secure.

Fold approx 1.25 inch/3cm of the piece of floral wire back on itself to create a smooth end. Thread that end up through the icord stem and into the top point of blossom.

If you find the floral wire stem's insistence on poking through and snagging on your yarn annoying, push the wire through one of the openings left by the short rows and wrap it with a bit of floral stem wrap tape, then push it back through the opening into the flower. Another solution is to pull more length out, fold it over onto itself and work it back through one of the other openings.

Sew in ends.


ABOUT THE DESIGNER

heather broadhurst aka walkabout knitter and self-proclaimed queen of short rows has a well deserved reputation for knitting almost anything with almost anything. When she's not in cubicle purgatory, she can often be found walking and knitting in San Diego, California.

More of her antics can be followed here and here.