


Fylgje, a free knitting pattern from Knitty.com. Free knitting pattern for a huge modular shawl.
INTRODUCTION
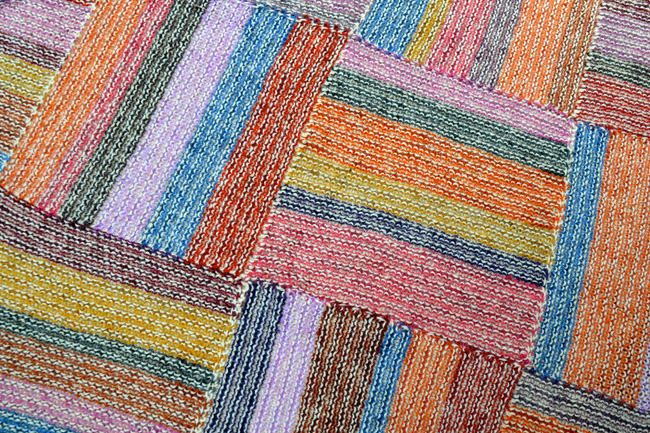
Fylgje

The Fylgje Shawl is knit in stripy multicolor modules, using a handful of little tricks to minimize the number of ends to weave in. Shown here in sport and fingering weight, finer or fatter yarns could work too, since it is easy to make size adaptations.
The shawl begins with a sequence of triangle and square modules, then more square modules are knit onto existing ones. No modules are sewn together.
Since even the edge is knit in modules, the need arose to invent a new way of joining adjacent garter stitch panels. Much fiddling about resulted in an easy crochet join that is also decorative.
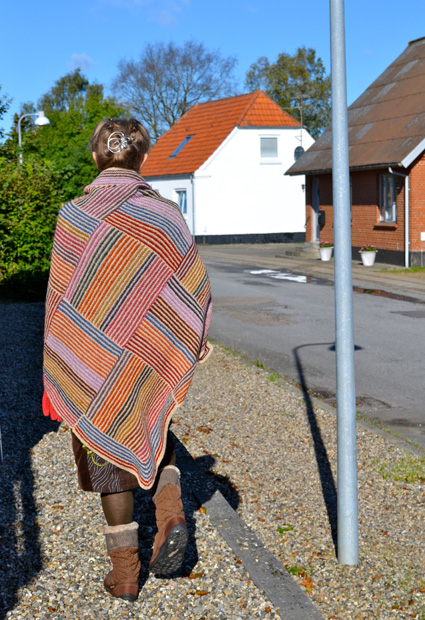
In Norse mythology, a Fylgje (pronounced “FILG-yur”) is an animal spirit companion that will come to you in your hour of need. Large and warm, this shawl will surely become a beloved cold-weather companion.
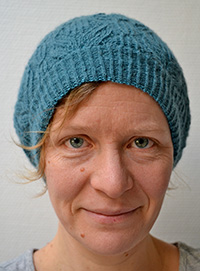
 model: Wendy Colding
photos: Astrid Colding Sivertsen


SIZE
One size
see Pattern Notes for customization instructions
FINISHED MEASUREMENTS
Red-purple version:
Width: 89 inches/227 cm
Height: 45 inches/115 cm
Blue-green version:
Width: 84 inches/214 cm
Height: 42 inches/106 cm
MATERIALS
Yarn
Red-purple version:
![]() [MC] Kauni Wool 8/2 Solids [100% wool, 656 yd / 600 m per 150 g (5.29 ounces)]; color NN1; 2 skeins
[MC] Kauni Wool 8/2 Solids [100% wool, 656 yd / 600 m per 150 g (5.29 ounces)]; color NN1; 2 skeins
[CC] is an assortment of different colors stash leftover skeins of:
![]() Kauni Wool 8/2 Effektgarn [100% wool, 656 yd / 600 m per 150 g (5.29 ounces)]
Kauni Wool 8/2 Effektgarn [100% wool, 656 yd / 600 m per 150 g (5.29 ounces)]
![]() Karen Noe Design Shetland Wool [100% wool, 235 yd / 215 m per 50 g (1.76 ounces)]
Karen Noe Design Shetland Wool [100% wool, 235 yd / 215 m per 50 g (1.76 ounces)]
![]() Hjelholts Uldspinderi Dansk Pelsuld 8/2 [100% wool, 427 yd / 390 m per 100 g (3.53 ounces)]
Hjelholts Uldspinderi Dansk Pelsuld 8/2 [100% wool, 427 yd / 390 m per 100 g (3.53 ounces)]
![]() Læsø Uldstue Klitgarn [100% wool, 437 yd / 400 m per 100 g (3.53 ounces)]
Læsø Uldstue Klitgarn [100% wool, 437 yd / 400 m per 100 g (3.53 ounces)]
Blue-green version:
Midgaards Have Fenris [100% wool, 492 yd / 450 m per 100 g (3.53 ounces)];
![]() [MC] natural white, 2 skeins
[MC] natural white, 2 skeins
![]() [CC] assorted mini skeins, naturally dyed with indigo, plants, and mushrooms, combined total of 2 skeins
[CC] assorted mini skeins, naturally dyed with indigo, plants, and mushrooms, combined total of 2 skeins
Recommended needle size
[always use a needle size that gives you the gauge listed below - every knitter's gauge is unique]
Red-purple version:
![]() US #7/4.5mm needles for working flat
US #7/4.5mm needles for working flat
![]() US #7/4.5mm circular needle, 32 inches/80 cm for Edge on Module 1, 9, and 15
US #7/4.5mm circular needle, 32 inches/80 cm for Edge on Module 1, 9, and 15
Blue-green version:
![]() US #6/4mm needles for working flat
US #6/4mm needles for working flat
![]() US #6/4mm circular needle, 32 inches / 80 cm for Edge on Module 1, 9, and 15
US #6/4mm circular needle, 32 inches / 80 cm for Edge on Module 1, 9, and 15
Notions
![]() Crochet hook US G or H/4-5mm
Crochet hook US G or H/4-5mm
![]() 1 stitch marker
1 stitch marker
![]() Tapestry needle
Tapestry needle
![]() Smooth waste yarn for use as stitch holder
Smooth waste yarn for use as stitch holder
GAUGE
Red-purple version:
14 sts/24 rows = 4 inches/10 cm in stockinette stitch
15 sts/30 rows = 4 inches/10 cm in garter stitch
Blue-green version:
16 sts/26 rows = 4 inches/10 cm in stockinette stitch
17 sts / 34 rows = 4 inches / 10 cm in garter stitch
PATTERN NOTES
[Knitty's list of standard abbreviations and techniques can be found here.]
When making yarn substitutions, the combined yardage of all CCs should be the same as the yardage of MC.
Construction
Fylgje is worked in modules, beginning with a triangle (Module 1). A square (Module 2) is worked onto the triangle, and then triangles and squares alternate until 5 triangles have been worked. A row of triangles forms the long edge of the shawl.
The rest of the shawl body (Modules 10 to 15) is worked as square modules onto squares. The edge is formed as a natural extension of some modules, and is picked up and knit on the rest of the modules. The edge modules are finally joined by crocheting through the side loops of knit sts.

In the diagram, the thick black line indicates the CO, thick grey lines indicate where stitches are picked up, and arrows show the direction of knitting.
Working Stripes
When changing yarn every two rows, do not break yarn. Let the strand not in use hang on the side, and carry the new working yarn up the side in front of the old strand. Don’t tighten these small loops on the side too much, hold them so they match the fabric gauge.
Contrast Color
The contrast color consists of many different skeins of yarn in different colors. Work as many or few rows in one color as you like, then change to the next color.
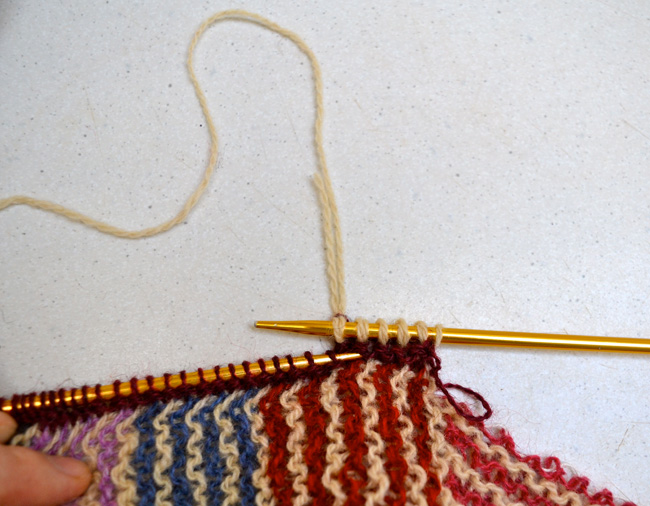
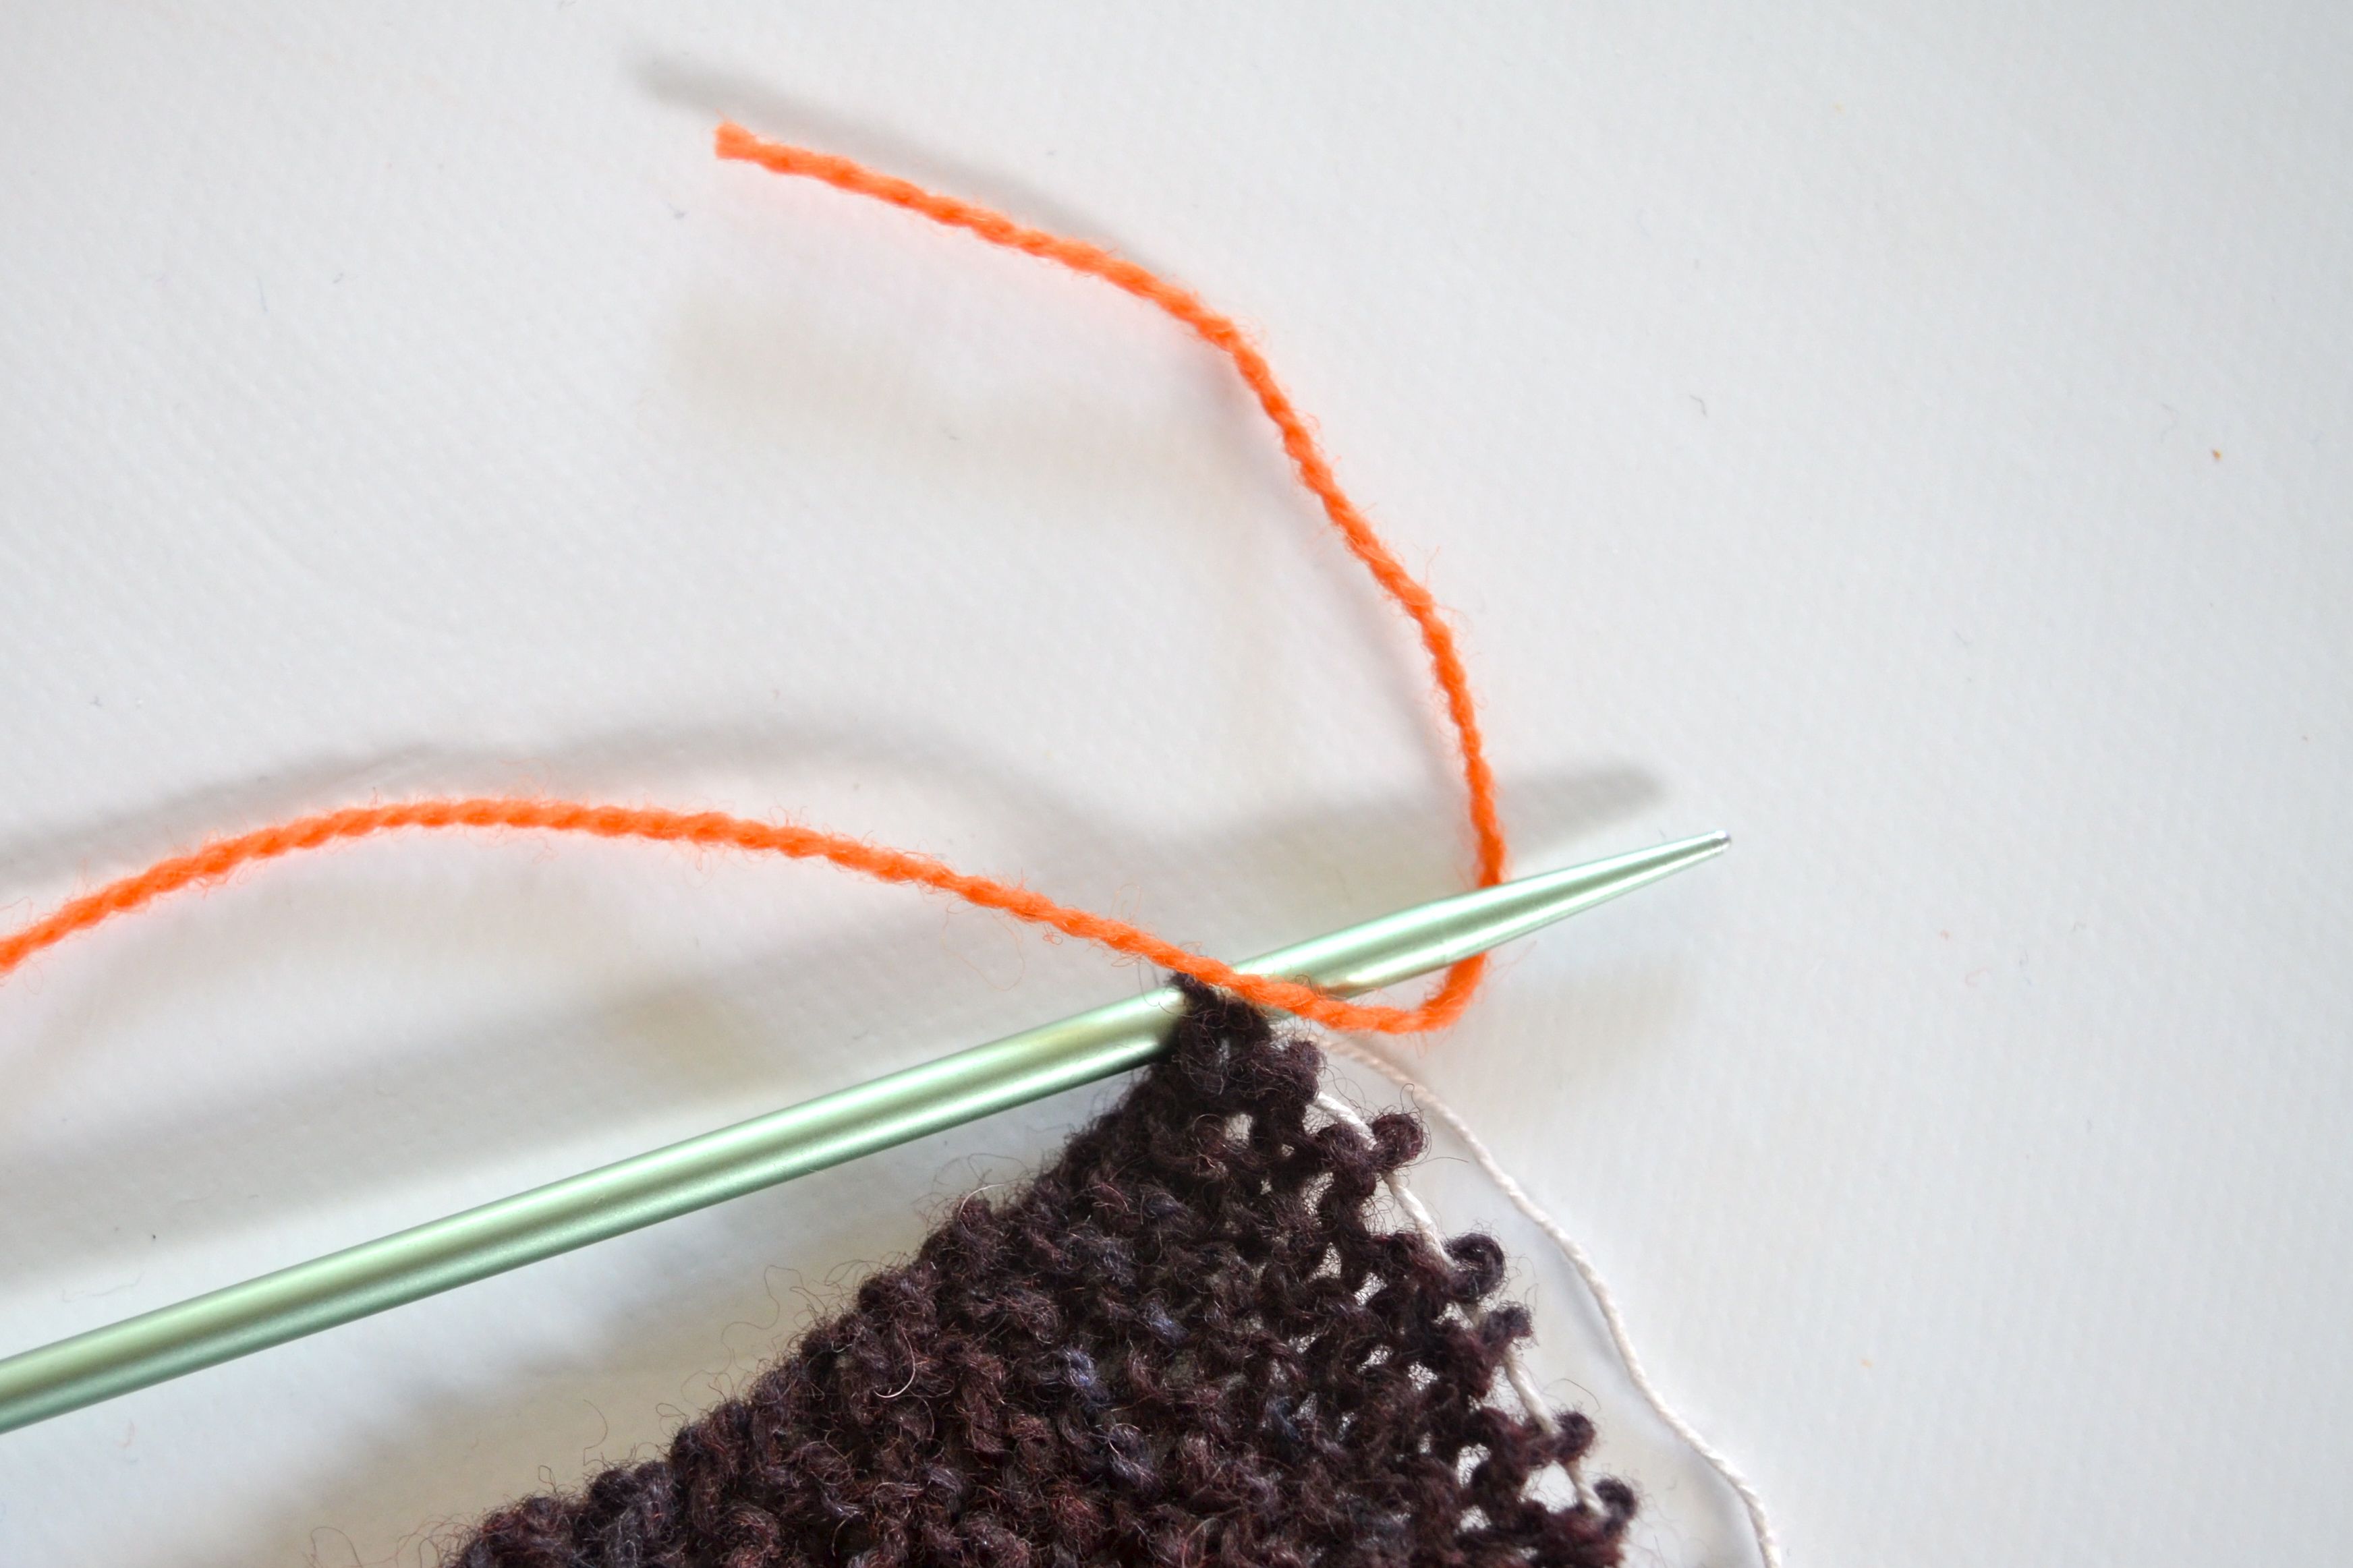
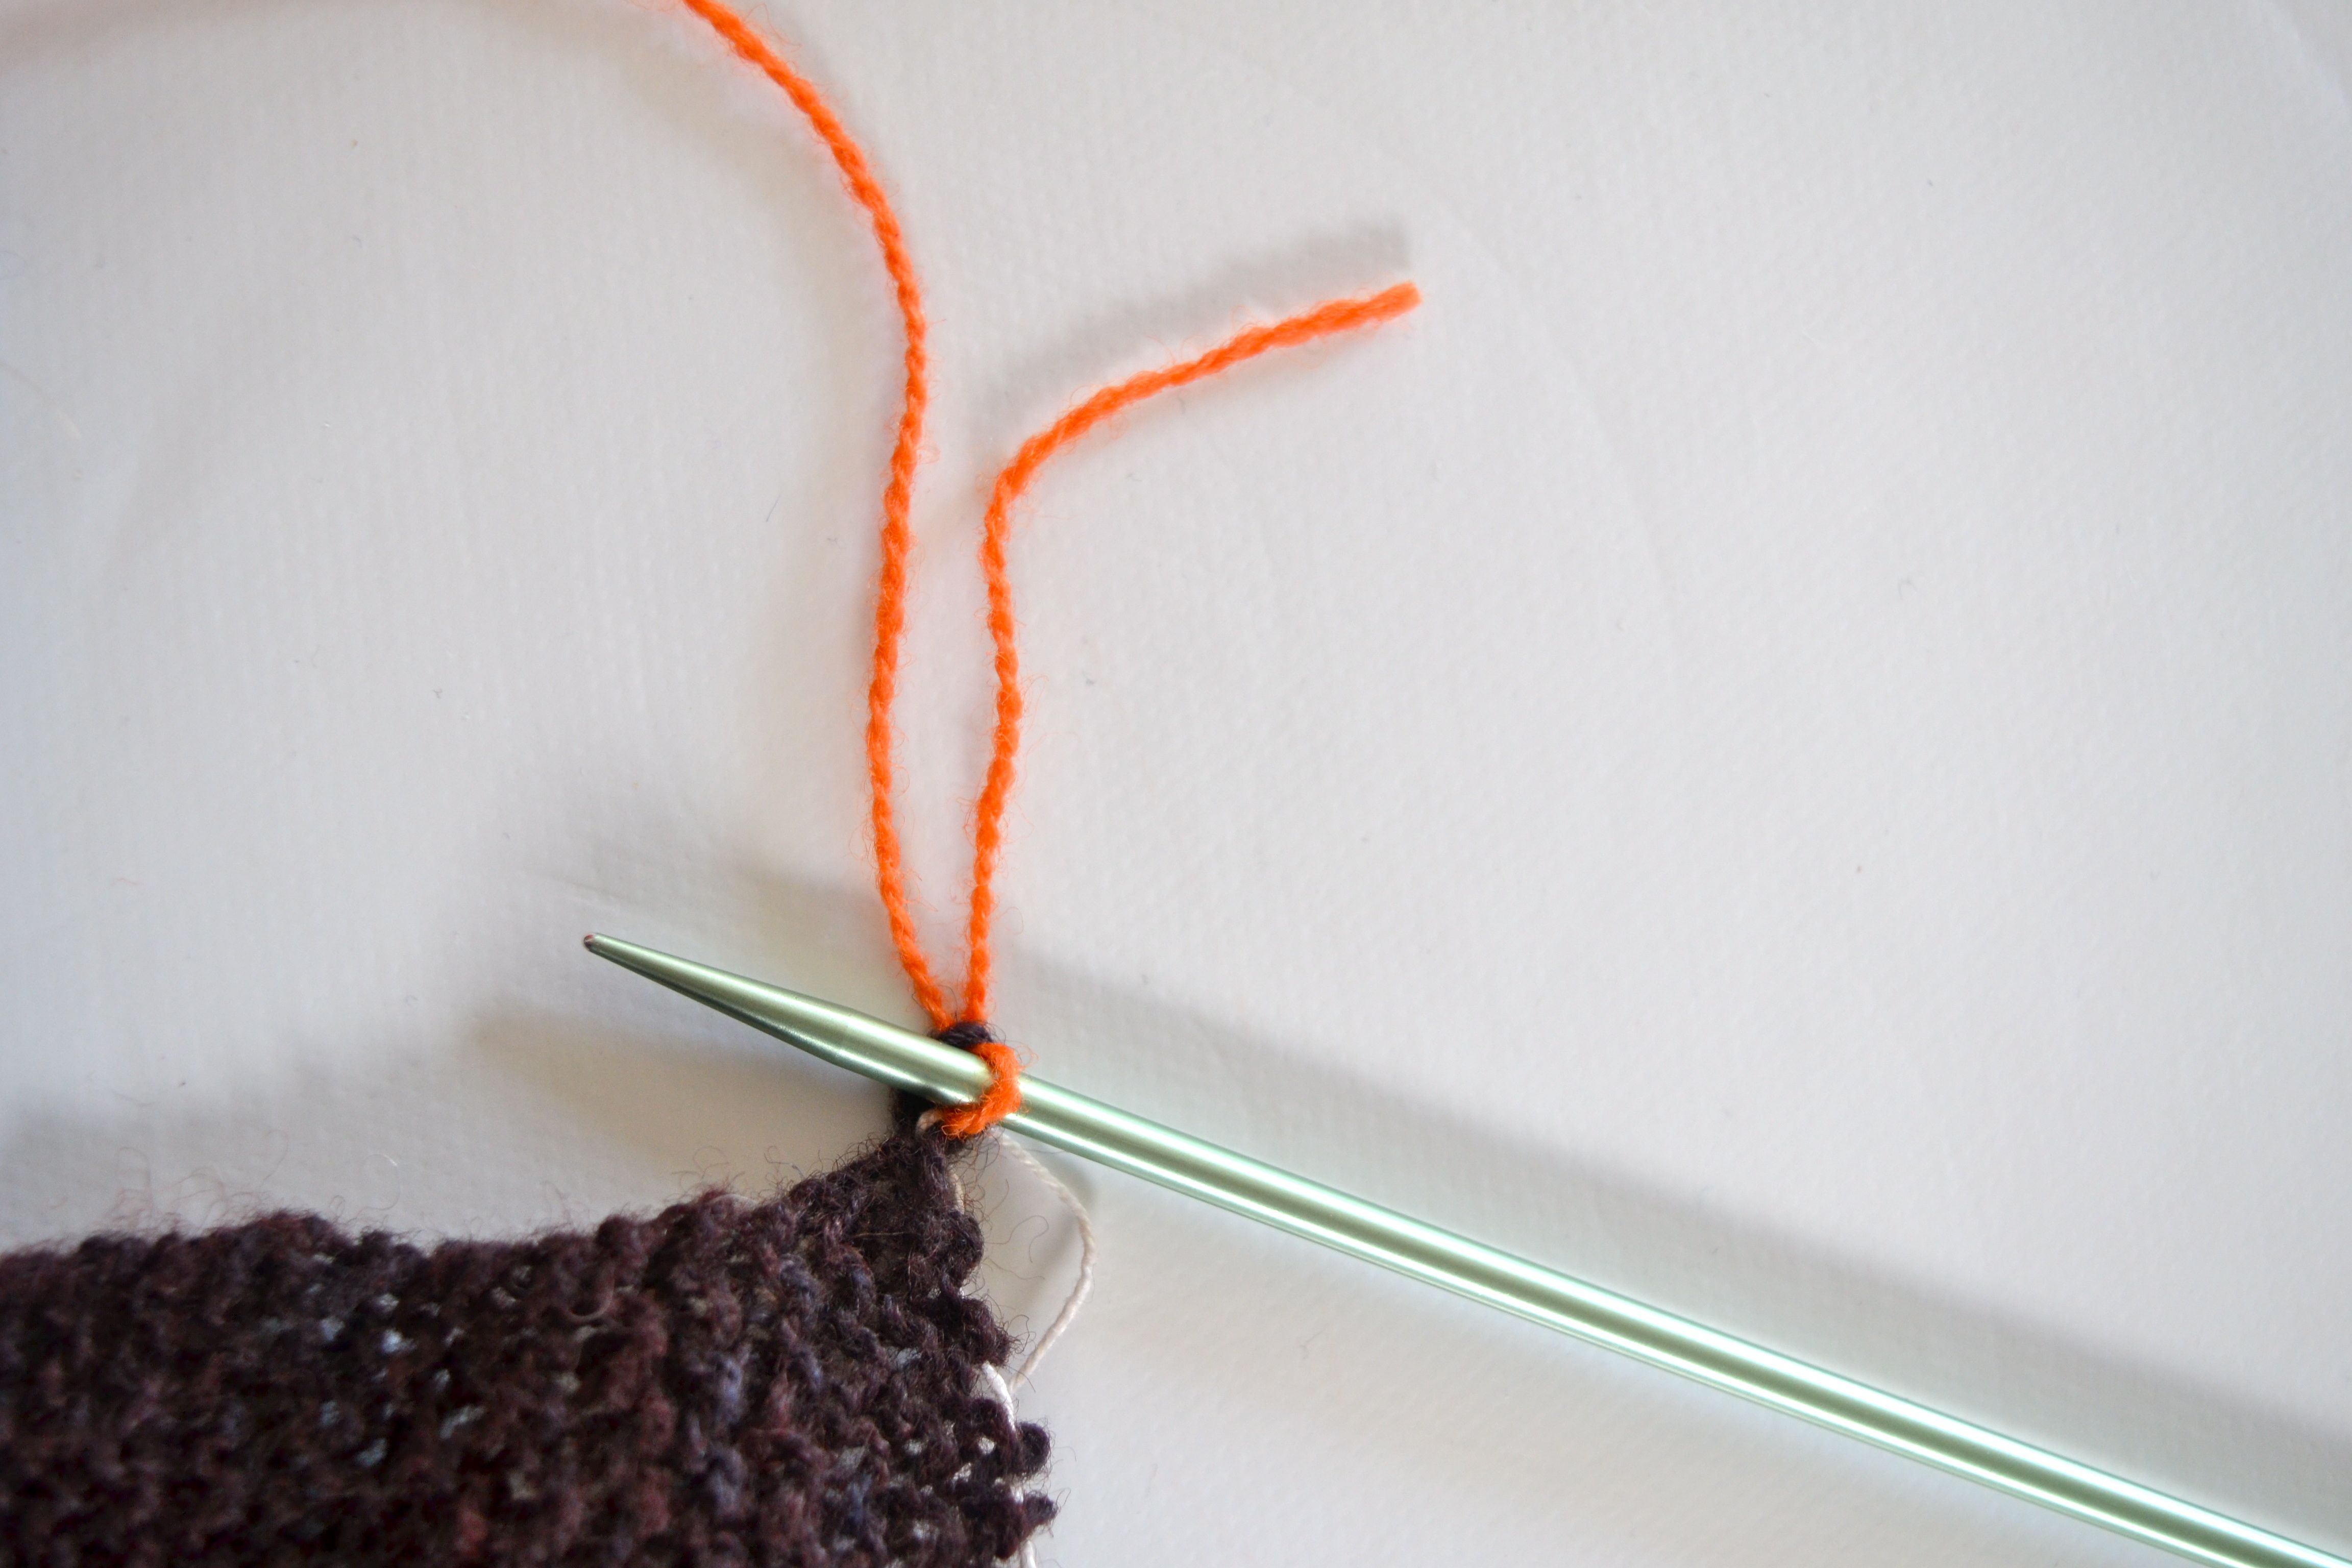
Adding Yarn by Doubling
When joining a new color yarn, leave a long tail, and work the first stitch with the new yarn unattached. Then work 5 stitches with both the working yarn and the tail end held together. This eliminates the need to weave in the end, you can just trim the tail end.

Attaching New Modules
For attaching new modules, use pick up and knit throughout. Place work with RS facing up. In order to attach a new color yarn, a variant of Add Yarn by Doubling while picking up and knitting is used.
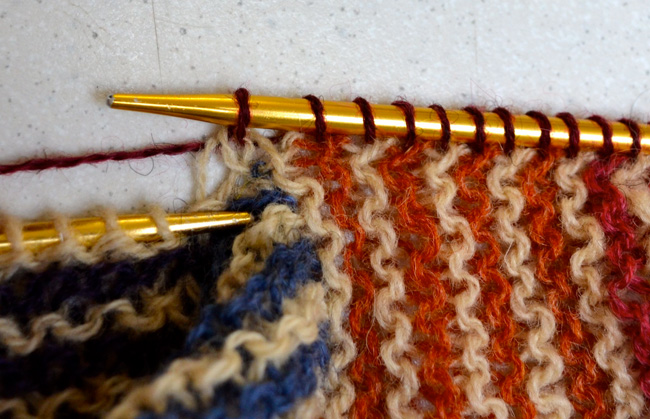
In every case, the place to pick up and knit is shown by the grey lines in the diagram, and sts are picked up and knitted beginning at the right side of the grey line.
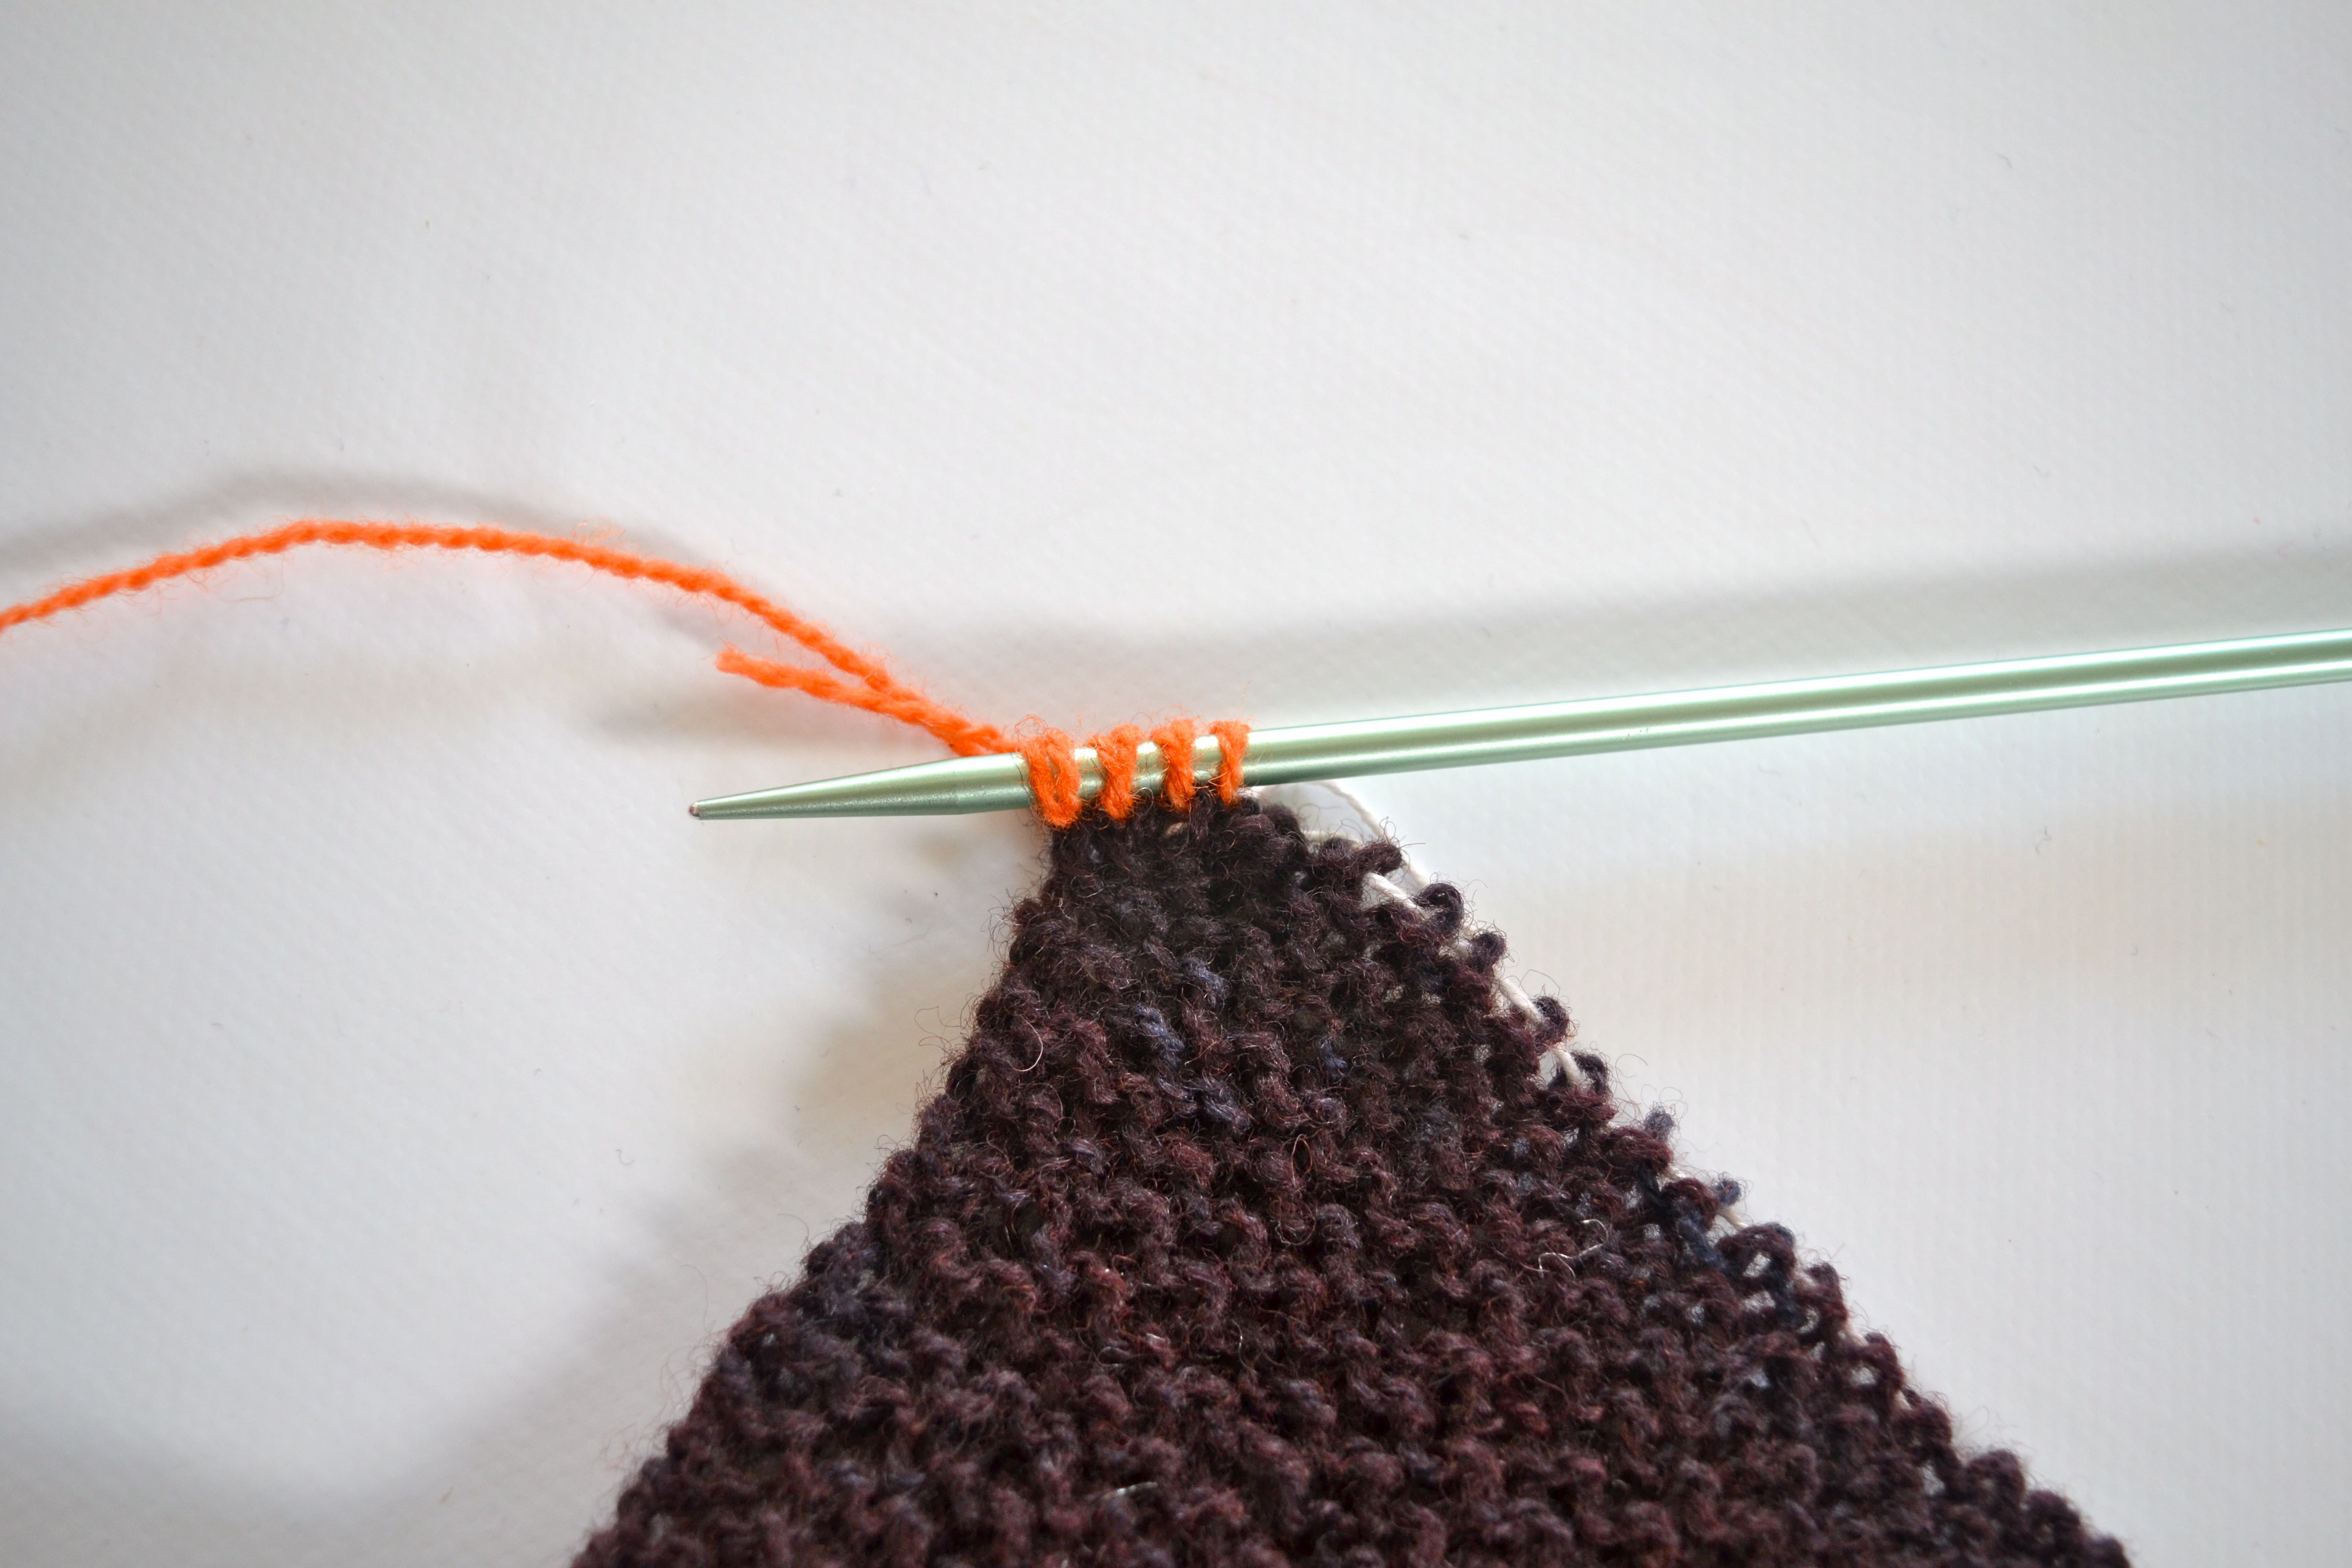
Insert the left needle from left to right in the right-most bump, and wrap yarn over needle:
Knit st onto right needle:
and continue to pick up and knit for a few sts, one st per garter bump:
Then, pick up and knit along the rest of the module with your working yarn, until the indicated number of sts is reached and you have picked up in all the garter bumps.
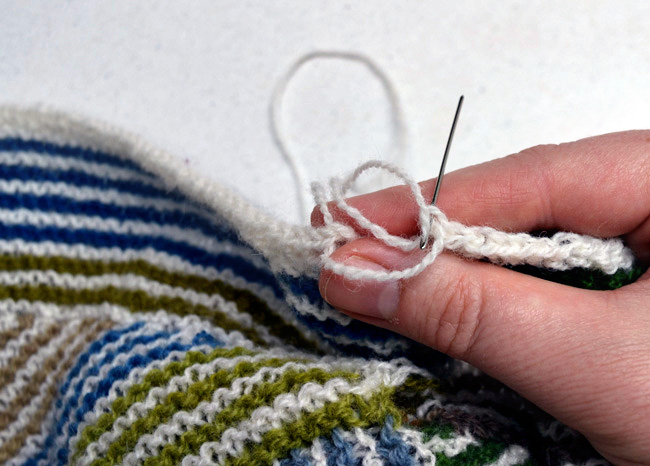
Weaving on the RS
Even with this join, there are still ends to be woven in. Simply darning the end in on the WS of garter stitch makes the WS extremely unattractive. Instead, weave on the RS. First, thread the yarn end to the RS. Now, follow a strand of yarn. Insert tapestry needle through bump of a st:
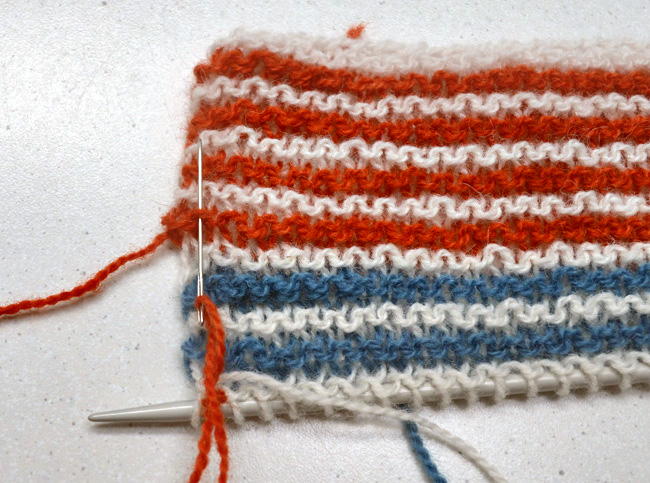
Pull yarn through, then insert needle in the legs of the st above:
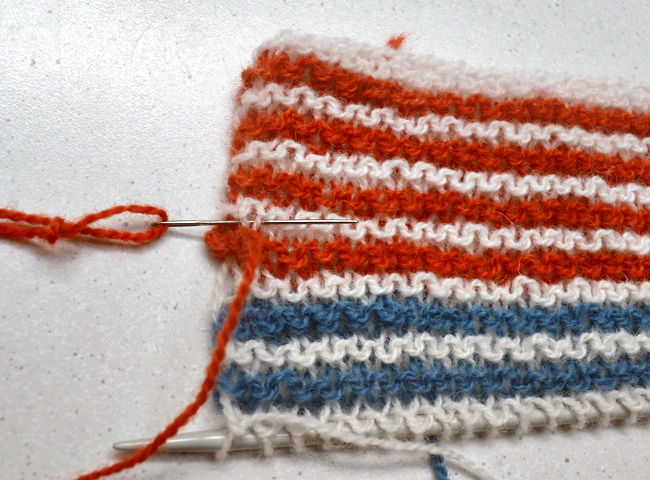
Pull yarn through, and continue following the same strand for a few sts. Then pull yarn to the WS and cut yarn.
Strands woven on the RS become invisible on both sides, giving a WS that is almost as pretty as the RS:
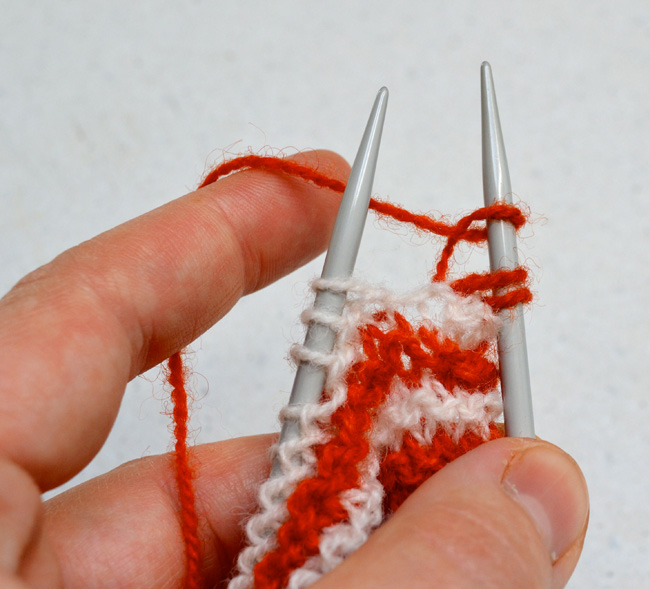
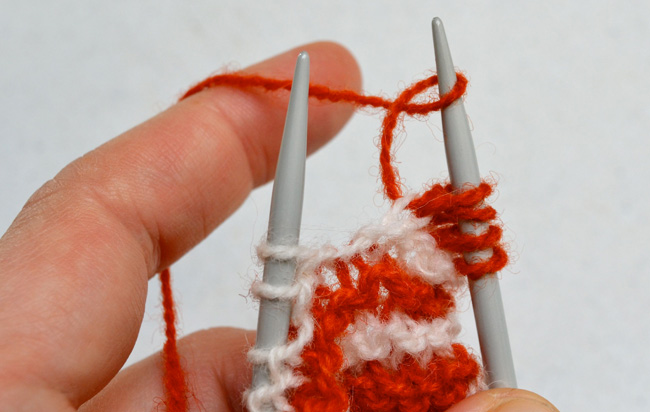
Left-Attached Corner Stitch
When working Left-Attached Square, a special Left-Attached Corner Stitch is used to close the inner corner of the square.
45 hold sts from an earlier square sit on the left needle, while 44 sts have been picked up and sit on the right needle. A bump remains on the left side of the 44 sts. Insert the left needle into the left side of the bump:

Work an SSK on the picked-up bump and the first st on the left needle. You now have 45 sts on the right needle and 44 sts on the left needle:
Edge Increases: Right and Left Leaning Twisted YOs
When working edge, corner increases consisting of paired twisted yo’s and a middle k st are made. In the right-leaning twisted yo, the part of the yarn that is closest to the left needle is on top:
In the left-leaning twisted yo, the part of the yarn that is closest to the left needle is below:
Bind Off
A knit-only variation of Jeny's Surprisingly Stretchy Bind Off is worked by simply processing every st in the k st fashion. This gives the edge just the right bounce and the slight bumpiness is almost unnoticeable.
Crocheting Together Edge Modules
Edge modules are finished individually. To assemble edge, first sew the BO edge of neighboring modules together. Using saved yarn tail from BO, sew into rightmost BO st on neighboring module from front to back:

Then into the BO st that the tail comes from:
Pull yarn through and secure on the WS with a buttonhole stitch. Do not cut yarn. Place a crochet hook through the MC bumps of the garter ridges on the two edge modules. One module has 7, the other 6. Begin and end with bumps on the module with 7 bumps.

Crochet through the picked-up bumps using the yarn tail. First, bring the yarn over the crochet hook and pull through one picked-up sts. For the remainder of the sts, bring the yarn over the hook and pull it through the next two sts on the needle. Work the crochet loops loosely, so they don’t pull the edge together. Use the remaining yarn tail to close the hole neatly:
Notes on Customization
The shawl is based on 45-st modules and 5 triangles on the long edge. If you wish to work a striped shawl, these two numbers must be odd.
It is very easy to change the number of modules. For example, if working at a smaller gauge, just work 7 or 9 triangles on the long edge instead of 5.
It is also possible to change the number of sts in each module to another odd number, let's call that number N. Since garter st is as wide as it is tall, you can work a square by casting on N sts and working until N garter ridges.
Using another N, the width of the edge should change, too. In the 45-st case, the edge is 14 ridges, so the edge is (14/45) 31% of the module. If you like this balance, keep it: for example, if working a 30-st shawl, make edge 9 ridges, or if working a 60-st shawl, make edge 18 ridges. Even or odd numbers of ridges will work for the edge, but note that an even number puts the double MC ridges on the corners, an odd number does not.
When picking up sts for the edge of the triangles, 63 sts are picked up in the 45-st version. The number of sts to pick up for a different N can be calculated using Pythagoras' equation (remember him?) so:
Number of sts to pick up = sqrt (2 x N^2) that is, the square root of (2 x N squared).
Calculated here for a few standard st counts:
N = 25, pick up 35
N = 30, pick up 42
N = 35, pick up 49
N = 40, pick up 56
N = 45, pick up 63
N = 50, pick up 70
N = 55, pick up 77
N = 65, pick up 91
N = 70, pick up 99
It does not matter if the number of sts to pick up is even or odd.
If you wish to make a version of the shawl that is not striped, for example a color-block version, the number of triangles along the long edge of the shawl and the st number N can also be even.
DIRECTIONS
Module 1
Using CC, CO 45 sts.
Work Triangle as follows:
Row 1 [WS]: Knit
Row 2 [RS]: Change to MC, knit.
Row 3: Knit.
Row 4: Change to CC, k2tog, k to end. 1 st decreased.
Row 5: Knit.
Row 6: Change to MC, k2tog, k to end. 1 st decreased.
Row 7: Knit.
Repeat Rows 4-7 until 3 sts remain, then work Rows 4-5 once more. 2 sts. Triangle is now 44 garter ridges tall, and begins and ends with ridges worked in CC.
Cut CC yarn and weave in end, but leave these 2 sts live on the needle.
Module 2
Work Square-on-Triangle as follows:
Using MC, k2tog. Pick up and knit 44 sts down the left-hand side of the triangle just worked. 45 sts.
Row 1 [WS]: Knit.
Row 2 [RS]: Change to CC, knit.
Row 3: Knit.
Row 4: Change to MC, knit.
Row 5: Knit.
Repeat Rows 2-5 until square is 44 garter ridges tall.
Work Row 2-3 once more. Square is now 45 garter ridges tall, and begins and ends with ridges knit in MC.
Cut both yarns, weave in ends, and transfer the 45 sts to waste yarn.
Module 3
Join CC and with RS facing, pick up and knit 45 stitches along the right-hand side of the square just worked. Work Triangle.
Modules 4, 5, 6 and 7
Module 4 is worked in the same way as Module 2, but is picked up and knitted along the left-hand side of Module 3.
Module 5 is worked in the same way as Module 3, but is picked up and knitted from the right-hand side of Module 4.
Module 6 is worked in the same way as Module 2, but is picked up and knitted from the left-hand side of Module 5.
Module 7 is worked in the same way as Module 3, but is picked up and knitted from the right-hand side of Module 6.
Module 8
Module 8 is worked in the same way as Module 2, but is picked up and knitted from the left-hand side of Module 7.
Make a color change in your CC sequence to mark difference between body and edge of shawl.
Then work Edge as follows:
Row 1 [RS]: Change to CC, knit.
Row 2 [WS]: Knit.
Row 3: Change to MC, knit.
Row 4: Knit.
Repeat Rows 1-4 6 more times.
Bind off with MC and cut yarn, leaving a 20 inch/50cm tail.
Module 9
Module 9 is worked in the same way as Module 3, but is picked up and knitted from the right-hand side of Module 8. Then, with CC, k2tog, cut yarn and pull end through. Cut MC yarn. Weave in both ends.
You now have 5 triangles (Modules 1, 3, 5, 7, and 9) interspaced by 4 squares (Modules 2, 4, 6, and 8).
Module 10
Return 45 held sts of Module 6 to left needle.
Join CC and with RS facing, pick up and knit 44 sts in the bumps of the left side of the body part of Module 8. One bump, the one closest to Module 7, remains on the body part of Module 8. Work Left-Attached Corner Stitch. You now have 45 sts on the right needle (Module 10) and 44 sts on the left needle (Module 6).
Work Left-Attached Square as follows:
Row 1 [WS]: Knit.
Row 2 [RS]: Change to MC, k until 1 st of Module 10 remains. Work SSK on the last st of Module 10 and the neighboring st from Module 6. Turn.
Row 3: Knit.
Row 4: Change to CC, k until 1 st of Module 10 remains. Work SSK on the last st of Module 10 and the neighboring st from Module 6. Turn.
Row 5: Knit.
Repeat Rows 2-5 until square is 45 garter ridges tall, and all Module 6 sts have been decreased away. Square begins and ends with ridges knit in CC.
Cut yarns and weave in ends. Put 45 sts on waste yarn.
Module 11
Return 45 held sts of Module 4 to left needle.
Join CC and with RS facing, pick up and knit 44 sts in the bumps on the left side of Module 6. One bump, the one closest to Module 5, remains on Module 6. Work Left-Attached Corner Stitch. You now have 45 sts on the right needle (Module 11) and 44 sts on the left needle (Module 4).
Work Left-Attached Square.
Module 12
Return 45 held sts of Module 2 to left needle.
Join CC and with RS facing, pick up and knit 44 sts in the bumps on the left side of Module 4. One bump, the one closest to Module 3, remains on Module 4. Work Left-Attached Corner Stitch. You now have 45 sts on the right needle (Module 12) and 44 sts on the left needle (Module 2)
Work Left-Attached Square.
Make a color change in your CC sequence to mark difference between body and edge of shawl.
Then work Edge as follows:
Row 1 [RS]: Change to MC, knit.
Row 2 [WS]: Knit.
Row 3: Change to CC, knit.
Row 4: Knit.
Repeat Rows 1-4 5 more times, cut CC yarn and weave in end, then repeat Rows 1-2 twice. BO with MC and cut yarn, leaving a 20 inch/50 cm tail.
Module 13
Return 45 held sts from Module 11 to right needle. With MC, pick up and knit 45 sts in the bumps on the side of the body part of Module 12.
Work Right-Attached Square as follows:
Row 1 [WS]: K44, work k2tog on the last st of Module 13 and the neighboring st from Module 11. Turn.
Row 2 [RS]: Change to CC, knit.
Row 3: K44, work k2tog on the last st of Module 13 and the neighboring st from Module 11. Turn.
Row 4: Change to MC, knit.
Row 5: K44, work k2tog on the last st of Module 13 and the neighboring st from Module 11. Turn.
Repeat Rows 2-5 until square is 45 garter ridges tall, and all Module 11 sts have been decreased away. Square begins and ends with ridges knit in MC.
Cut yarns and put 45 sts on waste yarn.
Module 14
Return 45 held sts from Module 10 to right needle.
With MC, pick up and knit 45 sts in the bumps on the side of Module 11.
Work Right-Attached Square.
Make a color change in your CC sequence to mark difference between body and edge of shawl. Then work Edge of Module 14 in the same way as Edge of Module 8.
Module 15
Return 45 held sts of Module 13 to left needle.
Join CC and with RS facing, pick up and knit 44 sts in the bumps on the left side of the body part of Module 14. One bump, the one closest to Module 11, remains on Module 14. Work Left-Attached Corner Stitch. You now have 45 sts on the right needle (Module 15) and 44 sts on the left needle (Module 13).
Work Left-Attached Square. Do not put the 45 sts on waste yarn, keep them on needle.
Edge on Module 15
Using MC, pick up and knit 45 sts along edge of Module 15, pm. Pick up an extra st in the corner, k to end. 91 sts.
Row 1 [WS]: Knit.
Row 2 [RS]: Change to CC, k to marker, right-leaning twisted yo, sl m, k1, left-leaning twisted yo, k to end. 2 sts increased.
Row 3: Knit.
Row 4: Change to MC, k to marker, right-leaning twisted yo, sl m, k1, left-leaning twisted yo, k to end. 2 sts increased.
Row 5: Knit.
Repeat Rows 2-5 5 more times, then work Rows 4-5 once. 117 sts. BO with MC and cut yarn, leaving a 20 inch/50 cm tail.
Edge on Module 2
Using CC, pick up and knit 45 sts.
Row 1 [WS]: Knit.
Row 2 [RS]: Change to MC, knit.
Row 3: Knit.
Row 4: Change to CC, knit.
Row 5: Knit.
Repeat Rows 2-5 5 more times, then work Rows 2-3 once.
BO with MC and cut yarn, leaving a 20 inch/50 cm tail.
Edge on Module 13
As for Edge on Module 2.
Edge on Module 1
Using MC, pick up and knit 45 sts along original CO edge, pm, pick up 63 along long edge of triangle. 108 sts.
Row 1 [WS]: Knit.
Row 2 [RS]: Change to CC, k to 1 st before marker, right-leaning twisted yo, k1, sl m, left-leaning twisted yo, k to end. 2 sts increased.
Row 3: K to 2 sts before marker, kfb, k to end. 1 st increased.
Row 4: Change to MC, k to 1 st before marker, right-leaning twisted yo, k1, sl m, left-leaning twisted yo, k to end. 2 sts increased.
Row 5: K to 2 sts before marker, kfb, k to end. 1 st increased.
Repeat Rows 2-5 5 more times.
Work Rows 4-5 once. 147 sts.
BO with MC and cut yarn, leaving a 20 inch/50 cm tail.
Edge on Module 3
Using CC, pick up and knit 63 sts along edge of triangle.
Row 1 [WS]: Knit.
Row 2 [RS]: Change to MC, knit.
Row 3: Knit.
Row 4: Change to CC, knit.
Row 5: Knit.
Repeat Rows 2-5 5 more times.
Work Rows 2-3 once.
BO with MC and cut yarn, leaving a 20 inch/50 cm tail.
Edge on Module 7
As for Edge on Module 3.
Edge on Module 5
Using MC, pick up and knit 63 sts along edge of triangle.
Row 1 [WS]: Knit.
Row 2 [RS]: Change to CC, knit.
Row 3: Knit.
Row 4: Change to MC, knit.
Row 5: Knit.
Repeat Rows 2-5 5 more times.
Work Rows 4-5 once.
BO with MC and cut yarn, leaving a 20 inch/50 cm tail.
Edge on Module 9
Using MC, pick up and knit 63 sts along long edge of triangle, pm, pick up and knit 45 sts along short edge. 108 sts.
Row 1 [WS]: Knit.
Row 2 [RS]: Change to CC, k to marker, right-leaning twisted yo, sl m, k1, left-leaning twisted yo, k to end. 2 sts increased.
Row 3: K to marker, sl m, k1, kfb, k to end. 1 st increased.
Row 4: Change to MC, k to marker, right-leaning twisted yo, sl m, k1, left-leaning twisted yo, k to end. 2 sts increased.
Row 5: K to marker, sl m, k1, kfb, k to end. 1 st increased.
Repeat Rows 2-5 5 more times.
Work Rows 4-5 once. 147 sts.
BO with MC and cut yarn, leaving a 20 inch/50 cm tail.
Edge on Module 10
Using MC, pick up and knit 45 sts
Row 1 [WS]: Knit.
Row 2 [RS]: Change to CC, knit.
Row 3: Knit.
Row 4: Change to MC, knit.
Row 5: Knit.
Repeat Rows 2-5 5 more times.
Work Rows 4-5 once.
BO with MC and cut yarn, leaving a 20 inch/50 cm tail.
FINISHING
Crochet together neighboring Edge Modules (see Pattern Notes).
Weave ends in on the RS.
Wash shawl in lukewarm water with wool soap and lay flat to dry. Do not stretch or pin, just pat shawl into shape.
ABOUT THE DESIGNER
 Astrid has moved to the US, France, and back to Denmark with her otherworldly yarn stash and library. Since taking up natural dying, the amount of equipment has become so large that she will have to stay in mainland Denmark from now on. She has trained her family to think that it’s perfectly normal to bring bags, scissors and knives on long walks to harvest dye mushrooms and plants.
You can find her on Ravelry or on her website, and you can see her yarns on Etsy
Pattern & images © 2017 Astrid Colding Sivertsen.