Winter is coming, and depending on where you live, you may need
a pair of really warm socks to keep your lower limbs cozy and
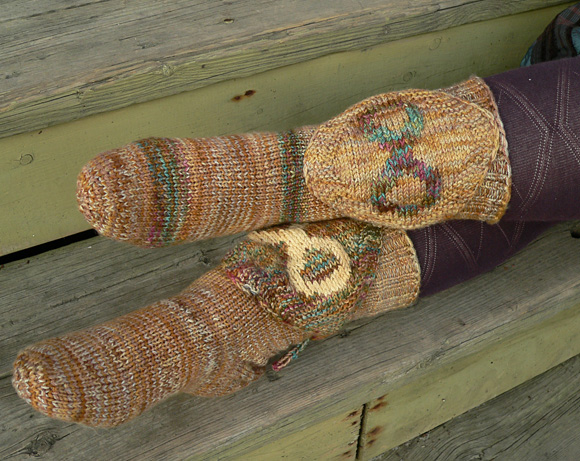
root you in a sense of well-being. These socks are warm, mysterious,
and can use up lots of leftover sock yarn, gathering up happy
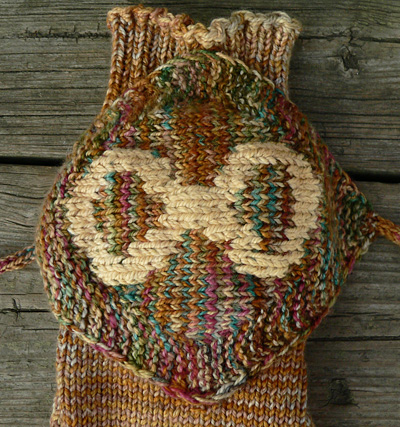
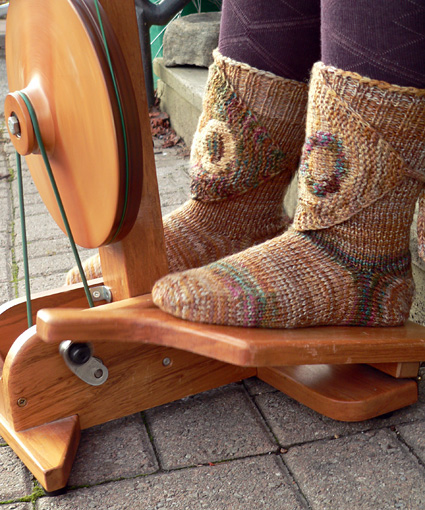
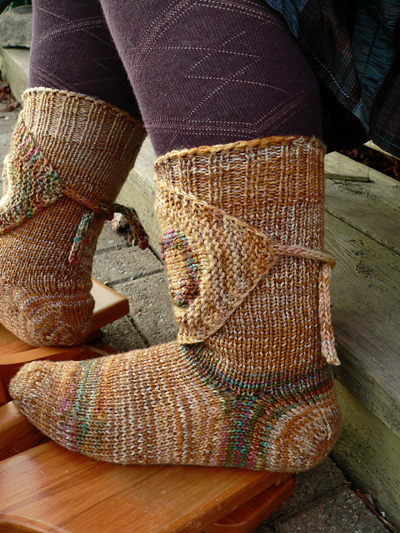
sock memories. A separate diamond-shaped shield with a duplicate-stitched
image is sewn to the leg and tied in the back. You can use the
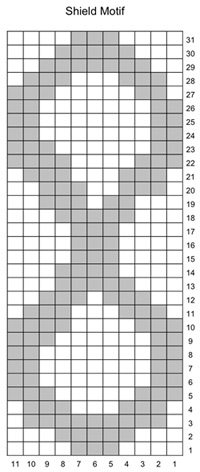
infinity symbol I chose, or anything that sparks your heart.
You can knit these stockinette, ribbed-cuff
socks using any basic sock pattern—toe-up, top-down,
sideways (for sideways try Janel Laidman’s The
Eclectic Sole, or her new book, The Enchanted
Sole).
This new method allows socks
to be worked 100% in the round (not a purl in sight, unless
used as a design element!) which, along with the ease of knitting
and perfect fit, makes this method unique.
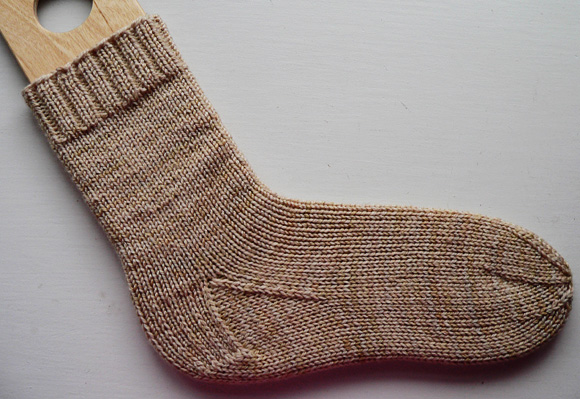
For those who prefer a traditional-style
top-down heel-flap sock, I've provided
a pattern below [the cream-colored sock]
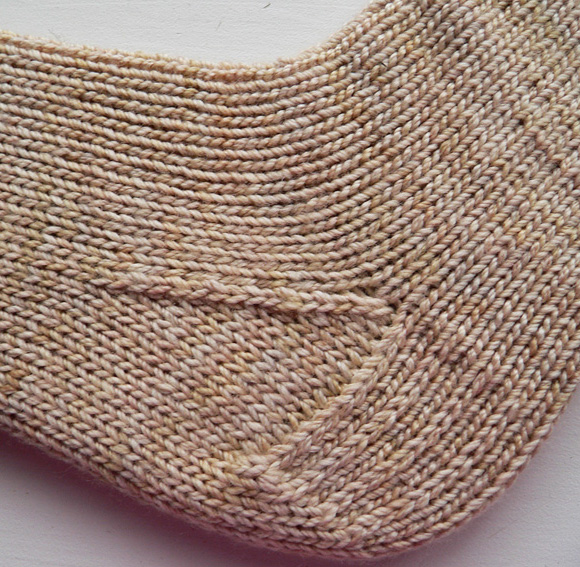
with a few unique twists that improve the fine
points of a sock: one is an ssp decrease
instead of a p2tog in the heel turn, which
I introduced in Socks
Soar on Two Circular Needles,
but which so far as I can tell has not been
widely adopted in the general sock world.
It creates a smooth surface on the heel turn
which is a lovely thing to behold, instead
of the cross-hatched version everyone else
uses (and it probably wears better too).
The other improvement is the ssk line on
the gusset. The pattern instructions below ask you to knit
the former ssk through the back loop on "plain" rounds, which
takes the wobble out of this line. If you'd
like to also snug up your ssk line to match
your sleek, smooth k2tog line perfectly,
watch my
YouTube video to learn a technique I call "Hungry
Stitch".
This common-sense technique can be used any
time you need to snug up loose stitches,
and works like a charm.
Synergy Shield socks may
be knit of any yarn, in any gauge. For extra
warmth and durability I’ve double-stranded
several sock yarns—one main
color (Bronze) is occasionally joined by
leftovers in another colorway (Mombasa).
To make the color changes gradual, work several
rounds with 1 strand of each colorway, then
switch to both strands of the new colorway.
Part of the charm is the synergy between
the colorways and the intentional different
placement of colors in the two socks. Only
human beings want everything in matching
pairs, and the truth is that if you allow
spontaneous variation in the designs of two
socks, an energy arises which is more than
the sum of its parts (the definition of synergy).
photos: Amy
Singer
SIZE
Sock measures 6.5 [7.5, 8.5] inches around foot.
The Shield is 7 inches tall and 9 inches wide when worn. Unstretched,
it is 6 inches wide and 8.5 inches long. All measurements indicate
diamond tip to tip.
FINISHED MEASUREMENTS
The Shield is 7 inches tall and 9 inches wide when worn. Unstretched,
it is 6 inches wide and 8.5 inches long. All measurements indicate
diamond tip to tip.
MATERIALS
Yarn used for both the socks and the
shield:
Dark version shown above
Fleece
Artist Merino 2/6 [100% merino; 355yd/
per 115g skein]; color: Bronze; 2 skeins,
and partial skeins of colors Mombasa and Ivory (I darkened the
ivory a bit with some tea after knitting).
Light version shown below
Fleece
Artist Sea Wool [70% wool, 30% seacell;
382yd per 115g skein]; color:
Ivory; 2 skeins.
Recommended needle size [always use a needle
size that gives you the gauge
listed below -- every knitter's
gauge is unique]
1
set US #3/3.25 mm double-point needles OR
1 long US #3/3.25 mm circular needle for magic loop method OR
2 US #3/3.25 mm circular needles, 24 inches or longer
Notions
Yarn
needle
GAUGE
26 sts/34 rounds = 4 inches in stockinette stitch in the round
These socks are meant for winter, so
to make them warmer, I knit with a double
strand of fingering-weight yarn. You
could substitute a single strand of sport-weight
yarn if it works up well at the same
gauge.
PATTERN NOTES [Knitty's list of standard abbreviations and techniques can be found here.]
I chose the infinity sign after much musing about what
to use as an image. I considered words, stars, trees, a
sliver of moon—you could use anything that will fit.
The infinity sign is beautiful, ancient, and reflects the
endless variety of sock designs, strategies, and architectures
that are possible. The finer your gauge, the more detailed
your design can be.
You must start with the Synergy Shield itself, because
its vertical height lets you know how tall to make the
leg of your socks. You’ll knit about 5 inches of
three-stitch-I-cord, and then begin increasing a few stitches
in from each edge, working in garter stitch. After about
an inch, you’ll begin the stockinette oval that fills
shield’s center, keeping the edges in garter stitch.
This oval becomes your duplicate stitch canvas. Alternatively,
you could work an image in intarsia. To find images, browse
stitch dictionaries, convert cross stitch designs, or draw
images on graph paper. Because of the way the shield
stretches around the leg, when worn your stitches are pulled
nearly square, like graph paper, so what you draw
will closely resemble your stitching.
Work shield increases as instructed until you can hold
the needle holding the stitches along the center front
of your leg and pull the corner with the I-cord tie to
the center of the back. This half diamond should stretch
from center front to center back. Write down the number
you increased to so you’ll remember to make the second
shield the same size. Then begin decreasing as instructed.
DIRECTIONS
SHIELD
Start:
(Worked in Bronze, double-stranded like
the socks)
Cast on 3 sts and knit 5 inches of
I-Cord, ensuring that when you’re done you’re
in position to work the RS.
As you’re working, slip all sts with yarn in front,
as if to purl. Then move yarn to back to begin knitting.
Row 1 [RS]: Sl1, kfb twice, k1. (5 sts)
Row 2 and all WS rows: Sl1,
k to end.
Row 3 [RS]: Sl1, kfb twice,
k to end. (7 sts)
Row 5 [RS]: Sl1, k1, kfb twice,
k to end. (9 sts)
Row 7 [RS]: Sl1, k1, kfb,
k until only 4 sts rem, kfb, k3.
Repeat Rows 6 and 7 until st total reaches
21, ending with a completed RS Row
7.
Next part: Row 1 [WS]: Sl1, k8, p3, k9. (21 sts)
Row 2 and all RS rows: Sl1, k1, kfb, k until only 4 sts rem,
kfb, k3. (23 sts)
Row 3 [WS]: Sl1, k7, p7, k8.
Row 5 [WS]: Sl1, k6, p11, k7. (25 sts)
Row 7 [WS]: Sl1, k6, p13, k7. (27 sts)
Row 9 [WS]: Sl1, k6, p until only 7 sts rem, k7. (31 sts)
Row 10 [RS]: Sl1, k1, kfb, k until only 4 sts rem, kfb, k3.
(33 sts)
Repeat Rows 9 and 10 until desired shield
width is achieved.
Make sure to measure
it by pulling it around half of your
leg at the tension you wish to wear it,
making sure that the sts are held at the center front of
the leg and the corner with the I-Cord reaches the center
back. The width will compress as you stretch it this way,
so measure the compressed width.
Next part: Row 1 [WS]: Sl1, k6, p until only 7 sts rem, k7.
Row 2 [RS]: Sl1, k2, k2tog, k until only 5 sts rem, ssk, k3.
(2 fewer sts)
Repeat Rows 1 and 2 until only 23 sts
rem, ending with a completed RS row.
Finish: Row 1 [WS]: Sl1, k7, p7, k8. (23 sts) Rows 2, 4, 6, 8, 10, 12, and 14 [RS]: Sl1, k2, k2tog, k until
only 5 sts rem, ssk, k3. (2 fewer sts) Row 3 [WS]: Sl1, k8, p3, k9. (21 sts) Rows 5 and all following WS rows: Sl1, k to end. Row 16 [RS]: Sl1, k1, k2tog, k1, ssk, k2. (7 sts) Row 18 [RS]: Sl1, k2tog, k1, ssk, k1. (5 sts) Row 20 [RS]: Sl1, k2tog twice. Do not turn. (3 sts)
Slide 3 sts back to left needle and begin
working I-cord same length as first I-cord.
Duplicate stitch your image on the shields,
following the chart, using a contrasting
color of yarn. Or use your own design!
Knit the socks: The bronze socks shown above use
the method taught in Personal
Footprints for Insouciant Sock Knitters. The cream
socks shown below use the pattern that follows. No matter
what sock pattern you use, remember to read leg instructions below to
be sure your sock leg is the right length for your shield.
Cat's Simple-but-elegant top-down socks
Cuff:
Cast on 42[48, 54] sts. Join in the round,
taking care not to twist cast-on edge,
repeat [k1, p1, k1] to end of round.
Repeat this round until cuff measures about 2 inches.
Leg:
Knit all stitches until leg measures
about 1 inch taller than the vertical height of the synergy
shield (to measure, first tie completed shield around
leg and smooth shield out vertically, so it matches the
size it will be when worn).
Heel flap:
Isolate 22[24, 26] stitches on one needle
or cable section if you’re working on circulars
(letting the remaining stitches rest on another needle(s)
or cable section) and work in rows on this needle or
cable section alone: Row 1 [RS]: Repeat [slip 1 pwise wyib, k1] 11[12, 13] times,
turn. Row 2 [WS]: Slip 1 pwise wyib, p21[23, 25], turn.
Repeat Rows 1 and 2 another 10 [12, 14]
times—11 [13, 15] chain selvedge stitches.
Heel turn:
Continue to work in rows on this needle
or cable section alone.
Note: the SSP decrease (instead of the traditional
p2tog) creates a significantly smoother heel turn, quite possibly resolving
a mystery you have been wondering about for years. To work an SSP, with
yarn in front, slip 2 sts 1 at a time knitwise to right needle. Replace
sts on left needle, sliding them from right tip to left tip. Insert right
needle from left to right (through second st, then first st) through
back loops of both sts and purl them together.
Small size only: 14
sts remain. Row 9 [RS]: Knit 7, place
marker to indicate new start of round,
k7.
Go on to gusset.
Medium size only: Row 9 [RS]: Slip 1 pwise wyif,
k12, k2tog, turn. Row 10 [WS]: Slip 1 pwise
wyif, p12, SSP, turn—14 sts remain. Row 11 [RS]: Knit 7, place marker to
indicate new start of round, k7 .
Go on to gusset.
Large size only: Row 11 [RS]: Slip 1 pwise
wyif, k12, k2tog, k1, turn. Row 12 [WS]: Slip 1 pwise
wyif, p13, SSP, p1, turn—16 sts
remain. Row 13 [WS]: Knit 8, place marker to indicate new start of
round, k8.
Gusset
Pick up and knit 1 st in each loop along
adjacent heel flap edge, then 1 st
tbl in intersection—12[14,
16] sts total along edge—place first marker, k
20[24, 28], place second marker, pick
up and knit 1 st tbl in intersection
and then 1 in each loop along adjacent heel flap edge—12[14,
16] sts total along edge—knit
to start of round marker. Total sts—58[66, 76].
Round 1: Knit to 2 sts before
first marker, k2tog, k to second marker,
ssk, k to end of rnd—2 sts
decreased.
Round 2:Note: knitting
the ssk (which was worked in round
1) through the back loop will take
the wobble out of your ssk line. If
you’d like to also know how to tighten up
your ssk’s using
the Hungry Stitch, watch my
Youtube video.
Knit
to second marker, k1tbl, k to end of Round.
Repeat Rounds 1 and 2 until stitch total
is reduced to 42[48, 54].
Leg
Work even until when you try sock on
-- it needs only another 1.25 [1.6,
2] inches to reach desired foot length.
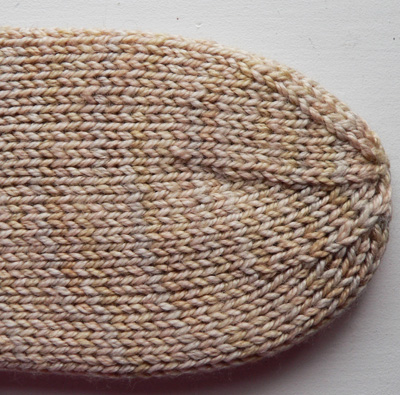
Toe
Divide sts into 6 equal groups by placing
markers or needle/cable intersections every 7 [8, 9]
stitches.
Round 1: Repeat 6 times: k until 2 sts
remain before next marker, k2tog—6 sts decreased.
Rounds 2-3: Knit.
Repeat Rounds 1-3 until stitch total
is reduced to 36.
Repeat Rounds 1-2 another 3 times—18 sts
remain.
Repeat Round 1 twice more—6 sts remain.
Cut
12 inch tail, thread through tapestry needle
and weave through remaining 6 sts.
Pull tight and weave
end in securely.
FINISHING
Put the socks on and tie the shields in
place. Center and smooth shields to your
satisfaction, then use safety pins to
attach just the top and bottom corners
to the sock. Remove socks from your feet
and sew these corners (only the corners)
to sock. Weave in all ends.
ABOUT THE DESIGNER
Cat Bordhi’s bed has foot-shaped indentations because she
keeps standing up and jumping out of bed
in the middle of the night with new knitting ideas. That, and a
love of getting lost and making mistakes account for most of her
original ideas.