  by
Kate Kuckro by
Kate Kuckro

In the fall, I often don't
want a big scarf...just a little something at
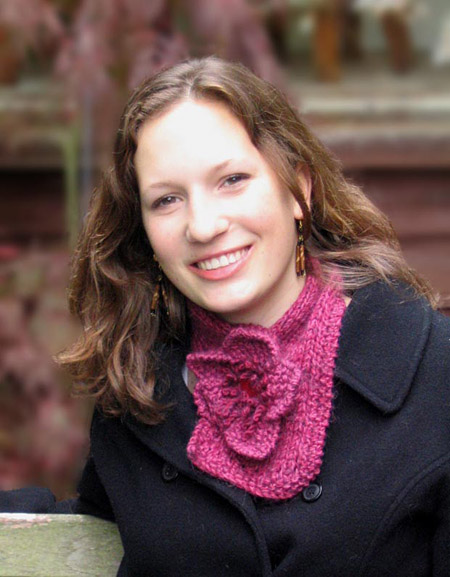
the neck to keep the chill away. This neck warmer
provides just the right amount of warmth plus
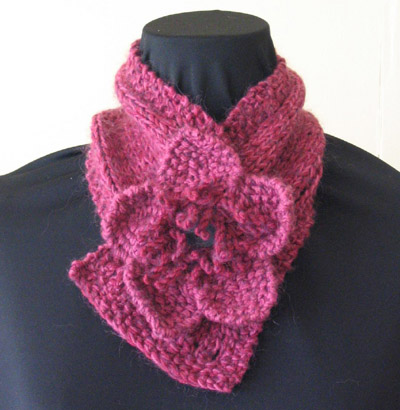
a big moss stitch flower to add a dash of style.
The neck warmer has a coordinating moss stitch
border that is set off from the stockinette
with little eyelets, and the flower is removable
for those days when you want something a bit
more subdued.
I used three thinner
yarns stranded together for this version, but
you could use any yarn or combination of yarns
that create a gauge of about 4 sts per inch.
The project can be a great stash buster, since
the neck warmer itself takes only about 100
yards of yarn, and the flower could be worked
in any other little coordinating bits that you
have lying around.
|
|
 model:
Andrea Dillon
  photos:
Kate Kuckro
|
|
| One |
| |
| Length: 23
inches
Width: 5 inches
Flower Diameter: 5.5 inches
|
| |
|
|
|
 [A] Rowan Wool Cotton [50% merino wool, 50%
cotton; 123 yd/113m
per 50g skein]; color: #943 Flower; 1
ball
 [B] Rowan Wool Cotton [50% merino wool, 50%
cotton; 123 yd/113m per 50g skein]; color: #911 Rich; 1 ball
 [C] Crystal Palace Yarns Kid Merino [28% kid
mohair, 28% merino wool, 44% micro nylon; 240
yd/216m per 25g skein]; color: #4672
Berry ; 1 ball
 1 set US #9/5.5mm needles
 Stitch holder
 Blunt tapestry needle
 One 1-inch button
 Three 5/8-inch buttons
 Sharp sewing needle
 Sewing thread
|
| |
| 16 sts/18 rows
= 4 inches in stockinette stitch with 1 strand
each of A, B and C held together |
|
| [Knitty's
list of standard abbreviations can be found
here]
Seed
Stitch (Worked over an odd number of
sts):
Row 1: K1, [p1, k1] to end.
Repeat this row for Seed Stitch.
Note: When instructed
to work with 2 strands of one yarn, pull one
end from inside of ball and one end from outside
of same ball.
Twisted
Loop
Bring yarn to front of work, catch all strands
with one finger of right hand, bring yarn to
back of work again, creating a loop approx.
3 inches long. Using left hand, hold base of
loop in place against right needle. Use finger
holding loop to twist loop in one direction
until loop is so twisted that it starts to kink
and twist back on itself. Slip top of loop from
finger onto tip of right needle. Tug slightly
on doubled loop to straighten it; it will twist
around itself to form a short cord.
1 st increased.
|
| |
  Using
1 strand each of A, B and C held together,
CO 7 sts. Using
1 strand each of A, B and C held together,
CO 7 sts.
Work 4 rows in Seed Stitch.
Next Row [RS]: K1, p1, k1, yo, k1,
yo, k1, p1, k1. 9 sts.
Next Row [WS]: K1, p1, k1, p to
last 3 sts, k1, p1, k1.
Buttonhole Row [RS]: K1, p1, k1,
yo, k1, yo, k2tog, yo, k1, p1, k1. 11 sts.
Next Row [WS]: K1, p1, k1, p to
last 3 sts, k1, p1, k1.
Next Row [RS]: K1, p1, k1, yo, k
to last 3 sts, yo, k1, p1, k1.
Next Row [WS]: K1, p1, k1, p to last
3 sts, k1, p1, k1.
Repeat these 2 rows 4 times more. 21 sts.
Next Row [RS]: K1, p1, k2tog, yo,
k to last 4 sts, yo, ssk, p1, k1.
Next Row [WS]: K1, p1, k1, p to last
3 sts, k1, p1, k1.
Repeat these 2 rows until work measures 22
inches, or 1 inch less than desired length.
Next Row [RS]: K1, p1, k2tog, yo,
k1, [k1, yo, k2tog] 4 times, yo, ssk, p1,
k1.
Work 4 rows in Seed Stitch. BO all sts.
Flower
Petal (Make 5):
Using 2 strands of A and 1 strand of C held
together, CO 2 sts.
Row 1 [RS]: Kfb, k1. 3 sts.
Row 2 [WS]: K1, p1, k1.
Row 3 [RS]: Kfb, m1, p1, k1. 5 sts.
Rows 4, 6 [WS]: [K1, p1] to last
st, k1.
Row 5 [RS]: K1, p1, kfb, m1, p1,
k1. 7 sts.
Row 7 [RS]: K1, p1, kfb, m1, [p1,
k1] twice. 9 sts.
Rows 8-11: Work in Seed Stitch as
set.
Row 12 [WS]: P2tog, work 5 sts in
patt, sl1, k1, psso. 7 sts.
Row 13 [RS]: Work in Seed Stitch
as set.
Slip rem sts to st holder; break yarn, leaving
10-inch tails.
Center
Replace all petals on needle with WS facing
(35 sts on needle).
Using 2 strands of B and 1 strand of C held
together, proceed as follows:
Row 1
[WS]: K2tog, [p1, k1] twice, p2tog, [work
5 sts in Seed Stitch, p2tog] 3 times, work
4 sts in Seed Stitch, k2tog. 29 sts.
Row 2 [RS]: [K1, work Twisted Loop]
to last st, k1. 57 sts.
Row 3 [WS]: [P3tog] to end. 19 sts
rem.
Row 4 [RS]: [K1, work Twisted Loop]
to last st, k1. 37 sts.
Row 5 [WS]: [P3tog] to last st, p1.
13 sts rem. BO all sts.
|
|
| Steam block
scarf so it lays flat.
Assemble Flower:
Sew lower edge of first petal to lower edge
of last petal, leaving a hole in center of flower
(the 1-inch button will go through this hole
to secure flower to neck warmer).
Sew flower petals to each other at lower edges,
overlapping petals slightly (see photo). Place
flower with RS down on a flat surface.
Add Large Button to
Neck Warmer:
Wrap neck warmer around neck so it fits comfortably,
with pointed end (with buttonhole) overlapping
straight end. Mark position of buttonhole; this
is where large button will be sewn.
Because large button both
closes neck warmer and secures flower, you will
need to create a quarter inch shank between
button and neck warmer as follows:
With sewing thread, make several
anchor stitches at position of button on neck
warmer. Draw thread up through one hole in button,
then down through another hole. Now slip a knitting
needle, pencil, or something else that is about
one quarter inch in diameter, between button
and neck warmer; this will act as a spacer,
helping you set the length of the button shank.
Make several more sts to secure button, using
spacer to maintain distance between button and
knit fabric.
Once button is securely fastened,
attach one smaller button to back of fabric.
Keep sewing through top button, fabric, and
smaller bottom button until both buttons are
secure.
Remove spacer, draw thread
between top button and fabric, and wrap thread
around button shank several times. Draw thread
to back of neck warmer and secure.
Add stabilizing buttons
to back of flower:
Place scarf over flower so that button hole
is centered over hole in flower. Find two eyelets
at border of neck warmer that overlap flower
petals. Mark corresponding points on back of
the flower, and sew smaller buttons at these
points. Button flower onto neck warmer, keeping
center of flower centered over buttonhole on
neck warmer.
|
|   Kate
Kuckro lives in San Francisco, where she spends
as much time as possible knitting, crafting,
and baking. Kate
Kuckro lives in San Francisco, where she spends
as much time as possible knitting, crafting,
and baking.
After a number of dismal attempts at scarves
and doll blankets when she was little, Kate
abandoned knitting until college. She has been
happily experimenting, designing and knitting
ever since.
To read more about her knitting inspirations
and experiments, please visit her
blog; to see more of her knits and patterns,
please see her
website.
|
| Pattern &
images © 2005 Kate Kuckro. Contact Kate |
|

