Thyatira, a free knitting pattern from Knitty.com.
INTRODUCTION
Thyatira
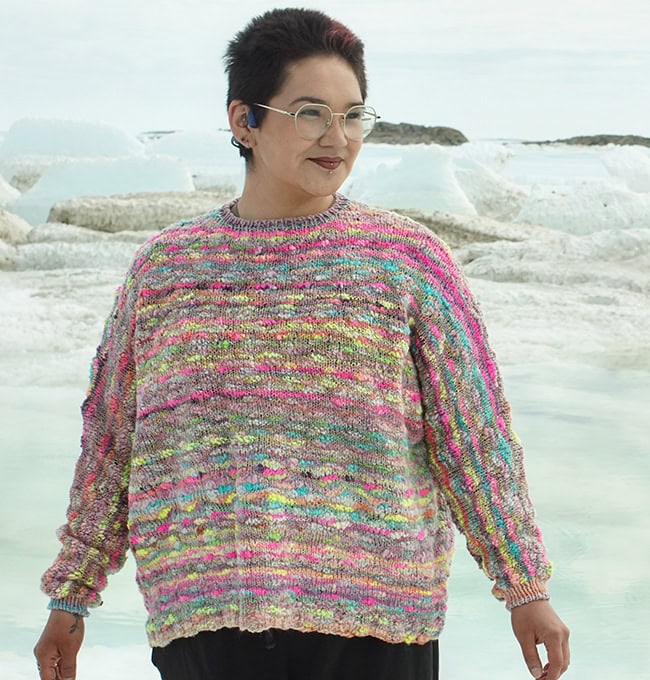
by Rebecca Osborn

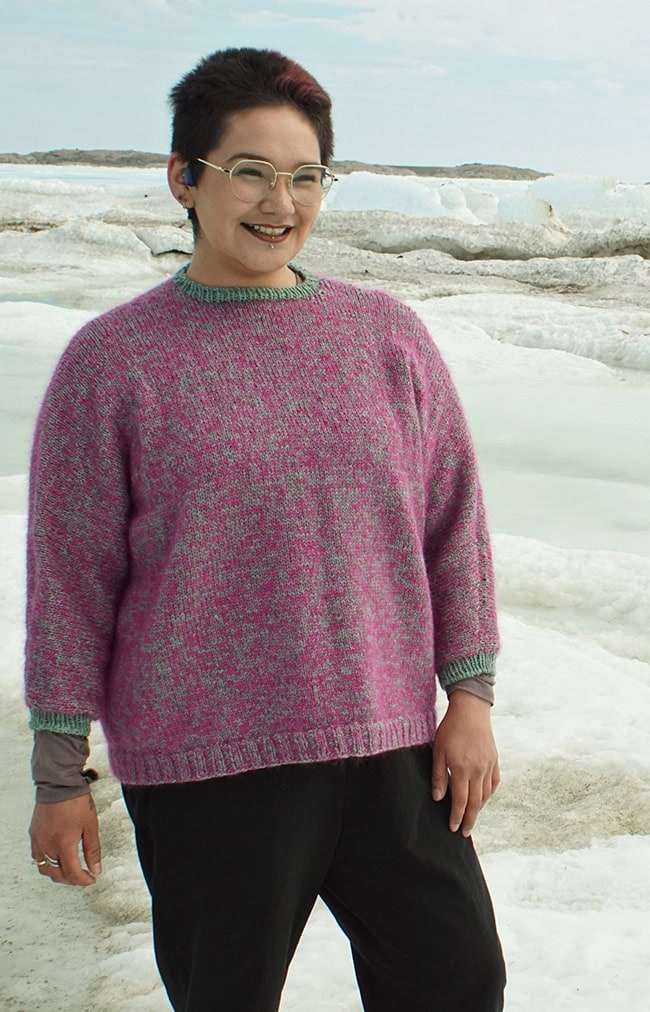
Thyatira is a city in Ancient Greece that during the first century AD was famous for its dyeing facilities. Now named Akhisar, it is located in present-day Turkey. As handspinners and knitters, we are often inspired by the ever-evolving craft of dyeing. This pullover pattern was inspired by the idea of maximizing the use of textured handspun yarn made from a combination of several hand-painted combed tops, maximizing wearability by planning for narrow stripes and avoiding pooling. This evolved into the cozy sweatshirt you see here, suitable for any combination of yarns you want to celebrate.
For those who love the shape and construction of this sweater but don't spin or have access to handspun yarn, we offer a commercially available yarn option as well, shown below.
 model: Akumalik Netser Sanguin
photos: Rebecca Osborn
SIZE
Women's XS[S, M, L, XL, 2X, 3X, 4X, 5X]
Both versions shown in size XL with 10 inches/25 cm of ease at largest part of chest, and 13 inches/33 cm of ease at upper bust.
FINISHED MEASUREMENTS
Chest/Bust: 40[44, 48, 52, 56, 60, 64, 68, 72] inches/ 101[111, 121.5, 131.5, 142, 152, 162, 172, 183] cm
Length: 22.5[23, 23.25, 23.5, 23.75, 24, 24, 24.5, 24.5] inches/ 57[58, 59, 59.5, 60, 61, 61, 62, 62] cm
MATERIALS
Yarn – Handspun (multicolor, shown above)
Fiber:
Kim Dyes Yarn Rambo/Silk [80% Rambouillet wool, 20% silk]; color: Naked Cake, 1 braid
Yarn Experiments Falkland [100% Falkland wool]; color: Summer Margarita, 1 braid
Yarn Experiments American Merino [100% superfine Merino wool]; color: I'm Just Ken, 1 braid
Keira Wiggins Speckle [90% Wool, 10% Viscose]; color: Pink Peppercorn, 1 braid
Bramble Ridge Cormo [100% Cormo wool]; color: Just a Dash, 1 braid
Bramble Ridge Cormo [100% Cormo wool]; color: Hastings Sunrise, 2 braids
Note: Both yarns spun from 7[7, 8, 8, 8, 9, 9, 10, 10] braids of 3.5-4oz/100-125g hand-painted combed top
Finished Yarn:
[MC] Flame Yarn [Corriedale, Merino, and other medium-to-fine wool; 900[900, 1000, 1000, 1000, 1100, 1100, 1200, 1200] yd/ 823[823, 914, 914, 914, 1006, 1006, 1097, 1097] m
[CC] Fingering weight yarn [100yd/82m].
Note: This yarn was made by chain plying the leftover thin singles used to make the Flame Yarn, worked double as described below. You could also use any DK-weight yarn in a coordinating colour [50yd/41m], not holding it double.
Wraps per inch: 2-16
Ply: [MC] 2; [CC] 3
Yardage used:
[MC] 900[900, 1000, 1000, 1000, 1100, 1100, 1200, 1200] yd/ 823[823, 914, 914, 914, 1006, 1006, 1097, 1097] m; [CC] 50 yards
Drafting method: [MC] Slub ply: Short forward draft, reaching into fiber supply every 6in/15cm to make slubs; thin ply: Continuous backwards draft, or your preferred draft for consisted singles ~28 WPI; [CC] Continuous backwards draft
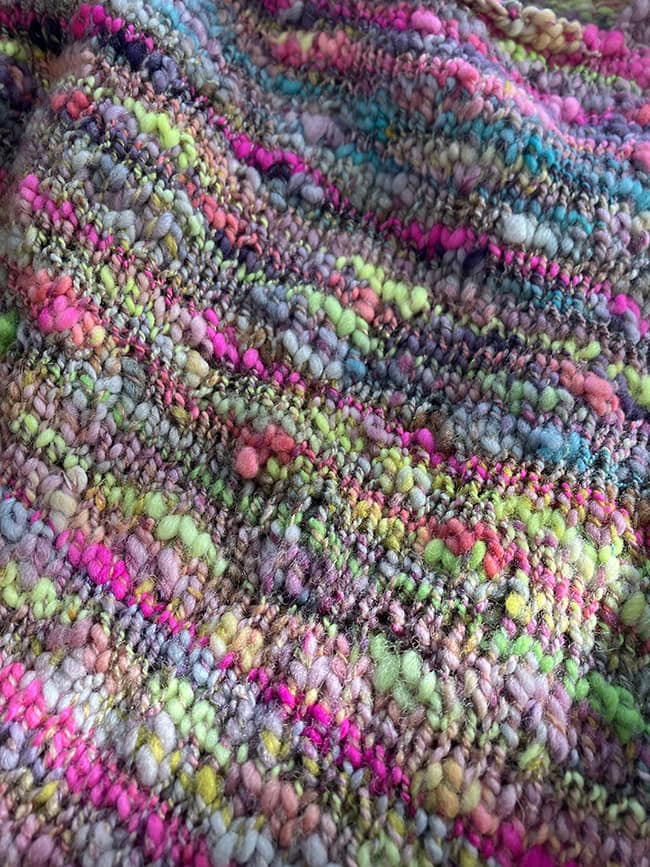
Spinning Instructions
Choosing braids: This is a combo spin. To choose braids to go together, select colorways that have something in common. If you want to have a pop color, have that highlight present in only some of the braids. It's OK to include a braid of just a neutral or solid colour in the mix.
Fiber prep: Unbraid all the braids and strip them into 4-6 strips each. Scramble them up into 8[8, 9, 9, 9, 10, 10, 11, 11] equal quantities, using as much planning or randomness as you want.
In the Z direction, spin 2[2, 2, 2, 2, 3, 3, 3, 3] of these quantities into fine singles. My singles were about 28 WPI, about my typical singles for a sturdy three-ply sock yarn.
Also in the Z direction, spin the remaining 6[6, 7, 7, 7, 7, 7, 8, 8] quantities into slub singles with plenty of extra twist, more twist than you would add for a slub yarn you were planning to leave as a singles.
Ply these yarns together with moderate twist. Each time you come to a slub, manually add a little extra twist to the slub and corespin it around the fine single. This creates the firm, squishy look of a flame yarn.
Use leftover thin singles to make a chain ply, used held double as CC.
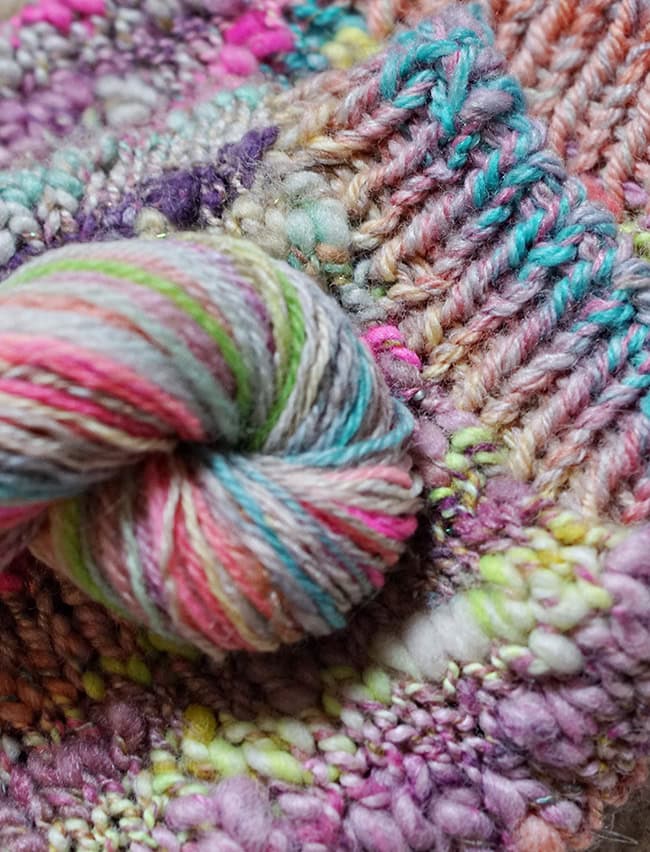
Yarn Characteristics
[MC]: This is a thick-and-thin plied yarn with long shifts in colour. This ply structure is called "Flame Yarn" by Sarah Anderson on page 117 of her book The Spinner's Book of Yarn Designs: Techniques for Creating 80 Yarns [Storey, 2012].
[CC]: This is a traditional fingering-weight 3-ply yarn, created by chain plying the leftover thin singles from the Flame Yarn.
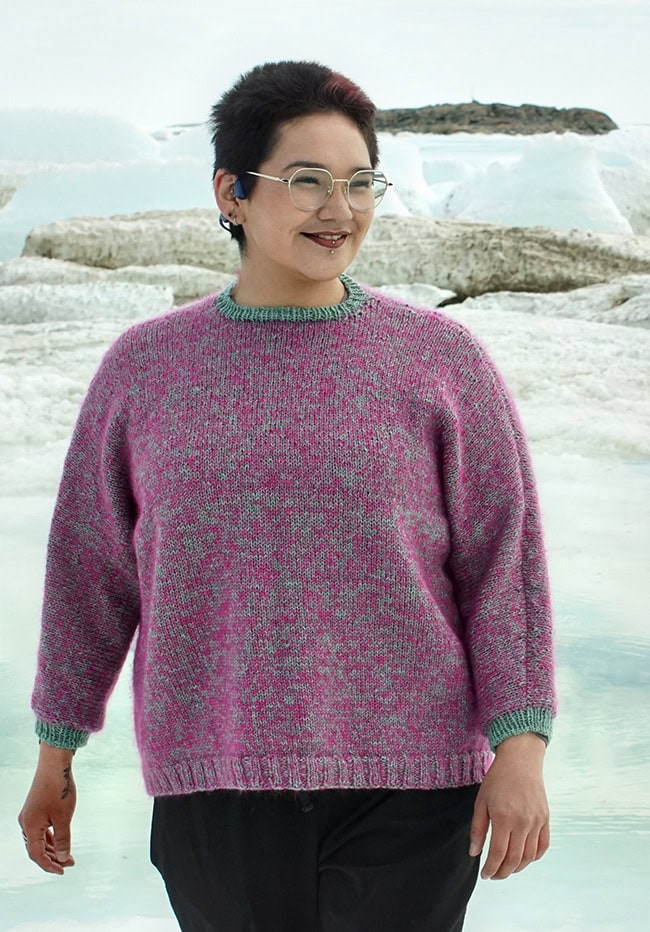
Yarn – ready to knit (pink)
[MC] Sonder Yarn Co. Sunday Morning DK [75% BFL, 25% Masham; 268yd/254m per 100g skein]; color: Breathe Easy; 4[4, 4, 4, 5, 5, 5, 5, 5] skeins
[CC] Sonder Yarn Co. Halo [72% Mohair, 28% Silk; 459yd/420m per 50g skein]; color: Free Spirit; 2[2, 3, 3, 3, 3, 3, 3, 3] skeins
Yarn Characteristics
Sunday Morning is a 2-ply worsted-spun DK-weight wool yarn. Halo is a mohair/silk cloud laceweight yarn.
Recommended needle size for both versions
[always use a needle size that gives you the gauge listed below - every knitter's gauge is unique]
2 US #8/5mm circular needle, 24-50 inches/60-100 cm 1 US #7/4.5mm circular needle, 24-50 inches/60-100 cm 1 set US #7/4.5mm needles for working small circumferences 1 spare US #8/5mm needle for three-needle bind off
Notions
2 stitch markers
yarn needle
GAUGE
16 sts/26 rounds = 4 inches/10 cm in stockinette stitch; if using commercial yarn note that both yarns are held together
Note: Aim to create a fairly open, relaxed fabric.
PATTERN NOTES
[Knitty's list of standard abbreviations and techniques can be found here.]
Construction method: The body of this pullover is worked seamlessly in the round from the hem up. After the body is complete, work is split into front and back. Sleeves are cast on and worked along with the front and back and are shaped with short rows before collar shaping. Front and back are joined with a three-needle bind off, then ribbing is added for the collar and sleeve cuffs.
Techniques:
- Cast Ons:
- For the hem of the garment, you may use a regular long tail cast on, but casting on in pattern allows the hem ribbing to extend to the very edge of the garment. Both are shown in this Long Tail Cast On tutorial.
- Sleeve cast on: use the Knitted Cast On for the RS and Purled Cast On for the WS.
- Short Rows: This pattern uses German Short Rows (video tutorial).
- Make DS (doubled stitch):
- On the right side, bring the yarn to the front of your work. Slip the next st purlwise. Tug the yarn upwards, bringing both legs of the stitch up onto the needle, and then take the yarn to the back again into knit position.
- On the wrong side, tug on the yarn upwards, bringing both legs of the stitch up onto the needle, and then take the yarn over the back of the needle and around to the front again between the needles into purl position.
- This makes a doubled stitch. When you next encounter the doubled stitch, knit or purl into both "legs" as if it's a single stitch, to "resolve" it.
- Bind Offs
- The Three Needle Bind Off (photo tutorial) joins the front and back together along shoulder and sleeves in one ste
- The Sewn Tubular Bind Off (video tutorial) works best on the collar and sleeves of this project as they create an elegant edge
- If you prefer, use a standard bind-off worked with the larger needle.
DIRECTIONS
Body
Handspun: Use MC only.
Commercial: Hold MC and CC together.
Both versions: use smaller needles to CO.
Long Tail Cast On In Pattern: (CO 2 kwise, CO 2 pwise) 40[44, 48, 52, 56, 60, 64, 68, 72] times, placing marker after 80[88, 96, 104, 112, 120, 128, 136, 144] sts to separate front and back. 160[176, 192, 208, 224, 240, 256, 272, 288] sts.
Join in the round, being careful not to twist.
Round 1: (K2, p2) around.
Repeat Round 1 9 times more.
Change to larger needles.
Round 2: K to end.
Repeat Round 2 until work is 15[15, 14.5, 14.5, 14, 14, 14, 13.5, 13.5] inches/ 38[38, 36.5, 36.5, 35.5, 35.5, 35.5, 34, 34] cm from CO edge, or desired length to armhole.
Back
Slip the last 80[88, 96, 104, 112, 120, 128, 136, 144] sts onto a spare needle or waste yarn. Continue on the remaining 80[88, 96, 104, 112, 120, 128, 136, 144] sts.
Mark for collar: Place locking stitch markers 26[30, 34, 36, 40, 44, 46, 50, 54] sts in from each end, to mark off the center 28[28, 28, 32, 32, 32, 36, 36, 36] sts for back neck opening.
Row 1 – Cast on for first sleeve [RS]: Using the yarn(s) attached to the body, with the Knitted Cast On, CO 52[52, 52, 52, 48, 50, 46, 46, 42] sts; k to end.
Row 2 – Cast on for second sleeve [WS]: Using Purled Cast On, CO 52[52, 52, 52, 48, 50, 46, 46, 42] sts; p to end. 184[192, 200, 208, 208, 220, 220, 228, 228] sts.
Work in st st until piece measures 4[4, 4.5, 4.5, 4.5, 5, 5, 5.5, 5.5] inches/ 10[10, 11.5, 11.5, 11.5, 12.5, 12.5, 14, 14] cm from sleeve cast on.
Shoulder row 1 [RS]: K to 5 sts from end, turn.
Shoulder row 2 [WS]: Make DS, p to 5 sts from end, turn.
Shoulder row 3: Make DS, k to 4 sts before DS, turn.
Shoulder row 4: Make DS, p to 4 sts before DS, turn.
Repeat Shoulder rows 3-4 a further 13[14, 15, 15, 15, 16, 16, 17, 17] times.
Next row [RS]: Make DS, k to end, knitting each DS together as one st.
Next row: P to end, purling each DS together as one st.
Leave all sts on needle.
Front
Return the remaining 80[88, 96, 104, 112, 120, 128, 136, 144] sts back to your second larger-size needle.
Mark for collar:
Place locking stitch markers 31[35, 39, 41, 45, 49, 51, 55, 59] sts from each end, to mark off the center 18[18, 18, 22, 22, 22, 26, 26, 26] sts for front neck opening.
Row 1 [RS]: using the same yarn or yarns that you used for the body and the Knitted Cast On, starting from the right cuff, pick up and knit 52[52, 52, 52, 48, 50, 46, 46, 42] sts in sleeve CO; k to end; pick up and knit 52[52, 52, 52, 48, 50, 46, 46, 42] sts in left sleeve. 184[192, 200, 208, 208, 220, 220, 228, 228] sts.
Row 2 [WS]: P to end.
Work in st st until 4[4, 4.5, 4.5, 4.5, 5, 5, 5.5, 5.5] inches/ 10[10, 11.5, 11.5, 11.5, 12.5, 12.5, 14, 14] cm from sleeve pick up.
Shoulder row 1 [RS]: K to 5 sts from end, turn.
Shoulder row 2 [WS]: Make DS, p to 5 sts from end, turn.
Shoulder Row 3: Make DS, k to 4 sts before DS, turn.
Shoulder Row 4: Make DS, p to 4 sts before DS, turn.
Repeat Shoulder Rows 3-4 a further 8[9, 10, 10, 10, 11, 11, 12, 12] times.
Row 9: Make DS, k to 2 sts before first marker, k2tog, remove marker, BO to second marker, remove marker, SSK, k to 4 sts before DS, turn. 82[86, 90, 92, 92, 98, 96, 100, 100] sts rem each side.
Row 10: Make DS, p to gap, join second ball of yarn, p to 4 sts before DS, turn.
Continue working both sides of front at the same time, using two balls of yarn.
In the instructions below, the ; is used to indicate where you will drop the first ball of yarn and start working with the second.
Next row [RS]: Make DS, k to 2 sts from gap, k2tog; SSK, k to 4 sts before DS, turn. 1 st decreased each side.
Next row: Make DS, p to gap, p to 4 sts before DS, turn.
Repeat the last two rows a further 3 times. 78[82, 86, 88, 88, 94, 92, 96, 96] sts rem on each side.
Next row: Make DS, k to gap; k to end, knitting each DS together as one st.
Next row: P to gap; p to end, purling each DS together as one st.
Join Shoulders and Sleeves
Place back and front pieces together (with RS facing each other, so you are working from the WS), with front closer to you. Using the same yarn you used for the body, work three needle bind off across 78[82, 86, 88, 88, 94, 92, 96, 96] sts to front neck opening. On back only, using regular bind off, BO 28[28, 28, 32, 32, 32, 36, 36, 36] sts. Placing back and front together again, using three needle bind off, BO remaining 78[82, 86, 88, 88, 94, 92, 96, 96] sts.
Collar
Handspun: Hold 2 strands of CC together.
Commercial: Use CC only.
Using smaller needles, starting at right shoulder seam, rejoin appropriate yarn and pick up and knit 60[60, 60, 68, 68, 68, 76, 76, 76] sts from around the collar opening as follows: 28[28, 28, 32, 32, 32, 36, 36, 36] sts along back neck, 7 sts along left front slope, 18[18, 18, 22, 22, 22, 26, 26, 26] sts along front neck, 7 sts along right front slope. Place marker and join for working in the round.
Round 1: (K1, p1) around.
Repeat Round 1 a further 4 times.
BO using the Sewn Tubular bind off method. (See pattern notes for alternate suggestions.)
Sleeve Cuffs
Handspun: Hold 2 strands of CC together.
Commercial: Use CC only.
Using smaller needles, starting at bottom sleeve seam, rejoin appropriate yarn and pick up and knit 36[36, 40, 40, 40, 44, 44, 48, 48] sts around the end of one sleeve.
Round 1: (K1, p1) around.
Repeat Round 1 a further six times, or until desired length is reached.
BO using the Sewn Tubular bind off method. (See pattern notes for alternate suggestions.)
FINISHING
Sew in all ends. Soak sweater in tepid water for at least 15 minutes; lay flat to dry. If using handspun, you may wish to stretch and pin. Leave to dry completely.
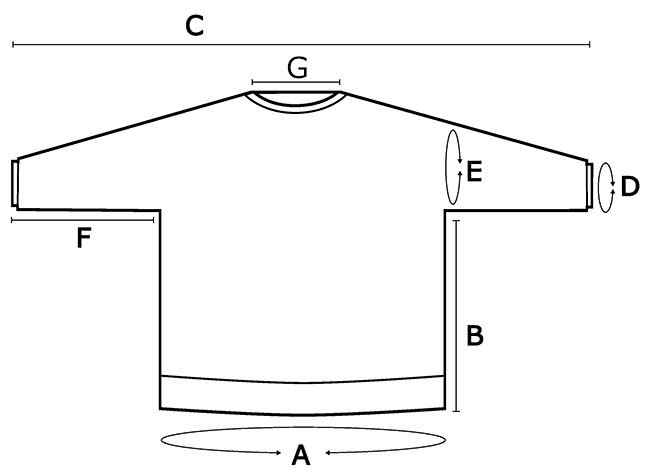
A – Chest/bust circumference: 40[44, 48, 52, 56, 60, 64, 68, 72] inches/ 101[111, 121.5, 131.5, 142, 152, 162, 172, 183] cm
B – Length from underarm to hem: 15[15, 14.5, 14.5, 14, 14, 14, 13.5, 13.5] inches/ 38[38, 36.5, 36.5, 35.5, 35.5, 35.5, 34, 34] cm
C – Wingspan: 48[50, 52, 54, 54, 57, 57, 59, 59] inches/ 122[127, 132, 137, 137, 145, 145, 150, 150] cm
D – Sleeve circumference at wrist: 8[8, 9, 9, 9, 10, 10, 11, 11] inches/ 20[20, 23, 23, 23, 25.5, 25.5, 28, 28] cm
E – Sleeve circumference at armhole: 14[14, 15, 15, 14, 16, 15, 16, 16] inches/ 35.5[35.5, 38, 38, 35.5, 40.5, 38, 40.5, 40.5] cm
F – Sleeve length: 14[14, 14, 14, 13, 13.5, 12.5, 12.5, 11.5] inches/ 35.5[35.5, 35.5, 35.5, 33, 34, 32, 32, 29] cm
G – Back neck width: 7[7, 7, 8, 8, 8, 9, 9, 9] inches/ 18[18, 18, 20.5, 20.5, 20.5, 23, 23, 23] cm
ABOUT THE DESIGNER
 Rebecca Osborn lives, makes, and writes in Ranin Inlet, Nunavut, in Arctic Canada. She writes about knitting, spinning, and life on her blog and teaches and chats about handspun with the Wool n' Spinning podcast. Her first book of knitting patterns, Migraineur, is available Amazon and on Ravelry, where you can find the rest of her pattern library.
Pattern & images © 2026 Rebecca Osborn