Rainbow Roads, a free knitting pattern from Knitty.com. Free knitting pattern for a DETAILS HERE.
INTRODUCTION
Rainbow Roads

![]()
Recently, I've had lots of time to ponder the roads and paths life has to offer us. The inevitable twists, turns, sudden stops and surprise detours. Our roads are alternately bumpy or smooth, clear or not marked out at all. Without a doubt, we're bound to lose our way and even fall down once and a while. The marvellous thing about the roads we journey is that we get to choose how we travel them and the people we want to share them with us.
Socks seem to go hand in hand with travelling. They're the perfect road trip project: small, portable and almost always a conversation starter. I've personally been needing the comfort of sock knitting while spending many hours in waiting rooms, appointments and yes, on the road. When I first started working on the Paper Moon socks, by AnneLena Mattison, I had that "ooooooh" moment when I realized that sock gussets didn't always have to be plain old stockinette. I don't know why I had never thought of it until then. It was like so many concepts that present themselves to you in the most unlikely of moments... which you promptly chastise yourself for not having realized sooner! I immediately started thinking about the myriad different ways I could treat a toe-up sock gusset. Taking the inspiration from Anne-Lena's design, my mind was off and exploring new paths and ideas.
No matter who we are or where we are in life, we all have our trails to blaze. Some of us, burning so bright, while others make their way more quietly. During our lifetimes, we'll wear through many a pair of shoes and oh so many socks. We're all on our own unique bearings, but so often our routes cross, weaving our stories and lives together. It doesn't matter how road weary we are, how dusty our soles. We'll always find a way to pick ourselves and each other up when we fall. And we'll keep moving forward together.
 photos: Carolyn Macpherson / Justus Stone
SIZE
S[M, L]
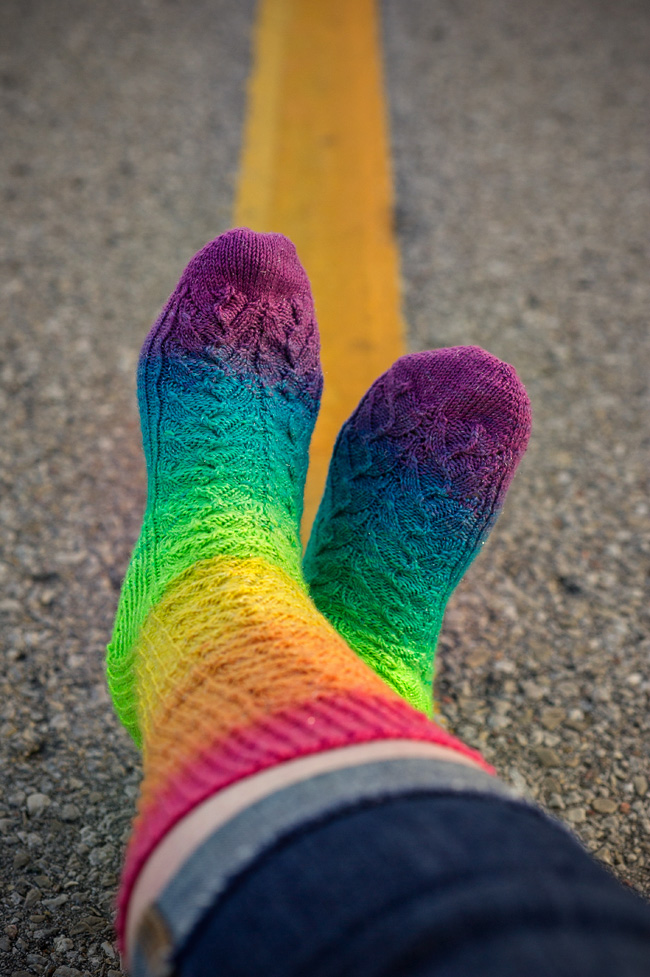
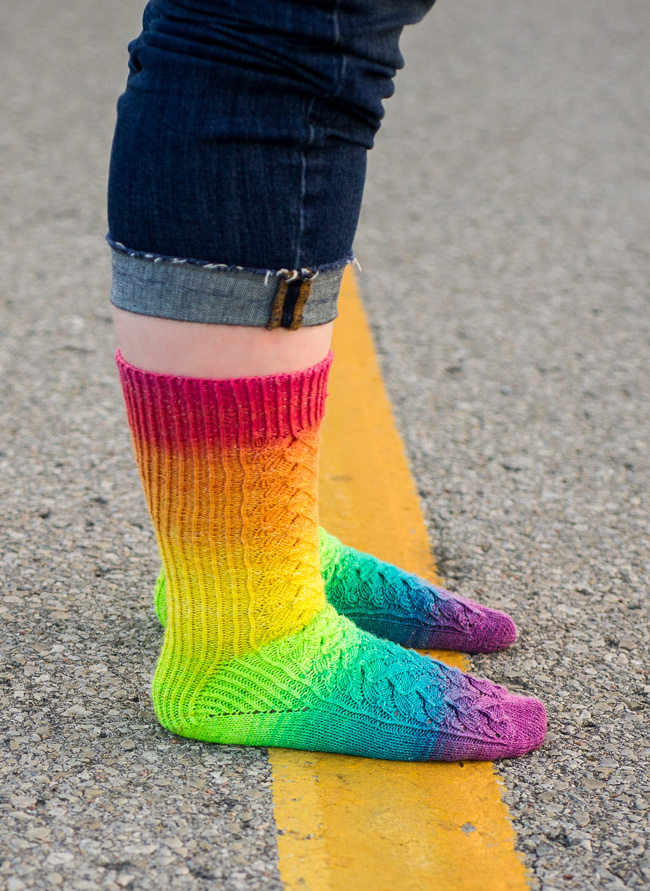
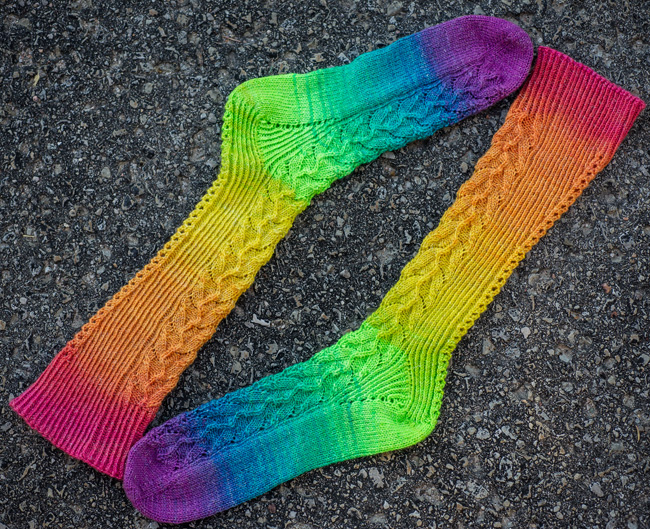
Shown in size M, on a 16 inch/40.5 cm calf with optional calf gusset.
FINISHED MEASUREMENTS
Foot circumference: 7[8, 9] inches / 18[20.5, 22.5] cm
Leg length: adjustable
Foot length: adjustable
MATERIALS
![]() Dragon Strings Phoenix Wing Gradient Shimmer [75% superwash merino, 20% nylon, 5% stellina; 438yd/400.5m per 100g skein]; color: Mirrored Rainbow; 1 skein
Dragon Strings Phoenix Wing Gradient Shimmer [75% superwash merino, 20% nylon, 5% stellina; 438yd/400.5m per 100g skein]; color: Mirrored Rainbow; 1 skein
Recommended needle size
[always use a needle size that gives you the gauge listed below - every knitter's gauge is unique]
![]() US #1/2.25mm needles for small circumference in the round: DPNs, 1 long circular for magic loop, or 2 short circulars
US #1/2.25mm needles for small circumference in the round: DPNs, 1 long circular for magic loop, or 2 short circulars
Notions
![]() cable needle
cable needle
![]() stitch markers
stitch markers
![]() yarn needle
yarn needle
GAUGE
34 sts/48 rounds = 4 inches/10 cm in stockinette stitch.
PATTERN NOTES
[Knitty's list of standard abbreviations and techniques can be found here.]
1/2 RC: Slip next 2 sts to cable needle and hold in back of work; k1 then k2 from cable needle.
1/2 LC: Slip next st to cable needle and hold in front of work; k2, then k1 from cable needle.
CDD: Centred double decrease. Slip next two stitches together as if to knit; knit 1, pass the slipped stitches over.
On Sock Leg Length:
If you wish to work the sock leg longer than the typical just-below-fullest-part of-calf-length sock, you can use the Calf Gusset chart to expand the leg circumference. Every 8 sts increased adds an inch/2.5 cm of circumference. For reference, the model has 16 inch / 40.5 cm calves and worked the calf gusset chart 6 times (approximately 4 inches/10 cm) after working the leg straight for 4.5 inches / 11 cm.
Techniques:
CHARTS
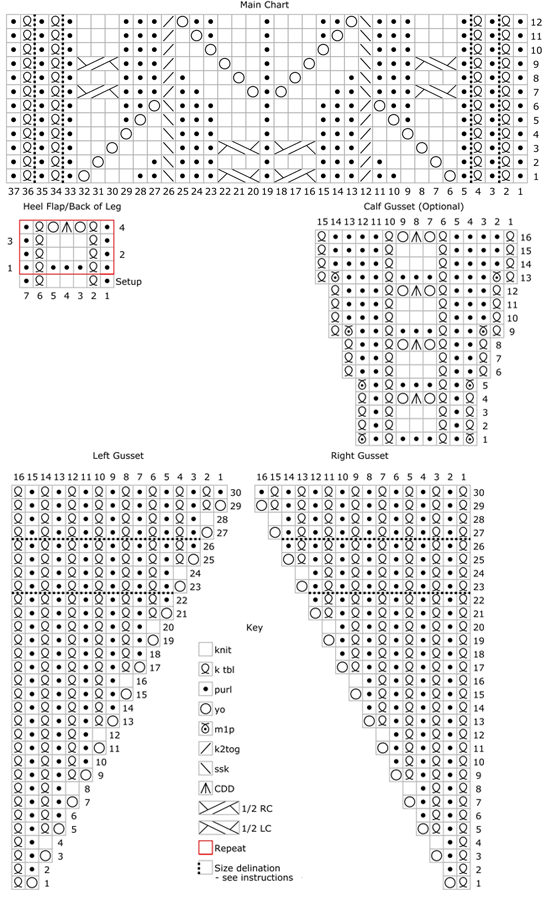
DIRECTIONS
Toe
Using Judy's Magic method, CO 20 sts.
Distribute your stitches across needles as you prefer, and join for working in the round. Place a removable stitch marker in the fabric (or just arrange your stitches) so that you can identify the halfway point of the round.
Round 1: [K1, kfb, k to 2 sts before the end of the half, kfb, k1] twice. 4 sts increased.
Round 2: Knit.
Repeat these 2 rounds 8[10, 12] more times, until there are 56[64, 72] total stitches.
On the final even round, stop 1 st before the end of the round. This is the new start of round position, and the start of the instep. The foot pattern requires 29[33, 37] sts for the instep, 27[31, 35] for sole.
Foot
Foot round: Work Main Pattern Chart across first 29[33, 37] sts of round, starting with st 5[3, 1] and ending with st 33[35, 37] ; k to end of round.
Work as set until sock foot is approximately 2.5[3, 3.5] inches/ 6.5[7.5, 9] cm short of desired length.
Gusset
Gusset round: Work main chart as set across first 29[33, 37] sts of round; work Right Gusset Chart, k 25[29, 33] , work Left Gusset Chart. 2 sts increased.
Work as set until you have completed round 22[26, 30] of the gusset chart. 78[90, 102] total sts.
Heel setup: Work next rnd of main chart across the first 29[33, 37] sts. Stop here. You will now begin working the remaining 49[57, 65] sts for the heel, in rows.
Heel Turn (All sizes)
Row 1 [RS]: (K1 tbl, p1) 6[7, 8] times, k 9[11, 13] , pm, k 7[7, 7] , pm, k 9[11, 13] , turn to work short rows (see pattern notes for link to German Short Rows tutorial).
Row 2 [WS]: Sl 1 wyif, lift yarn up and over needle, p 24[28, 32] , turn.
Row 3 [RS]: Sl 1 wyif, lift yarn up and over needle, k 22[26, 30] , turn.
Row 4 [WS]: Sl 1 wyif, lift yarn up and over needle, p 20[24, 28] , turn.
Row 5 [RS]: Sl 1 wyif, lift yarn up and over needle, k 18[22, 26] , turn.
Row 6 [WS]: Sl 1 wyif, lift yarn up and over needle, p 16[20, 24] , turn.
Row 7 [RS]: Sl 1 wyif, lift yarn up and over needle, k 14[18, 22] , turn.
Row 8 [WS]: Sl 1 wyif, lift yarn up and over needle, p 12[16, 20] , turn.
Row 9 [RS]: Sl 1 wyif, lift yarn up and over needle, k 10[14, 18] , turn.
Row 10 [WS]: Sl 1 wyif, lift yarn up and over needle, p 8[12, 16] , turn.
Small and Medium size, stop here and proceed to heel flap.
Large size only
Row 11 [RS]: Sl 1 wyif, lift yarn up and over needle, k –[-, 14] , turn.
Row 12 [WS]: Sl 1 wyif, lift yarn up and over needle, p -[-, 12] , turn.
Large size, stop here and proceed to heel flap.
Heel Flap
Row 1 [RS]: Sl 1 wyif, knit across heel working the two legs of the doubled sts together as one when you come to them, until 12[14, 16] sts rem in the heel, pm, p2tog, turn. 1 gusset st decreased.
Row 2 [WS]: Sl 1 wyif, purl across, working the German Short Row double stitches as p2tog when you come to them, until 12[14, 16] sts rem in the heel, pm, ssk, turn. 1 gusset st decreased.
Row 3 [RS]: Sl 1 wyif, sm, (p1, k1 tbl) to 1 st before next marker, p1, work Setup row of Heel/Back of Leg chart over next 7 sts, sm, (p1, k1 tbl) to 1 st before marker, p1, sm, p2tog, turn. 1 gusset st decreased.
Row 4 [WS]: Sl 1 wyif, sm, (k1, p1 tbl) to 1 st before marker, k1, sm, work row 1 of heel flap chart over next 7 sts, sm, (k1, p1 tbl) to 1 st before marker, k1, sm, ssk, turn. 1 gusset st decreased.
Repeat Rows 3-4 8[10, 12] more times, repeating Rows 1-4 of the Heel/Back of Leg Chart, until 29[33, 37] heel sts remain – 1 gusset st rems on each side.
Work Row 3 once more working a k2tog instead of the final p2tog, but do not turn. This position is the start of the instep, and the new start of round. Work instep in pattern as set. On heel sts, ssk and then continue across heel in pattern as set. Remove gusset stitch markers.
At this point you will resume working in the round. 56[64, 72] total sts.
Leg
Leg round: Work even in pattern as set – work Main chart as set across first 29[33, 37] sts; work ribbing and Heel/Back of Leg Chart across remainder of round.
Note: Heel/Back of Leg Chart is now worked in the round.
Continue until leg measures desired length:
- For a standard just-below-fullest-part of-calf-length sock, continue even in pattern until leg is desired length.
- If you wish to make the leg longer, you can work the Calf Gusset chart in place of the Heel Chart. Every 4 rounds, you add 2 stitches. Keep working the Calf Gusset increases as required, trying sock on to assess fit. When you've hit the required circumference, continue even on those stitches in pattern.
Cuff
Ribbing round: (P1, k1 tbl) around
Work ribbing as set for 2 inches/5cm, or until leg measures desired length.
Bind off using a stretchy method such as Jeny's Surprisingly Stretchy Bind Off.
FINISHING
Wash to block, and weave in ends.
ABOUT THE DESIGNER
 Always with an active imagination, Carolyn's designs contain winks and nods to popular culture, while retaining a classic sensibility. Since 2014, Carolyn has been fortunate to work with many dyers and yarn producers. Many of Carolyn's designs have been featured in such places as; Knitting Calendar 2016 and 2017, Knotions, Perth Festival of Yarn, Twist Collective and several super secret projects for upcoming knitting publications.
She is a stay at home mom, in Central Ontario, Canada where an adorable Shih-Poo keeps her feet warm and her two Autistic boys test the limits of her sanity.
You can find more of her work on Ravelry.
Pattern & images © 2018 Carolyn Macpherson