In my last
article,
I discussed the basics of plying. Sometimes,
despite best efforts, something goes wrong
during the process. Don’t despair.
Your yarn is not ruined. There are steps you
can take to correct mistakes and mishaps that
occur during plying.
I refer to tips in my previous
tutorial on plying, so peek at it if you
need clarification.
Broken single
Sometimes your single
has a spot with too little twist, which breaks
as you ply. It’s
not the end of the world. You have options.
- First check the single for any remaining
under twisted or thin spots adjacent to the
break.
- Cut off the bad part of the
single.
- Wind on until
the break is about three inches away from the
orifice.
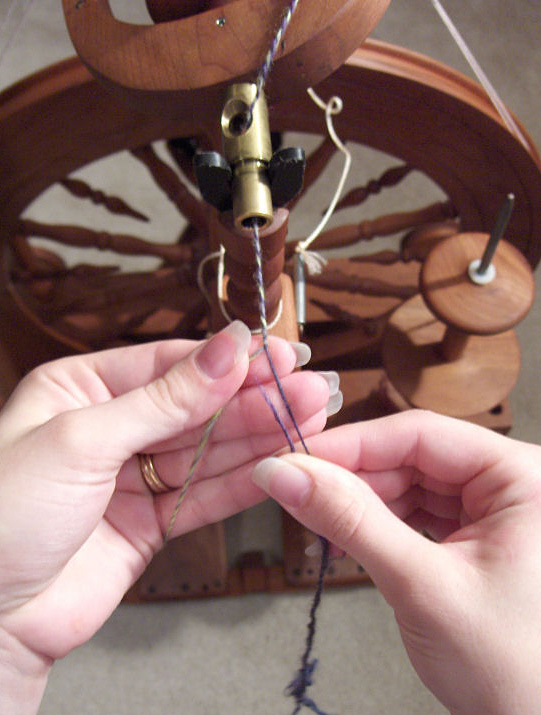
- Pinch the singles
together, 2 inches away from the break.
Pinch hard enough so no twist
gets past your hand.

- Now treadle until the yarn
has enough twist (looks like your sample) and
then treadle two or three times more. You need
a bit of over twist in the yarn in order to
splice.
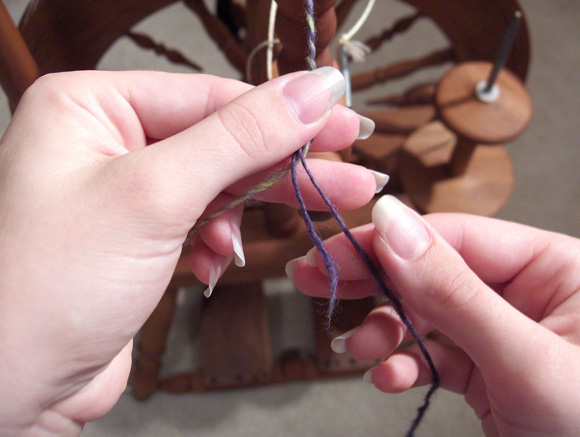
- Holding the yarn pinched in your forward
hand, place the single in between plies.
- Separate
them a bit and slide the new end in.
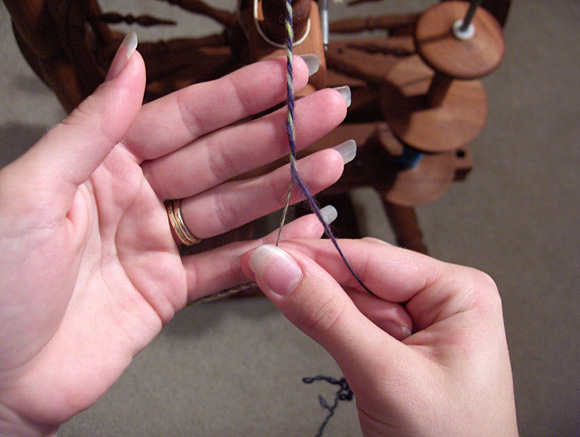
- Now slowly
release the pinch in your forward hand.

- Use your hands to guide
the twist over the break and into the yarn.
Run your hands lightly over the join to smooth.

- Position your hands and resume plying.
In order for this splice
to hold well, you’ll
need the overlap to be at least two inches long.
A shorter overlap might not have enough twist
and will pull out when tension is applied. (Yes,
you do apply tension to the yarn as you knit.
You certainly add tension to the yarn as you
stretch the knit fabric over your body when you
wear the sweater!)
Spit Splice
If you’re working with regular wool (not superwash),
you can spit splice it. Remove any portion
of bad single adjacent to the break, as described
above. Wet both ends of the yarn either with
spittle or water. Overlap the ends about 2 inches
and rub back and forth between your hands until
it felts together. Resume plying.
Spit splices are fast,
easy and convenient. They do however create
a bit of a texture slub where the join is.
Once it’s knit most
of the cosmetic flaw will be covered. Do ensure
that you’ve felted it enough, otherwise
it will pull out when you attempt to ply it in,
or even worse, when you’re knitting with
it.

Unbalanced Yarn
First off, how do you determine whether or not
your yarn is balanced? Wind your yarn into
a hank. Set the twist by submerging your skein
in hot tap water for at least five minutes
and letting it hang dry. Resist the urge to
evaluate your skein for balance without first
setting the twist. Setting the twist deactivates
the active energy in your yarn and reveals
its true nature. A hank that looks slightly
unbalanced coming directly off your wheel will
balance out after it’s soaked and dried.
I’ve found that, if a freshly plied hank
twists a half twist or less when you let it
dangle from your hand, it will balance in the
wash.
After washing and drying,
hold the hank by one end and allow it to hang
freely. A balanced yarn will not twist – it
will hang in an open circle. An unbalanced
yarn will twist either to the right or to the
left. (Note the direction of the twist.)
If you have significant
over twist, here are some options for “treating” the
problem. Each description lists the benefits
and any drawbacks of the method.
Weighted Twist Setting: Pop the skein
in hot water for at least five minutes. Then
hang the hank to dry. Weight the bottom of the
hank to pull the twist out of the yarn. I use
the straight pant hangers, loaded down with clean,
empty glass jars in a grocery bag so I can adjust
the amount of weight.
This will pull out significant
overtwist, but the drawback is that it stretches
the yarn. You will need to wet block anything
made from the yarn or the finished item may
shrink significantly when washed. This works
well for novelty yarns or items that don’t
need to be washed.
Soak
and Slap: Place
the skein in hot water for at least five minutes.
Gently twist to remove excess water. Go someplace
like your shower, outside, wash room, etc. Grab
one end of the hank and smack it repeatedly
onto a surface or wall. Repeat with the other
end of the hank. Hang to dry.
This encourages the twist
to distribute along the length of the hank.
It’s easy to do – the
only drawback is that it may not completely balance
your yarn if it’s significantly over spun. It’s
hard to tell unless you try!
Re-spin: You
can re-spin the yarn in the opposite direction. If
you didn’t
note the direction of the overtwist before,
do so now. You’ll need to wind your yarn
into a ball again, for ease in spinning. Use
your largest whorl for re-spinning – it’s
very easy to put too much twist into the yarn
as you re-spin, and end up worse off than you
were in the first place. Adjust your tension
so that the yarn draws in very quickly.
If your hank twists to
the right, you’ll
want to spin it with your wheel spinning to the
left. If your hank twists to the left, spin it
to the right. Start treadling, and allow
the wheel to pull the yarn in rapidly, much faster
than when you are spinning or plying. You don’t
want to overspin the yarn in the opposite direction.
Re-spin the entire hank. Evaluate the hank as
before, and then go from there. You can re-spin
as many times as is necessary until you get it
perfect. Just remember that if you have a half
twist or less of overtwist, the skein will balance
when you set the twist.

Any combination of the above troubleshooting
tips can be used to fix your skeins. Be sure
to set the twist after each fix, so that you
are starting with an accurate assessment of the
yarn.
Remember, there really
is no bad yarn, just yarn with unintended characteristics.
Problem skeins that bias can be used as a slanted
design element in your knitting. It also felts
wonderfully…I’ve
done it myself. Once your yarn stays together,
it’s really up to you how “perfect” you
want it to be. |

