| 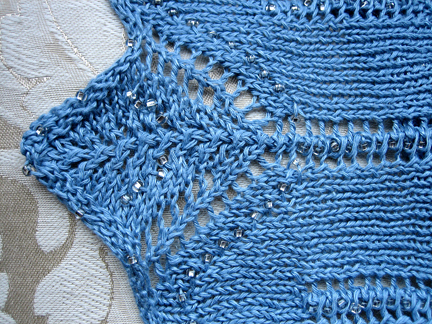  I
don't know about you, but I was a happy and
contented knitter before I knew about beads.
Many times I could be found following patterns
word for word, knitting late into the night
without hardly a thought of tweaking or fiddling
with the thing. All that changed when I started
to design my own knitting. Shortly after, beads
came into my life, two events which I can never
regard as coincidental. I
don't know about you, but I was a happy and
contented knitter before I knew about beads.
Many times I could be found following patterns
word for word, knitting late into the night
without hardly a thought of tweaking or fiddling
with the thing. All that changed when I started
to design my own knitting. Shortly after, beads
came into my life, two events which I can never
regard as coincidental.
Now I can't
even think about knitting anything
without wondering where I can manage
to throw in some beads. I have been
throroughly seduced by beads. I hope
that by the end of this article, you
will be hot and bothered too. Before
long, bead stores will become potential
treasure troves that call you in seductively
and put all kinds of ideas into your
head. Yes, beads are another addiction,
but so what? Bead stashes don't take
anything near the room that yarn stashes
do!
  Many
knitters are intimidated by beads, thinking
that they need to be expert knitters to even
try, or that beads are super fiddly to use with
yarn. This may be because they have seen those
tiny, elaborately beaded vintage purses and
other items that are indeed marvels of knitting
expertise and probably intense eyestrain. But
you don't need fine yarn and tiny beads to have
sparkles in your knitting. You can put beads
into anything you knit, once you find the right
size bead to fit on your yarn. Many
knitters are intimidated by beads, thinking
that they need to be expert knitters to even
try, or that beads are super fiddly to use with
yarn. This may be because they have seen those
tiny, elaborately beaded vintage purses and
other items that are indeed marvels of knitting
expertise and probably intense eyestrain. But
you don't need fine yarn and tiny beads to have
sparkles in your knitting. You can put beads
into anything you knit, once you find the right
size bead to fit on your yarn.
Beads 101 - What every
knitter needs to know about beads
Knitters who
walk into bead stores for the first
time may be awed by the plethora of
bead types, colors and sizes. Here
is a quick guide for the non-initiated.
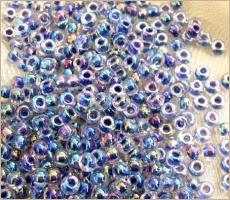
Beads come
in different sizes that will fit on
different weight yarns. Seed beads,
which are the most commonly used beads
for knitting, are measured in numbers
like 3, 6, 8, or 10. Size 6 (indicated
like this: 6/0) will fit easily on
fingering or sportweight yarn. The
higher the number, the smaller the
bead. The number relates to how many
beads fit into a certain measured
length.
 |
|
|
Beads are also classified by
millimeter size. 6/0 seed beads are about the same diameter
as 4 millimeter (mm) beads. But there is one main difference
-- the size of the hole. Seed beads have a much bigger
hole, which makes them better for knitting. 4 mm beads,
which may be made of glass, ceramic, semi-precious stone
or even plastic, will generally have a smaller hole.
So get your beads wherever you can -- I love scrounging
for them in odd places! But before you plan on using
them for a knitting project, string a few onto your
yarn to make sure the hole is the right size. It can
be a real bummer to get your beads home and find that
they won't go onto your yarn without a struggle.
When you go into a bead store,
you will find that beads come in all types and sizes
of containers, which will vary from store to store.
Some stores sell beads in sealed packets or bags,
some in vials that look like pill bottles, and some
threaded on string and hung together in hanks.
To give you an idea of how
many beads you are buying by weight, there are about
13,440 6/0 seed beads per kilogram (2.2 pounds for
you non-metric folks), or 270 per 20 grams. Beads
on hanks are usually sold by count, i.e. 50, 100,
or 1,000 beads. So, if you are making a beaded shawl
that calls for 1,500 6/0 beads, for example, you would
need to buy about 120 grams of beads, or about 4-1/3
ounces.
I am giving you very rough
estimates here, which brings me to an important point.
Always buy more beads than you think you will need.
Seed beads, at least the commonly found ones from
Czechoslovakia, contain some irregularities and you
can expect a few duds in every package. If you can
find seed beads from Japan, they will be near perfect,
but usually more expensive as well. Hey...in beads
as in most other things, you get what you pay for.
How do you get the
beads knitted into the yarn?
This is where
the fun starts. There are two main
methods, with lots of variations for
each one. Basically, beads are either
strung onto your yarn before you start
knitting or hooked onto stitches with
a crochet hook as you go. There are
lots of variations for either method,
and knitters can be opinionated about
which is the "right" way.
My feeling is that any way you can
imagine beads going in, around, or
onto yarn is a good way to try. Let's
face it guys, we are still in the
experimental stage of learning what
is possible to do with beads and yarn.
Knitting with beads is still very
much in its infancy, and it is entirely
possible to imagine ways to knit with
beads that no one has ever thought
of before!
That said,
here are some basic techniques that
have worked well for myself and many
other knitters.
  Slipping
pre-strung beads into place as you
knit Slipping
pre-strung beads into place as you
knit
The most common
way to knit beads into fabric is to
start by stringing them onto your
yarn and slipping them into place
as you knit.
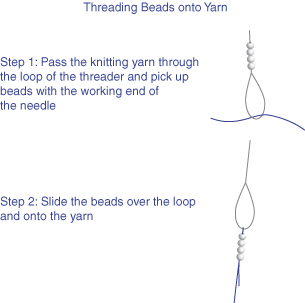
I like to use dental floss
threaders for stringing because they are cheap and
easy to find in drug stores. Dental floss threaders
are what people use to thread floss around their braces
and bridges. It is semi-rigid plastic and is made
up of an open loop and a "joined" part,
and it acts as a big-eyed needle.
To use it for threading beads
onto yarn, pass the knitting yarn through the loop
of the threader and pick up beads with the working
end of the "needle". Then slide the beads
over the loop and onto the yarn.
Here's one easy way
to knit with pre-strung beads:
1) On the right side
of the work, knit to the stitch where you are
going to place the bead.
2) Bring your
yarn to the front and slip the next stitch purlwise.
3) Slip a bead
as close as possible to the right hand needle.
4)
Bring your yarn to the back and continue knitting,
leaving the bead in front of the slipped stitch.
This results
in beads that float in front of slipped
stitches on the right side of the
knitted fabric.
My example
uses knit stitches, but you could
just as easily be purling, or for
that matter, slipping the beads into
place from the wrong side of your
work. Slipped beads can lie in front
(or in back) of a slipped stitch,
sit between stitches, or be knitted
into the legs of the stitches themselves.
Your imagination is the only limit
with this technique.
  Hooking
beads as you go Hooking
beads as you go
Hooking beads
onto individual stitches "as
you go" is an outstanding method
for those who hate to take the time
and trouble to string loads of beads
onto yarn before starting to knit.
It is also great for spontaneous or
accent beading, and also for yarns
that are too delicate for the punishing
strain that results from carrying
a heavy length of pre-strung beads
on the yarn. Beads are hooked on with
a crochet hook small enough to fit
through the hole of your beads. I
have written many of my beaded knitting
patterns using this technique and
it remains my personal favorite.
Hooking beads
onto stitches with a small crochet
hook does not require juggling skills,
although it may seem that way the
first few times you try it. Since
this method is so easy to learn from
watching a demonstration, and so difficult
to learn from words, here is a blow-by-blow
description of my hooking method as
it has evolved through hooking thousands
of beads:
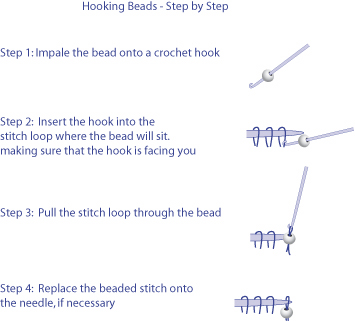
1) Impale
the bead onto a crochet hook small
enough to fit through the hole of
your bead.
2) Insert
the hook into the stitch loop where
the bead will sit, making sure that
the hook is facing you.
3) Pull
the loop through the bead.
4)
Replace the stitch loop onto the left
needle if necessary.
People are
usually a bit afraid that they will
drop the stitch when they try this
technique. Be aware that the stitch
loop does not need to come off the
needle at all for the bead to go on.
Even if it does come off the needle,
as long as the loop has the crochet
hook in proximity, you should be safe
from it slipping into oblivion. And
once the bead is seated securely on
the loop, it isn't going anywhere.
Once you feel secure about the process,
you will no doubt be taking all sorts
of liberties (like I do).
Everyone goes
through a period of discomfort when
learning a new skill. If you try the
hooking technique, please don't get
discouraged if you can't seem to get
it the first time. Just persist and
and you will be a hooker in no time.
Use your imagination
Don't stop
with the above two techniques. Here
are a few more, just to spark your
imagination.
1. String
beads on and slide one between every
two or three cast on stitches. I used
this one in my design Variations
on a Frill to add weight to the
edges of this very open, lacy stole.
You can try this with bind offs too,
but it may look a little different.
I am sure you can come up with many
variations of this one if you play
around with the possibilities.
2. Leave increasing
(or decreasing) numbers of beads between
select stitches across the row, creating
swags of beads that can hang very
attractively off the bottom edge of
a piece. Many knitted beaded purses
have been made with this technique,
and I used it on my Beaded Drawstring
Purse pattern.
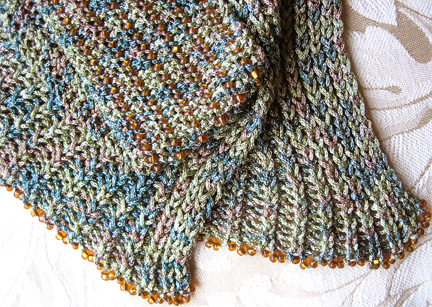
3. Hook beads
onto picot edges for a really easy
and attention-getting finish for scarves
and shawls. This is especially nice
on the edges of Moebius scarves as
it highlights the crossing point.
Jazz it up without
knitting a stitch
You can also
add beads to your knitting without
knitting a stitch. A couple of possibilities
are sewing beads onto your finished
knitted items and attaching beaded
fringe or tassels. This is great for
beads that are too big or heavy to
be knitted in, or beads that are too
small for your yarn. Beads are wonderful
embellishments in any form. Every
item you make will be totally unique
with the added magic of beads.
More sources of inspiration
There are
quite a few designers (myself among
them) who are designing with beads.
Look for patterns in your local yarn
store or on the internet.
One online store, earthfaire,
specializes in beads, yarn, patterns, and kits for
beaded knitting. Ellen Sandin, owner, is constantly
adding new items to her repertoire. A great place
to start with beads, especially if you don't have
a bead store in your vicinity. Earthfaire carries
the finest Miyuki beads from Japan.
Look in beading
magazines for ideas and new techniques
to steal over to the knitting camp.
All's fair in art and craft!
|

