First amendments:
altering length in a knitting
pattern
There's nothing
like a technical article to make
something sound more complicated
than it really is.
You're planning
to knit a sweater, but looking
at the finished dimensions it
seems that by following the instructions
as written, the sweater will come
up a little short on your body,
or perhaps a little long. You
might conclude that the solution
is to add (or subtract) enough
rows of knitting from (or to)
the pattern to make the sweater
the right length, and that no
further thought is required. And
assuming that your sweater is
knit from bottom to top, or top
to bottom, that's absolutely right.
But when the
design incorporates shaping, textural
stitch patterns, or colourwork,
adding or subtracting rows might
not be quite as straightforward
at it seems. What if the length
alteration interrupts a cable
repetition? What if it cuts into
a band of Fair Isle patterning?
There might be placement issues:
where is the adjustment actually
needed? In the upper body, above
the waist, or below the waist?
There might be shaping issues:
how should increases or decreases
be respaced? Are there any consequential
amendments that need to be made
to other pieces that are joined
on to the lengthened/shortened
piece?
And maybe you
only need extra length in a certain
area, and not an overall length
alteration is needed at all. Sometimes,
adding an inch or two of length
is used as a panacea for other
fitting or style problems. (This
is true of adding width, too.)
If you find that your sweater
fronts ride up too much compared
to the back, the solution isn't
necessarily to add length all
around; the solution might be
short row bust (or belly!) shaping
instead.
So here, we'll
take the long, analytical approach
to length alterations, which we
can summarize in four deceptively
simple questions:
- How much
length do you need to add/subtract?
- Where do
you need to add/subtract it?
- How can you
add/subtract this length while
causing the least disruption
to the design?
- Do any other
pieces need to be altered as
a result of this addition/subtraction?
We're not really
addressing significant alterations
that affect the overall style
of the garment. For example, you
might be working from a pattern
for a waist-length jacket that
you want to lengthen to fingertip
length -- that's a more substantial
alteration that will affect the
look of the jacket, and perhaps
skew the balance of the design.
Here, we're talking about length
alterations that are intended
to preserve the original style,
but keep a wrist-length sleeve
from becoming an unintentional
bracelet-length sleeve.
In this article,
we'll address the first two questions.
The next two, we'll save for next
time.

How
much length do you need to add/subtract?
Determining
how much length to insert or take
away is relatively simple: given
that you likely already know what
your preferred overall garment
and sleeve lengths are, compare
them to the pattern's finished
dimensions and do some simple
math.
Your preferred
lengths: When it comes to
preferred body length, you probably
have a series of preferred lengths
that you know you're comfortable
with and look good on you: one
for loose, casual sweaters and
cardigans, one for tight-fitting
tops, one for close-fitting, dressy
sweaters, and so on. This doesn't
mean that you've got these lengths
committed to memory. It means
that you're aware that different
styles of clothing look best at
different lengths, and that you're
not fixated on making every
single pullover or cardigan you
knit the same length.
As part of this
awareness, you're probably cognizant
of the fact that in tops with
waist shaping, the proper location
of the waist shaping depends on
the location of your natural waist
-- the indentation between your
ribcage and your hips (or at least,
the place where you'd put your
hands if you were asked to put
your hands around your waist).
If you find that you need to lengthen
or shorten a pattern with waist
shaping, the location of that
indentation may be important to
know.
The vertical
location is usually expressed
in sizing charts as your back
waist length, which is measured
along the back between the base
of the back of your neck and your
waist. To find the base of your
neck, tilt your head forward slightly,
and feel for the most prominent
bone jutting out of your spine.
That measurement isn't quite a
true vertical measurement because
the spine is naturally curved,
but for the purpose of most hand
knitted items, it's close enough.
For some individuals with rounded
shoulders or a hunch, the difference
between the back waist measurement
and the true vertical may be more
significant.
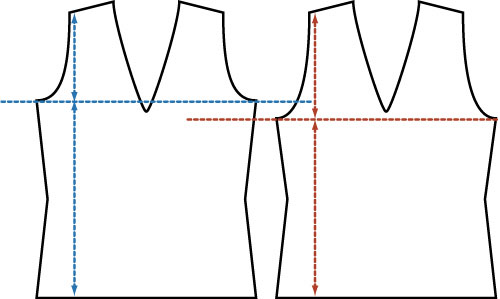
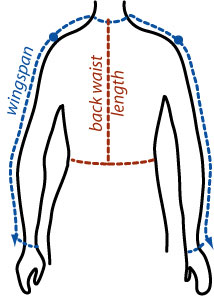 |
| The back
waist length (red) and the
wingspan (blue). The wingspan
can be broken up into two
sleeve lengths, plus the upper
body (cross-back) measurement. |
When measuring
for a full-length sleeve, make
sure that in addition to knowing
your ideal sleeve length for a
set-in sleeve (from the shoulder
joint to the wrist, with the elbow
slightly bent), you also know
your wingspan: the distance from
wrist to wrist, with elbows slightly
bent, along the shoulder and across
the back of the neck. Knowing
your preferred upper body width,
shoulder to shoulder, as well
as your set-in sleeve length,
is effectively the same thing.
The pattern's
finished dimensions: Ideally,
the relevant dimensions of each
garment piece -- front, back,
sleeves -- are provided in schematic
form. If they aren't, you'll have
to follow the pattern instructions
for your size and count the number
of rows worked, and do a spot
of math to calculate final lengths.
Either way, make sure that you
take any welting, ribbing, or
other hem treatment into account.
When taking the length of the
sleeve, also determine the width
of the upper body of the garment.
When determining
the length of the garment pieces,
keep a couple points in mind:
If you sew,
you might be accustomed to measuring
a scalloped or similarly shaped
hem from its highest point. In
knitting, because most lengths
are measured in terms of the number
of rows worked, changes are that
the length of the garment is reported
based on the distance to the lowest
point. In many cases, that won't
make a significant difference;
however, if the scallops or crenellations
are particularly deep or wide,
you may want to make sure that
the "shallow" portions are the
right length. For example, if
a full-length sleeve ends with
a scalloped edge, you will probably
want to estimate the pattern length
from the inner edge of the scallops,
not the outer edge.
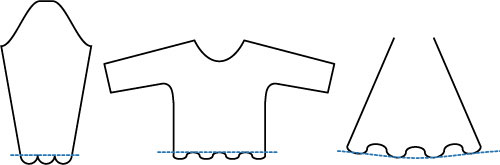 |
| When the
hem is shaped, make sure that
both the minimum length and
the maximum lengths are in
the right neighborhood. For
a long sleeve, the inner (upper)
edge of a scalloped hem should
match your preferred long
sleeve length -- don't measure
from the outer edge, or else
your sleeve may "feel" short.
But for a long skirt, make
sure that the outer (lower)
edge of the hem is still short
enough to avoid dragging on
the floor. |
Also, knitting
patterns often provide finished
garment lengths measured from
the top of the shoulder, and sometimes
from the top of the armscye. Frequently,
those numbers do correspond to
the base of the neckline, but
sometimes they don't. This means
that if you simply compare your
conventional back waist length
to the pattern's reported garment
length, you might mistakenly think
that the garment will hang lower
on your body than it would in
real life. For example, a knitting
pattern for a waist-length jacket
might claim to have a finished
length of 15 inches. If that 15
inches is measured from the top
of the shoulder to the hem, then
it will actually end above
the waist on a person with a back
waist length of 15 inches. We
frequently ignore this discrepancy
in hand knitting, because of the
overall fit of hand knitted garments
-- that length difference is often
unimportant.
So, there are
three ways to address this discrepancy:
either ignore it and assume that
your back waist length and the
garment length are "close enough";
or estimate your shoulder "depth",
from the top of the shoulder next
to the neck to a point at the
same depth as the base of the
back neck and add this to your
back waist length, or when determining
the length of the garment, estimate
where the base of the back neck
would lie and make your measurement
from that point.
With those caveats
in mind, the comparison of the
pattern dimensions to your preferred
lengths should be quite easy.
For the body length, compare one
of the two sets of numbers:
- your actual
back waist length vs. the length
of the garment measured from
the base of the neck, according
to the pattern
- your actual
back waist length + shoulder
depth vs. the length of the
garment measured from the top
of the shoulder, according to
the pattern
The difference
is the amount by which the pattern
must be lengthened or shortened.
For the sleeve
length, compare:
- your preferred
wingspan measurement (sleeve
length + upper body width +
sleeve length) vs. the wingspan
measurement of the pattern.
The difference
is twice the amount by which the
pattern must be lengthened or
shortened. Half of that difference
must be added or subtracted from
each sleeve. For example, if the
pattern wingspan is 60 inches,
but your actual wingspan measurement
is only 57 inches from wrist to
wrist, then you'll need to subtract
1.5 inches from the length of
each sleeve.
However, if
the sleeve is a set-in sleeve,
the length alteration that must
be made to the sleeve may be affected
by any necessary alterations to
the body -- see the discussion
below about determining where
length should be added or subtracted.
Where
do you need to add/subtract these
extra rows?
This is where
the actual shape of the
garment pieces is relevant.
Altering
the body length: If the body
is an unshaped rectangle without
an armscye (drop shoulder style),
then subject to texture or colour
pattern repeat issues, the extra
length can be added or removed
anywhere from the hem up to the
neck shaping.
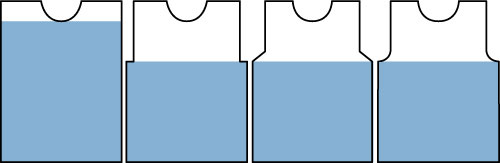 |
| In a plain,
rectangular body, you can
add or subtract length anywhere
below the neck shaping (blue
area) without affecting the
overall shape of the garment.
If the rectangular body has
an armhole indentation or
similar shaping (pretty much
any more or less rectangular
shape, other than a plain
drop shoulder), then the length
can be added or subtracted
easily anywhere between the
hem and the beginning of the
armscye area. |
If the body
is generally rectangular with
no waist shaping but with an armhole
indentation, as in a modified
drop shoulder or even a raglan
style, then chances are the armscye
is appropriately sized to accommodate
the body and requires no adjustment.
Typically, the fit of the entire
garment is loose, and a slightly
oversized armscye won't make much
of a difference. The length adjustment
can therefore be made anywhere
between the hem and the beginning
of the armscye shaping. This makes
the alteration easier: altering
in the armscye region would require
an alteration to the sleeve width.
Altering body
length between the hem and the
armscye also follows for dolman
styles and set-in styles. For
dolman styles, the fit at the
shoulder joint is loose, so small
adjustments would not make a noticeable
difference in fit. For set-in
styles, the armscye depth is usually
appropriately sized already, and
while individuals vary in back
waist length measurements, that
variation can be accounted for
by altering the length below the
armscye. On rare occasions, the
set-in sleeve armscye may be tight
and binding, requiring a length
adjustment to increase the armscye
depth, or a width adjustment to
make a bigger armhole. In that
case, the overall length of the
body will be affected, so consequential
alterations to the rest of the
body length may be necessary.
 |
| There are
circumstances in which precise
fit counts, and the armscye
depth may need to be adjusted.
If the armscye is made deeper,
as in the diagram to the right,
then the rest of the body
will need to be shortened
to preserve the overall length.
|
If the body
has waist shaping, however, you
might want to consider how your
body's vertical measurements deviate
from the vertical measurements
in the pattern. Depending on your
body shape, you might want to
add or subtract your rows above
or below the waist indentation.
If you're especially
long-waisted (have a longer than
average back waist length measurement)
and you've determined that you
need to add length to the garment
body, you might want to insert
your extra rows between the waist
and the beginning of the armscye
rather than at the hem. Similarly,
if you're noticeably short-waisted
and you find that you need to
shorten the garment body, you
might want to subtract those unnecessary
rows above the waist. But if the
back waist length of the pattern
matches your own back waist length,
then that length alteration would
be more appropriate between the
waist and the hem. In knitting
patterns, the indentation at the
waist is often an inch or two
wide. This means that a minor
length alteration might not adversely
impact the overall positioning
of the indentation, so you can
get away with making the length
alteration at the hem, which is
often easier.
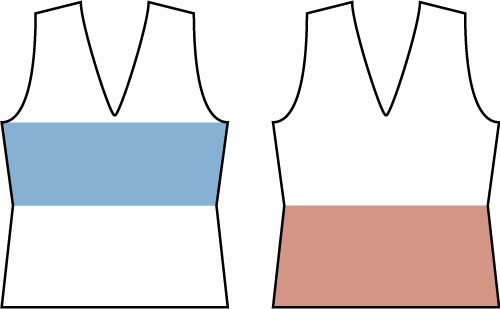 |
| When a garment
has waist shaping, make sure
that the length alteration
keeps the waist indentation
around your own waist. For
a significant long-waisted
or short-waisted alteration,
consider making the length
adjustment above the waist
(blue area). If your back
waist length matches the pattern's,
then the length adjustment
is made below the waist (red
area). |
Altering
the sleeve length: While
you may have determined the total
length to be added or subtracted
to the wingspan, that translates
directly to a sleeve length alteration
only if the upper body
width does not need to be altered.
In the case
of a garment without a set-in
sleeve, such as a drop shoulder
pullover, the upper body width
will likely be broader than your
actual, preferred, upper body
width, and no adjustment would
be made to the upper body width.
Differences between the pattern
wingspan and your preferred wingspan
measurement will be adjusted in
the sleeve length, as described
earlier; half of the wingspan
differential will be added or
subtracted to each sleeve.
In the case
of a set-in sleeve, you should
first determine whether the upper
body width is appropriate; if
it is, then any length adjustment
that needs to be made should be
made in the sleeves. If the upper
body width in the pattern needs
to be adjusted (which is actually
a width alteration, not a length
alteration), then this may impact
the sleeve length alteration.
So, you'll also need to compare:
- your preferred
upper body measurement (shoulder
to shoulder) vs. the upper body
measurement of the pattern
These should
be approximately the same in a
close- or slim-fitting style,
not taking into account any selvedge
stitches that would be worked
into the armscye seam. In some
classic-fitting or casual styles,
the armscye seam may not ride
exactly at the shoulder point,
but may fall slightly lower on
the arm -- but not by very much,
no more than about half an inch
depending on the thickness of
the fabric. If the upper body
measurements in a set-in sleeve
style differ significantly, then
the pattern should be altered
to bring this measurement in line
with your preferred size. This
might be done by choosing a different
pattern size, but it may also
be done by altering the width
of the body.
If the width
of the body is altered in order
to broaden or narrow the pattern's
upper body measurement, then this
will affect the total wingspan
measurement of the pattern: after
alteration, check again to make
sure that the pattern wingspan
matches your preferred wingspan
measurement. If it still doesn't
match, then the sleeves will have
to be shortened or lengthened
by half of the difference
in wingspan measurements. Just
as in the example described earlier,
a wingspan difference of 3 inches
translates to a length alteration
of 1.5 inches on either sleeve.
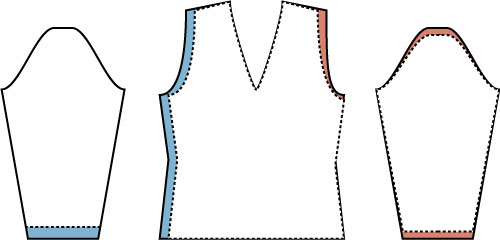 |
| In a long-sleeved,
set-in sleeve style, not only
should the pattern and body
wingspan measurements match,
but also the pattern and actual
upper body measurements. If
the upper body width is altered,
then a length alteration may
be required in the sleeves;
the nature of the alteration
will depend on whether the
armscye shape is affected
or not. On the left, the armscye
shape is preserved; any length
adjustment can be done below
the sleeve cap (e.g., at the
cuff). At right, the armscye
shape was altered; adjustment
may be necessary at the cap,
as well as below the sleeve
cap. |
Whether the
sleeve is a set-in style or not,
the length adjustment will be
made somewhere between the hem
and the beginning of the sleeve
cap shaping, not in the sleeve
cap itself. The sleeve cap shaping
will only be adjusted if the armscye
itself is altered.
Next
issue: Altering length and minimizing
design interruptions, and consequential
amendments