 Striped
Waist Band
Striped
Waist Band
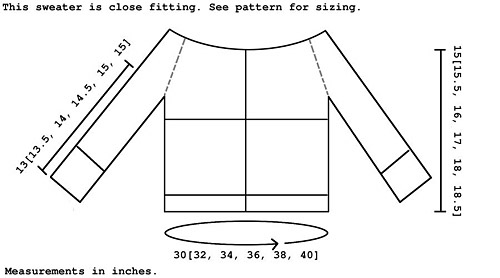
With MC, CO 32 [32, 34, 34, 36, 36] sts.
Set-up Row: [K1, p1] to last 2 sts, k2.
Row 1 [WS]: Switch to CC, k1, p to last
st, k1.
Row 2 [RS]: K all sts.
Row 3 [WS]: Switch to MC, k1, p to last
st, k1.
Row 4 [RS]: K all sts.
Work these four rows until work
measures 28 [30, 32, 34, 36, 38] inches, ending
with Row 3.
Next Row: [K1, p1] to
last 2 sts, k2. BO all sts.
Upper Body
Using MC and with RS facing, pick up and k 132 [140,
148, 156, 168, 176] sts evenly along one long edge
of waist band.
Row 1[WS]: K2, p31[33, 35, 37, 40, 42],
place marker, p66[70, 74, 78, 84, 88], place marker,
p to last 2 sts, k2.
Row 2 [RS]: [K to 1 st before marker,
m1, k1, slip marker, k1, m1] twice, k to end. 136[144,
152, 160, 172, 180] sts.
Cont in St st with 2 garter sts at each end of row,
until work measures 9 [9.5, 10, 10.5, 11, 11.5]
inches INCLUDING width of striped band, ending with
a RS row.
FITTING NOTE: The top edge
of the striped waist band should rest right along
the bottom band of your bra while the top of your
work reaches your underarms, where the sleeves will
join the main body. Depending on the length of your
torso and your cup size, you may want to add or
subtract a few rows from this upper body section.
Next Row [WS]: K2, [p
to 3 [3, 3, 4, 4, 4] sts before marker, BO 6[6,
6, 8, 8, 8] sts] twice, p to last 2 sts, k2. Place
all sts on st holder or spare needle. Do not break
yarn.
Striped Cuff
Bands (Make 2)
With MC, CO 20 sts.
Work as for Striped Waist Band until work measures
8[8.5, 9, 10, 11, 12] inches.
BO all sts.
Sleeves
Using MC and with RS facing, pick up and k 36[38,
40, 45, 50, 54] sts evenly along one long edge of
cuff band.
Work in St st until work measure 4 inches from beg
of MC section, ending with a WS row.
FITTING NOTE: This pattern
is for three-quarter length sleeves. If you would
like the sleeves to be longer, add more rows here
before sleeve shaping begins.
*Increase Row: Work 2 sts, m1,
work to last 2 sts, m1, work 2 sts.
Work 7[5, 4, 4, 3, 3] rows even.
Rep from * 3[5, 6, 7, 8, 9] times more. 44 [50,
54, 61, 68, 74] sts
Cont in St st until work measures 9[9.5, 10, 10.5,
11, 11] inches from beg of MC section.
BO 3[3, 3, 4, 4, 4] sts at beg and end of next row.
Place rem 38[44, 48, 53, 60, 66] sts on holders
or spare circular needles. Break yarn, leaving long
tail for sewing sleeve seams.
Yoke
With RS facing, k across sts of right front of body,
place marker, k across sts of one sleeve, place
marker, k across sts of back of body, place marker,
k across sts of one sleeve, place marker, k across
sts of left front of body. 200[220, 236, 250, 276,
296] sts.
Cont in St st with edge sts as set, work 1[1, 3,
3, 1, 1] row even.
FITTING NOTE: If you have
a larger cup size or want more coverage, you may
want to add a small number of plain rows here before
starting the raglan shaping. Just be sure to end
on a WS row.
Raglan Decrease Row [RS]:
[K to 3 sts before marker, ssk, k1, slip marker,
k1, k2tog] 4 times, k to end of row.
Sizes XS, M, L, XL, and
XXL Only: Repeat Raglan Decrease Row
every 4[_, 2, 2, 2, 2] rows 6[_, 10, 11, 14, 15]
times more, ending on the last Decrease Row. 144[_,
148, 154, 156, 168] sts rem.
Size S only:
Repeat Raglan Decrease Row every 4 rows
4 times more, then every 2 rows 4 times, ending
on the last Decrease Row. 148 sts rem.
Sizes XS and S only:
Next Row [WS]: K19[21], [k2tog, k19] 5 times, k2tog,
k18[20]. 138[142] sts rem.
P 1 row.
FITTING NOTE: If you have
broad/narrow shoulders or simply want a better fit,
try on the sweater while you are working the raglan
decreases to see how the sweater fits. (Slip the
stitches to a longer circular needle or a long piece
of yarn first, to avoid dropping sts.) If the neckline
is too wide, you can try working an extra row with
a few decreases evenly distributed before you move
on to the ribbing. If the neck line is way too wide,
try adding an extra raglan decrease row (or several)
in between the existing decrease rows, or try adding
another set of raglan repeat rows after working
the ones in the pattern. (e.g. If the pattern calls
for "repeat 10 more times", try repeating
11or 12 times instead.) If the neckline is too narrow,
try replacing the last raglan decrease row with
a plain knit row, or rip back several rows and add
more plain stockinette rows between the last few
decrease rows.
Neckline
Ribbing
Row 1 [RS]: K2[2, 3, 2, 3, 3], [k2, p2]
to last 4[4, 5, 4, 5, 5] sts, k to end.
Row 2: K2[2, 3, 2, 3, 3], [p2, k2] to last
4[4, 5, 4, 5, 5] sts, p2, k2[2, 3, 2, 3, 3].
Rep Row 1 once more.
BO all sts in patt.
Bottom Hem
Ribbing
Using MC and with RS facing, pick up and k 132 [140,
148, 156, 168, 176] sts evenly along bottom edge
of waist band.
Row 1 [WS]: K1, [p2, k2] to last 2 sts,
p2, k1.
Row 2 [RS]: K3, [p2, k2] to last st, k1.
Rep these 2 rows until ribbing measures 2 inches.
BO all sts in patt.