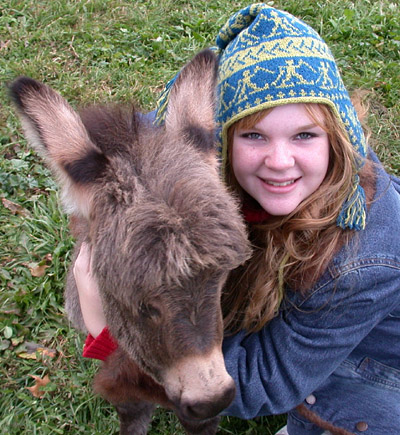
With MC and US #2/2.75mm dpns,
CO 36 sts (9 sts on each of 4 needles).
Join to begin working in the round, being careful
not to twist. Place marker or safety pin on first
st. (Carry this first st marker throughout.)
Rnds 1-8: K all sts using
MC.
Rnd 9: [K1, m1, k2, m1] around. 60 sts
(15 sts on each needle)
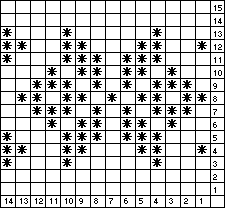
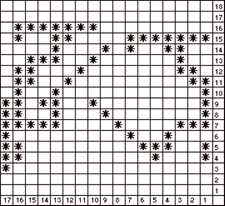
Cont following charts, increasing
as instructed.
MC is represented by blank squares.
CC is represented by asterisks.
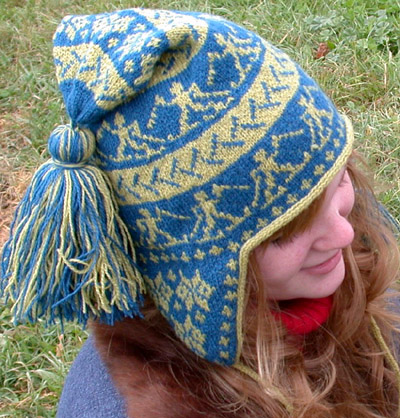
| Chart A -- Right Track |
Chart
B -- Large Snowflake |
Chart C -- Left Track |
|
|
|
Work Rows 1-10 of Chart
A. Chart A will be repeated
10 times around the hat.
On Chart A Row
11, work increases as follows: [K2, m1, k3,
m1] around. 84 sts (21 sts on each needle)
Work Rows
1-14 of Chart B. Chart
B will be repeated 6 times around the hat.
On Chart B Row 15,
work increases as follows: [K3, m1, k4, m1] around.
108 sts (27 sts on each needle)
Work Rows 1-10 of Chart
C. Chart C will be repeated
18 times around the hat.
On Chart C Row 11, work
increases as follows: [(K4, m1) 6 times, k3, m1]
around. 136 sts (34 sts on each needle)
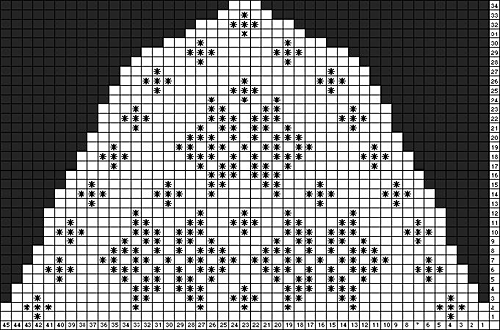
| Chart D -- Right Skier |
Chart E -- Left Skier |
Chart F --
Small
Snowflake |
|
|
|
Work Rows
1-17 of Chart D. Chart
D will be repeated 8 times around the hat.
On Chart D Row 18, work
increases as follows: [K3, m1, k4, m1] to last 3
sts, k3. 174 sts
(Sts distributed as follows: 43 sts on first and
third needles, 44 sts on second and fourth needles.)
Work 10 rows of Chart
A again. This time, Chart A
will be repeated 29 times around the hat.
On Chart A Row 11, work
increases as follows: [K13, m1] to last 5 sts, k5.
187 sts
(Sts distributed as follows: 47 sts on first, second,
and third needles, 46 sts on fourth needle.)
Work Rows 1-17 of
Chart E. Chart E will
be repeated 11 times around the hat.
On Chart E Row 18, work
decreases as follows: [K24, k2tog] to last 5 sts,
k5. 180 sts.
45 sts on each needle
Work Rows 1-6 of Chart
F. Chart F will be repeated 45 times around
the hat.
The body of the hat is complete.
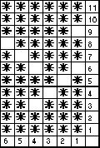
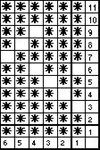
Ear Flap Chart
Ear Flaps
Leaving 5 inch tails, break off both yarns.
Rearrange sts as follows:
Place last 22 sts of round on needle with first
23 sts of round. 45 sts on needle. This becomes
needle #1.
Place 45 sts on each of 3 needles. The needle opposite
needle #1 becomes needle #3.
Ear flaps are worked on needles #2 and #4.|
With RS facing, rejoin yarns to right end of sts
on needle #2.
Work ear flap back and forth, following Ear Flap
Chart.
Odd-numbered rows are knit, and even-numbered rows
are purled.
Work decreases as indicated, 1 st in from edge.
For example, work Row 3 as follows: K1,
k2tog, work foll chart to last 3 sts, ssk, k1. Where
a row shows that 2 sts have been decreased, work
decreases as foll: K1, k3tog, work to end of row
foll chart, k3togtbl, k1.
Leave rem sts on hold on needle
or st holder.
Work Applied
I-cord
Using smaller dpn, pick up (DO NOT pick up and
knit) 30 sts along back edge of right ear flap,
NOT including 3 sts on hold.
Using larger needle and CC, CO 3 sts
Slide these sts back to the right end of the needle,
pulling the yarn from the third st around the back
of the sts, knit st 1 and 2, yarn over, knit st
3 and the first st picked up from the ear flap together,
pass the yarn over this third st.
[Slip the three sts on your right hand needle back
to the left needle, bring the yarn coming from the
3rd stitch around the back of the work, knit sts
1 and 2, yarn over, knit stitch 3 together with
the next stitch on the ear flap, pass the YO over
the st just worked.] Repeat this step until all
picked up sts have been worked.
Continue in this manner along the back edge of the
hat [incorporating the live sts from needle #1],
down the back side of the other ear flap [picking
up 30 sts here] down to and including the 3 sts
at the bottom of the ear flap.
You'll now have 3 sts on your needle. Slide them
back to the right hand of the needle, and k a simple
I-cord to make your under the chin ties.
Note: As this hat has ear flaps, these
ties don't have to be too long! I suggest you leave
these sts on hold and work the ties after
all applied I-cord has been completed.
Work applied I-cord up the front of the left ear
flap, across the front of the hat, down the front
of the right ear flap, and continue down to make
a short tie on this ear flap. Judge how long to
make your ties by the amount of yarn you have left.
(I only had a very small amount of yarn left when
I'd finished my hat.)
Finish the I-cord ties by breaking off the yarn
leaving a 5" tail.
Draw this yarn through the 3 live I-cord sts, tie,
then push it up through the center of the I-cord
for a couple of inches -- bring it to the outside
and cut off.
Give it a little tug to hide the cut edge back into
the I-cord tie.