|
By
Shannon Okey
Looking
for a new challenge? Bored with commercial yarn? Do
you have sheep or other fur-bearing animals around
the house? You're a handspinner waiting to happen.
Like knitting, it's not nearly as difficult as
it appears to the novice, but you can spend years
perfecting complicated techniques while conquering
exotic fibers, dyes and different types of spindles
or wheels along the way.
This
article will address the basics as I know them.
I started to spin last year, and my experience
is based on an Ashford Kiwi wheel with sheep
fleece. I will take you through the first project
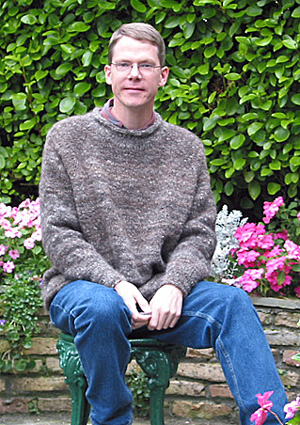
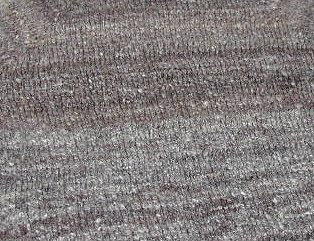
I made [a handspun, handknit pullover] and explain
the terminology, equipment, and methods.
The
first decision to make was "spindle or
wheel?" You can learn to spin very inexpensively
using what's called a drop spindle. A wood spindle
costs around $20, or you can make
your own with an old CD. Interweave Press
offers an article about beginning handspindling
called Low
Tech, High Satisfaction on their site.
Being
the impatient sort, I knew a spinning wheel
would allow me to meet the ambitious timeline
I'd given myself for my first project. There
are as many types of wheels as there are spinners,
and you're really only constrained by cost.
After searching for a used wheel online at The
Fiber Equipment and Barter Page, I ended
up with an Ashford
Kiwi. Ashford is a family-run company in
New Zealand, and they have half a million satisfied
customers worldwide. The Kiwi is a great beginner's
wheel, and I'm really pleased with mine. Schacht
and Louet are other well-known wheel manufacturers;
ask around if you're thinking of buying your
own.
If
you like fairytales, you'll love the names of
a spinning wheel's components. There are maidens,
footmen, Lazy Kates, the mother-of-all and distaffs,
among others. Check out The Woolery's article
on choosing
a wheel for illustrations of these parts.
  After
you've chosen your wheel or spindle, you'll need fiber.
Most beginning spinners choose sheep's wool, because
it is the most forgiving of error and easiest to handle.
My teacher, Lucy Lee of Mind's
Eye Yarns, helped me pick out a fleece from a
sheep named Eddie at Rivercroft Farm in Starks, ME.
This project became known as The Eddie Sweater for
that reason [see right, modelled by my friend Lee].
Lucy recommended a Romney fleece [Romney is one type
of sheep, others include Merino, Corriedale, Lincoln
and Shetland] because it has a long staple length.
Staple length refers to the length of the individual
fibers. Longer is better when you are first learning
to spin because it is easier to draft without breaking
your single every few feet. [Don't worry; explanation
to follow]. After
you've chosen your wheel or spindle, you'll need fiber.
Most beginning spinners choose sheep's wool, because
it is the most forgiving of error and easiest to handle.
My teacher, Lucy Lee of Mind's
Eye Yarns, helped me pick out a fleece from a
sheep named Eddie at Rivercroft Farm in Starks, ME.
This project became known as The Eddie Sweater for
that reason [see right, modelled by my friend Lee].
Lucy recommended a Romney fleece [Romney is one type
of sheep, others include Merino, Corriedale, Lincoln
and Shetland] because it has a long staple length.
Staple length refers to the length of the individual
fibers. Longer is better when you are first learning
to spin because it is easier to draft without breaking
your single every few feet. [Don't worry; explanation
to follow].
When
you buy a raw fleece, a good farm or supplier will
have skirted it, or removed the dirtiest, most matted
pieces along the edges. A fleece is quite large [I've
made 2 sweaters from Eddie's so far], weighing
anywhere from 4 to 10 pounds. Good fleece is expensive,
but compared to finished yarn, quite reasonable, not
to mention absolutely unique! You can expect to pay
at least $5 per pound and up.
Before
you get started, you'll need to wash the fleece.
Surprise! In addition to their skin's natural
lanolin and other oils, sheep sweat. They sweat
a lot, actually. And there will be dust and
dirt on even the cleanest fleece. Although I've
read many articles that suggest using dishwashing
soap, I took Lucy's advice and used human shampoo.
Those economy bottles of lavender-scented Suave
are great!
Like
washing a finished wool sweater, you never want to
alternate between hot and cold water, or you will
be learning to felt instead! In this context, felting
is bad. Felting intentionally tangles fibers and that's
not what we're trying to do.
Basic
fleece-washing rules include:
-
Choose
either hot or cold water and stick with it. I'd
go with hot. It should be hot enough to be uncomfortable,
but not so hot you burn yourself. You also need
to maintain the temperature, so be prepared to
work quickly.
-
Put
in a good amount of shampoo, but not so much you
end up rinsing the fleece 10 times. Take out too
much of the natural oils and the fleece becomes
more difficult to spin.
-
Don't
crowd the fleece. I wash it in my bathtub, and
one whole fleece was divided into at least 8 sections.
-
When
the water is ready, float the fleece on top of
the water and push it under gently. Don't
agitate the fleece, you'll inadvertently
felt it!
-
Lift
out sections of fleece with a wooden spoon
handle or similar and employ Shannon's Lazy
Method of Drying. Let gravity do the work:
on your balcony rail or a wooden clothes
rack, drape individual segments of fleece
you've scooped out [they'll look
like long locks of hair] and leave them
until dry. A sunny windy day is best. Added
bonus: less carding! If there's a little
soap left on the wool, that's ok.
Carding
is the next step. Carding aligns all the fibers in
one direction and fluffs them to make drafting easier.
There are different methods and different tools for
carding, including combs, hand-cranked/electronic
carders and carding paddles. I use paddles. If you've
used Shannon's Lazy Method of Drying, you might
not need to card much. As the water drips out of the
drying locks, it pulls the fibers in one direction
and, if you're careful, you can draft straight
from a dried section. Otherwise, take a piece of your
clean, dry fleece [it must be completely dry —
don't forget wool's amazing ability to hold
water] and "charge" a paddle by draping
pieces of fleece in one direction. You'll then
take the other paddle and gently swipe across the
fibers, aligning them in one direction. When everything
is fluffy and aligned, pull the fiber off and put
it aside. Sometimes you'll need to pick apart
stubborn individual locks with your fingers. When
I first started to card, I had a tendency to over-card.
You don't want to beat the fibers into submission,
just make them presentable.
Now
you have a giant pile of clean, wooly puffballs. It's
time to spin! After attaching a leader, or
starter piece of yarn, to your bobbin, and pulling
it through the orifice, you wrap the edge of a puffball
around the leader, pinch it and start to work the
treadles with your feet. Most spinners spin clockwise
and ply counter-clockwise. As the fiber starts to
wrap around the leader, you begin to draft. Drafting
is pulling fiber out with your free hand from the
puffball so it can twist itself into the yarn that
is beginning to wind onto the bobbin. If you're
right-handed like me, you'll hold the puffball
on your left, guide the forming yarn with your left
hand, and pull with your right. Sometimes you really
need to give the fiber a good tug -- it's easy
to be too tentative at first. What you are making
now is called a single.
When
you have two bobbins filled with single-ply yarn,
you can make a double-ply yarn by putting your bobbins
on something called a "Lazy
Kate" and attaching the ends to a leader
on a new bobbin. Plying makes a more balanced yarn,
particularly for beginners who have a tendency to
over-twist their singles [me included!]. When plying,
you treadle in the reverse direction -- usually counterclockwise.
As the two singles wrap together, you pull them forward
with your free hand [guiding with your left, pulling
with your right for a right-hander] and allow them
to wind on to the bobbin.
Niddy-noddy
time! When you've made a bobbinful of yarn, this
strange implement helps you turn it into familiar-looking
skeins. By wrapping the yarn from the bobbin onto
the niddy, you create a large loop in a small amount
of space, which is then tied in sections and removed
by sliding it off one "shoulder" of the
niddy.
Stop
and beam with pride. It's your first skein!
This
isn't Superwash from the yarn store. Before
knitting with your new yarn, you should wash
it. It can shrink anywhere from 10-25%, and
wouldn't that be a terrible surprise the first
time you washed whatever you make from it! I
stuck with shampoo, but "plain soap"
is also recommended [see the The
Alden Amos Big Book of Handspinning for
recipes and extensive details, but don't use
laundry detergent: too many chemicals and brighteners].
Here's the fun part. You've got a dripping skein
in your hand and don't feel like standing there
all day. Whack it against your shower wall,
or go outside [my aunt's birdfeeder got pummeled
the day I was there!]. Not only will you forcefully
remove some of the water, but Lucy says this
also helps set the twist. Hang to dry, and ball
as usual.
  Something
I learned while making the Eddie sweater is
that your yarn's gauge will likely change as
you continue to spin. Before committing to a
project, try to make enough yarn to complete
it. I didn't follow this advice, but had excellent
beginner's luck. Despite overtwisted yarn that
made the top of my sweater start to slant on
a bias, it compensated as I continued to knit,
and the finished object is just perfect. Using
a top-down circular needle pattern helped, too
- in this case, Knitting
Pure & Simple #9724. Another method
is to alternate yarn from different skeins as
you go along. Something
I learned while making the Eddie sweater is
that your yarn's gauge will likely change as
you continue to spin. Before committing to a
project, try to make enough yarn to complete
it. I didn't follow this advice, but had excellent
beginner's luck. Despite overtwisted yarn that
made the top of my sweater start to slant on
a bias, it compensated as I continued to knit,
and the finished object is just perfect. Using
a top-down circular needle pattern helped, too
- in this case, Knitting
Pure & Simple #9724. Another method
is to alternate yarn from different skeins as
you go along.
Now
knit yourself something beautiful! For more
information, check out the open directory guide
to handspinning, SpinOff magazine from Interweave Press or my
knitting website. I plan to grow and process
a dye garden this summer — stay tuned for
more adventures!
|

