Repeat these last two
rows until all the stitches have been worked.
The right side will be facing. Knit 1 row
on all stitches. For the mathematically
inclined, the number of stitches you have
now is x/6+2, rounded up to an even number.
On your 48-stitch sock, that's 10. On the
32-stitch sock, that's 8.
5. Shape the Gusset
If you put half of your
stitches on a holder in step 3, return them
to a needle. You've now got the instep stitches
on one needle, and the remaining heel stitches
on a second, with two selvedge edges between
them. You're going to pick up stitches along
those edges to form the gusset. On each
side, you'll be picking up the same number
of stitches as you have on the heel needle.
Kate:
you need to specify where each needle begins
and ends in this section: for example, "Knit
the remaining heel stitches with a new needle.
With that same needle, along the first side..."
or whatever. can you please clarify? also,
do you have pictures of where to pick up
the stitches?
Knit the remaining heel
stitches. Along the first side, using the
loops created when you slipped the stitches
in step 3, pick up the required number of
stitches.
Knit across the instep
stitches. Then pick up the required number
of stitches on the other side. Then knit
half of the stitches on the heel needle.
You will again have a
complete round, with the centre of the round
at the centre of the heel. Knit a single
round, knitting into the back of the picked
up stitches.
6. Decrease the Gusset
On the very next round,
work a decrease round:
Decrease Round
Needle 1: Knit to last three stitches,
k2tog, k1
Needle 2: Knit even
Needle 3: K1, SKP, knit to end of needle
Alternate decrease rounds
and even rounds until you're back to X,
the number of stitches you cast on originally.
7. Foot
Once you're back to the
original number of stitches, X, knit until
the foot of the sock measures 2 inches less
than the length of the actual foot that
will be wearing the sock.
8. Decrease for the toe
Decrease round
Work the next round as a decrease round
as described in step 6.
Work the following round even.
Alternate decrease rounds and even rounds
until you've got 8 stitches left.
9. Finish
There as many ways to
finish a sock as there are to make one.
Which method you choose is a matter of taste,
skill and patience.
You can reduce the toe
down to 8 stitches and do a two-needle bind-off.
Or reduce down to 4 stitches,
cut the yarn leaving a long tail, thread
this tail on a yarn needle and pull the
thread through the 4 stitches, pulling them
tight.
Or cast off both sides
and sew them together.
The neat and tidy prefer
grafting, also known as Kitchener stitch,
for a seamless toe.
See Teresa's
excellent article in the Summer 2004
issue of Knitty.
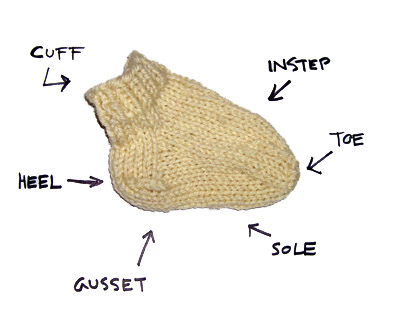
Yarns for Sock Making
Wool and Blends
Wool is absolutely the best choice for sock
knitting. It's breathable, comfortable and
durable, with a bit of natural "give"
to help with the fit. It also feels nice
running through your fingers.
Most commercial
sock yarns are a wool and nylon blend, spun
very tightly, and machine washable. The
spin and the nylon add to the wearability.
A non-sock-specific yarn can be used, but
will not wear as long.
Cotton
Cotton feels and looks great, but
doesn't always have the give or durability
you want for socks. If you do want to use
cotton, choose a purpose-built sock yarn,
like Lang Jawoll Cotton Superwash or Cascade
Fixation. These are both blends of cotton
with other fibres.
Acrylic and Other Synthetics
Only for kids, and even then, only
if absolutely necessary. Synthetic yarns
don't breathe and the resulting socks can
get very sweaty and smelly. Synthetics also
don't have much flexibility or give.
The only exception to
this rule is for special effects yarn. I've
seen some marvellous things done with furry
and eyelash yarn used in the cuff.
Weights
"Proper" sock
yarn gauge is 28 or 30 stitches across 4
inches/10cm on 2-3mm needles. If you want
to be able to wear your socks in your everyday
shoes, you'll need to use one of these yarns.
Don't be afraid. It may seem like a lot
of stitches to work to fit around your foot,
but it's still fewer than the sleeve of
the average adult-sized sweater.
Self-patterning Yarns
Marvellous!
Stripes, Fair-Isle like patterning, random
fun shapes and areas. The ball band will
have a picture of what you can roughly expect.
There are lots on the market; some popular
brands include Lang Jawoll,
Regia, Fortissima, and Koigu.
Getting Fancy
Ribbing Alternatives
The ribbing on the cuff
is there for the fit -- to create stretch
to fit around the ankle and leg. It's entirely
flexible. Have fun with it.
Other ribbing patterns
work nicely: 2x2, 3x3, or odd combinations
like 3x1. Even combinations of ribs (e.g.
2x2) do have more stretch.
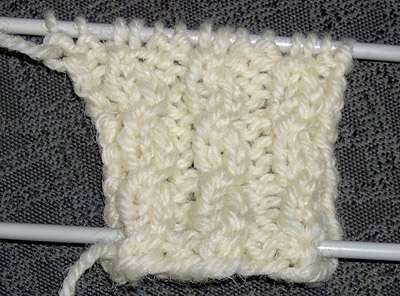
The mock cable rib looks
very sophisticated, and is easy to do. It's
a 4 row repeat, on a multiple of 4 stitches
plus 2.
Row
1, RS: *P2, skip 1 st and k into 2nd stitch,
then k into first st and slip both off the
needle; repeat from *, end p2
Row 2: K2 p2 rib across
Row 3: P2 k2 rib across
Row 4: K2 p2 rib across
isn't
this knit in the round? if so, are the instructions
above correct?
And if you want a loose,
slouchy sock skip the ribbing entirely.
Stockinette stitch will curl a bit at the
top.
Try 3 or 4 rounds of stockinette
stitch before the ribbing, for a sock with
a rolled top that still stays up.
Pattern stitches
Heel Stitch
A commonly used stitch
pattern for the heel rows (not the turned
part, just the initial rows of the heel),
this provides a layer of reinforcement.
On right side rows, slip
1 knit 1 across the row.
On wrong side rows, slip
the first stitch, and purl the rest.
Body Patterns
Pretty much anything goes
in the body of the sock itself. The only
real guideline is that the sole should be
a simple stockinette stitch, for comfort.
Combinations of knit and
purl stitches on a stockinette stitch background
create textural interest. Rounds in reverse
stockinette stitch (that is, purl) provide
a striping effect against a stockinette
stitch background. Try a single round of
purl every 5 or 10 knit rounds for stripes.
Cable and lace patterns
are both very effective and attractive in
sock designs. Check your favourite knitting
stitch book for ideas. Be inspired by other
knitted garments. I've seen very effective
socks with basketweave patterns in the cuff
and on the instep. Look up some traditional
gansey patterns -- they're designed specifically
for knitting in the round.
Colour work
Horizontal stripes
are easy -- make them as wide or as narrow
as you'd like. Try irregular stripe widths
for a bit of visual variety.
Vertical stripes
are just about as simple, and provide the
wonderful side effect of lining the socks
with an extra layer of yarn for thickness
and warmth. To create vertical stripes in
stockinette stitch, simply work with two
different coloured yarns and alternate the
yarns for every other stitch.
To create vertical stripes
in ribbing, cast on using two different
yarns at the same time, alternating yarns.
Then work k1 p1 ribbing, alternating the
yarns in same order as the cast on. You'll
get the "up" ribs in one colour,
and the "down" ribs in the other.
The ribbing on these Turkish style socks
(a variation of pattern the Socks: Spin-off
pattern book) done in 2 colours.
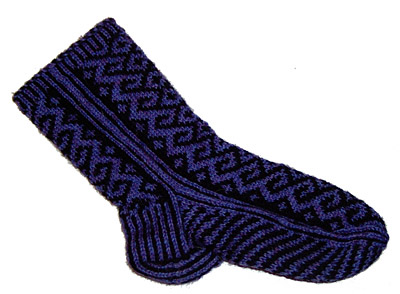
Fair Isle Socks
lend themselves very well to Fair Isle style
colour work; that is, using two or more
colours at the same time across the entire
row. Fair Isle typically features small,
repeating motifs or patterns across the
row. Vertical stripes are the simplest possible
form of Fair-Isle colour work. All Fair
Isle knitting has an extra layer of yarn
on the wrong side (the strands) and creating
a warmer and comfier sock. My favourite
pair of hand-made socks feature a simple
houndstooth pattern, done with a stranded
Fair Isle technique.
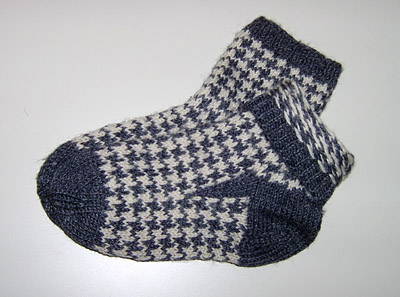
In the picture, I've turned
down the cuff of one of the socks so you
can see the stranding.
Intarsia -- colour
knitted in separate, usually large, blocks
-- cannot be done in the round. Think of
all those sweaters with ducks or dogs or
tractors or cartoon characters on them.
Intarsia designs can be
done on socks, but they must be constructed
entirely differently. It requires knitting
socks flat on two needles and then sewing
them up. Although a popular method of sock
knitting, it's not as neat and requires
post-knitting construction -- the sewing
up. Whether you prefer sewing or knitting
in the round is entirely a personal decision.
For me, the less time spent sewing up the
better.
Kate:
please note -- it is possible, although
fiddly, to work colour blocks in the round.
See for example Mary Thomas's description
of "festive knitting"; Priscilla
Gibson-Roberts in Knitting in the Old Way.
Can you revise the paragraph above?
Problems?
Twisted stitches
Always stop after you've completed
a couple of rounds of the cuff and check
to see if the knitting is twisted. Always.
There is no fix for this, so the sooner
you check, the better.
Ladders
You may notice looser stitches
occurring at the break between two needles
-- these are called ladders. A number of
things help fix this problem:
-keeping the two working
needles -- that is, the one you're knitting
stitches from, and the one you're knitting
them onto -- above the others, and keep
the left needle above the right.
-pulling the yarn extra
tight when working the stitches at the end
and beginning of a needle.
-practice
Too Tight Cast-on?
Cast on using larger needles,
or cast on over two needles held together.
Other stretchy cast-on
techniques include the Twisted German, and
Channel Island techniques. Check your favourite
reference book.
The "Jogless
Jog"
When knitting vertical
stripes, you'll notice that something strange
happens at the beginning and end of the
round: the stripes never line up. This is
not unique to hand knitting. I've got a
pair of commercial knitted socks with narrow
stripes, and the jog is clearly visible.

Meg Swansen developed
an excellent method to disguise the color
jog, described in detail in an article in
Knitters Magazine issue 45, Winter 1996.
There's a great summary and pictures available
at www.socknitters.com/kickback/joglessjog.htm.
More Resources
Books
Folk Socks, Nancy Bush,
Interweave Press, 1994
Socks: A Spin-Off Special
Publication for Knitters and Spinners, Interweave
Press, 1994
Vogue Knitting, Pantheon
Books
Vogue Knitting On the
Go Socks!, Butterick Publishing Company,
1998
Pattern Booklets
Stahl Socka Series, Stahl
Wolle
Paton's has many booklets
with sock patterns, including:
Pull Up Your Socks!
Classics in Kroy
Cool Weather Accessories
Happy Feet
Winter Warmth
Online
There are thousands of
websites with information about knitting
in general, and about sock knitting specifically.
These are a handful of my favourites.
www.woolworks.org
-- specifically www.woolworks.org/patterns/joanssocks.txt,
which is one of the better beginner sock
patterns, done with 2 strands of a worsted
weight yarn
www.needletrax.com/mysocks.htm
- features a few free patterns and an Excel
spreadsheet that calculates a complete sock
pattern for you, based on gauge and ankle
circumference.
www.socknitters.com
-- answers your every question, including
www.socknitters.com/kickback/joglessjog.html
and http://www.socknitters.com/lessons/lessons.html
for hints on grafting
www.knitty.com
- check the archive: there are sock patterns
in the Winter 2002, Spring 2003, Summer
2003, Spring 2004 issues.