Frankenknits will explore some approaches
-- both conventional and unconventional
-- that can breathe new life into
your old stuff: That sweater at the
back of your closet that you somehow
love but never wear. The thriftshop
coat that is almost cool. The "bad
idea" garment in a really great
yarn.
It will involve chopping things
up, ripping things out -- possibly
even power tools! Creating new from
old in a mad scientist way that's
almost always quick, inexpensive.
and lets you be the genius
behind the monster. Re-purposing tired
garments. Re-using yarns. Using up
those terrific bits of yarn that are
too short for any from-scratch project
but too long to simply throw away.
Some of these things may be hand knit
(by you or someone else), but other
projects will involve ready-made garments
that need a little knitterly love
before you're ready to trot them out
on the runway.
Frankenknits will also give you
a chance to show your evil genius.
Be inspired, then send
us a snapshot of your finished
project. We'll share a few of our
favorites.
This month's topic: Duplicate stitch.
Also called Swiss darning. Also called
"how to look like you've taken
the master's class in intarsia when
you can't even really purl unless
you're in a well-lighted room with
your chakras freshly aligned".
Indeed, truth be told, you don't even
need to know how to knit to do this
project, but it will help you become
a better knitter (more on that later).
So say you want to monogram your
sweater. Or you want a row of duckies
marching across a baby blanket. Or
you want fuzzy multicolored polka-dots
on your scarf. you could map it out
on a chart and knit it in with intarsia
as you go. True intarsia is gorgeous
and lovely and knitters should be
doing more of it. But it can involve
having lots of daunting tangly strings
and bobbins hanging off the back of
your knitting. And a fair amount of
forethought, patience and knitterly
skill. But say you were hoping to
have "I heart Knitty" emblazoned
across your chest before next week.
Duplicate stitch is your ticket.
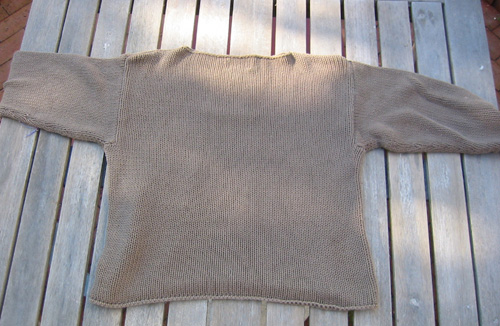

Step 1: Choose your garment.
Something in stockinette stitch, which
you've knit or have found in the dark recesses
of your closet, works best. Choose something
in a gauge that you can see. The smaller
the gauge, the greater the amount of detail
you'll be able to capture, but the more
stitching you'll have to do. Somewhere around
4 to 5 stiches per inch is ideal. My survey
of second hand shops assures me that there
are many garments that meet these criteria
available. Maybe not in your favorite color
on the first day you go, but I have two
things to say about that: Surprise yourself
by wearing something you wouldn't normally.
Or start assembling some Frankenstash over
time and when the urge overtakes you, you'll
have some things to choose from.
 Step
2: Choose your contrasting yarn (or yarns).
Step
2: Choose your contrasting yarn (or yarns).
You have a lot of choices here. Embroidery
floss for the smallest gauges, ribbons,
fuzz. Ribbon or tape yarns work particularly
well as they lie nice and flat against the
existing knitting and don't add much bulk.
Each offers a different effect, but choose
one that comes close to matching the gauge
of the existing garment or is slightly larger.
Too fine and you'll have incomplete coverage,
too bulky and your text or image won't show
up well and your design will develop unseemly
bloating. Obviously, if you want your work
to show, choose a yarn with high color contrast
to the existing garment. But you might also
chose a hairy or very shiny yarn with less
contrast to add a textural effect in stripes,
geometrics or polka-dots.
Step 3: Create your design.
If you want to put an icon or word on
your garment, decide how much space you
want your image to take up. You might look
at t-shirts with logos on them to get an
idea of what will look right on your chest
(or back, or arm). Measure the space, then
multiply the number of inches by your gauge
per inch to get your number of available
stitches. Note whether your rows (height)
or your stitches (width) are the most significant
restraint to your working canvas. Let's
pretend that our sweater has 4.5 stitches
and 6 rows per inch and I have about 12
inches in width that I want to use. That
means I have 54 stitches in play widthwise.
Depending on whether you're fonder of
pencils or pixels, you have two options.
Pencil people can use knitter's graph paper
to sketch out their designs.
The more pixelated will capture their
text or picture. Or write it out with the
font tool in an image manipulation program.
If your image has color, or anti-aliasing,
get rid of it. You want a very rudimentary
drawing here, with smooth clean edges. Sharpen.
Smooth. Despeckle. These are your friends.
You might be able to work in 8 colors without
going crazy, but not thousands or even 256.
Black and white is easiest. Think dot matrix
over state-of-the-art laser printer here.
If your image manipulation program has a
ñposterizeî option -- use it. This will wipe
out any extraneous color patches and give
you a simpler image to work with. If you
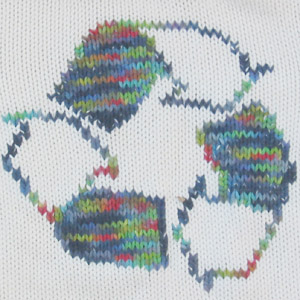
want your image to be more colorful, consider
a variegated yarn to create haphazard shading.
More color. Less work.

worked in Colinette
Wigwam
Now shrink your image so that it's within
the number of pixels available to you. Crop
your image very close to the edges and go
into the ñImage Sizeî dialog box. Set your
width to the number of stitches available
to you (in our example, 54) with the ratio
of width and height maintained. My image
ends up being 54 pixels tall by 54 pixels
wide. Great!

But there's one more thing: Knitting stitches
are not square (pixels are exactly square
either, but they are much more square than
knitting stitches). If you duplicate stitch
your pattern pixel for stitch, your letters
will end up looking very short and squat
rather than how they appear on the screen.
So how do I account for that? A bit of math.
Say my gauge is 18 stitches and 24 rows
per 4 inches -- a ratio of 18/24. A stitch
is 75% as tall as it is wide. So I can leave
my height (or row count) where it is and
shrink the width to 75%. But I want to keep
it as wide as possible at 54 stitches, so
instead, I will multiply the height by 24/18
or 133%.

Once I've done that, I've got an image
that's 72 pixels tall and 54 pixels wide.
It looks strangely tall, but that's what
we need to correct for our stitch-pitch.
Note that if you're fastidious you can go
back and noodle around with it until it
looks just right making some lines thicker
and some thinner, maybe changing the spacing
between letters a bit.
To make yourself a chart you have a few
options: You can view your Frankentext at
about 1200% so you can actually see the
pixels and just stitch by the computer (which
is fine if it's a quickie), or you can blow
it up and print it at that size, or you
can transfer it to graph paper (either plain
or knitter's) so you can carry it with you.
Step 4: Get stitching.
Once you've got your sweater, your sketch
and your yarn, get out a good yarn needle.
A nice fat blunt one is what you want. Don't
try to make do here, you will drive yourself
crazy with some other sort of needle that
is too sharp as you'll end up going through
stitches rather then around them.
The stitching itself is a lot like counted
cross stitch combined with weaving in ends
like an ace. Because here's the thing: the
same technique you will be using here is
the textbook way to weave in your ends.
They will be held solidly in place and would
be virtually invisible if you are working
with the same yarn as your project. This
is why this project will make you a better
knitter -- or at least a better finisher.
If you haven't read it already, go back
and look at Techniques with Theresa on Weaving
in Ends in the Fall 2004 issue of Knitty
for a great how-to. Her photos show you
what you'll be doing.
Figure out where your image fits on your
garment. If you want it centered, then find
the center stitch on your sweater and the
center of the image. Count from there to
the edge to figure out where one side is.
(If this seems troublesome, go for off center
and simply start your design on one edge
of your sweater and work your way over...
you can even wrap your text around the side
of your garment if you like.) If you wish,
you can baste in some lines with contrasting
thread that delineate your working space
and make it easier to count.
You can start your stitching at the top
or the bottom of your image. Say we're stitching
our @ sign onto our 54 stitch space
and I want the top to hit in a certain spot,
but don't care so much about where the bottom
ends up. I'll start at the top. Looking
at my chart, I know that I need 12 stitches
in the top row, centered on the sweater.
I'll count over 6 stitches to the left of
center to start.
Cut a piece of yarn about a yard long
and thread it onto your yarn needle. You
don't want to work with longer lengths as
you are more likely to get tangled up and
the yarn starts to get beat up. Take a moment
and really look at the architecture of the
stitches. On a single row, the yarn moves
in a sideways S wave interlocking with the
rows above and below. With your threaded
needle, you are going to mimic that shape,
essentially repeating the desired shape
with your contrasting yarn.
Coming up from the wrong side of
the work, poke the needle up at the
bottom of that 6th stitch
-- at the base of the V. From here
you are going to be following the
path that the piece of yarn in your
existing knitting takes across that
row. So from the base of the V, go
up the left leg of the stich and put
your needle through to the back at
the top of the same V. Go under the
two legs of the stitch in the row
above and bring the needle back out
to the public side of the work at
the top of the other leg of the V.
Put the needle back in at the base
of the V where you started. You have
just duplicated that stitch, and now
have one little V. Go under the two
legs of the stitch in the row below
to the base of the next V and repeat
the process.
On a single row, your needle will always
go under two legs. It will always go in
where it came out the last time and it's
always poking through the row above and
the row below the row you're working on.
 When
you've completed the appropriate number
of stitches for that row, move on to the
next one. You've finished by poking the
needle to the wrong side of the work at
the base of a V. Come back out at the base
of the V at the end of the next charted
row. Work the next row in the opposite direction.
If your pattern has breaks between stitches,
simply hop over to the base of the next
worked stitch. If it's only a couple of
stitches, you can leave the tail and just
drag it along on the underside. If it's
more than a couple you might think about
cutting the tail so you don't have a lot
of floats on the back. Work each section
separately if you need to.
When
you've completed the appropriate number
of stitches for that row, move on to the
next one. You've finished by poking the
needle to the wrong side of the work at
the base of a V. Come back out at the base
of the V at the end of the next charted
row. Work the next row in the opposite direction.
If your pattern has breaks between stitches,
simply hop over to the base of the next
worked stitch. If it's only a couple of
stitches, you can leave the tail and just
drag it along on the underside. If it's
more than a couple you might think about
cutting the tail so you don't have a lot
of floats on the back. Work each section
separately if you need to.
It is easier to work horizontally across
a row than to make duplicate stitches in
vertical lines, so work as much of your
design as possible horizontally. You can
always come back and work the extraneous
stitches later if need be.
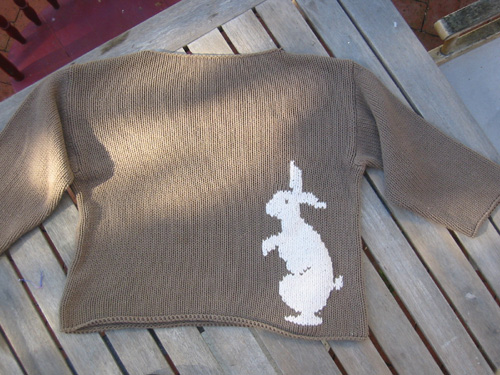
Continue working your chart until your
design is complete. If something still looks
wonky, go back and add or subtract the necessary
stitches. This is one advantage of duplicate
stitching versus true knitted in colorwork
-- it's easy to go back and monkey with,
or even remove when your whims change.