Grandma Knitty Home
Knitty: little purls of wisdom
letter from the editorfeatured articlesKnitty's fabulous pattern selectionarchive of back issuestell us what you think of KnittyKnitty's favorite linkshelp knitty keep on keepin' onknitty's virtual sNbjoin the Knitty notifylistknitty's tiny little shopping malltake home something Knitty


Elann

the Knitty FAQ

submission guidelines for designers and writers

the obligatory legal statement

the rabbit

© Knitty 2002-2006. All rights reserved. Unauthorized reproduction prohibited. This means you.


mesillaanatoliaungranny smitht-twistjameseyjardin anglais
exchequeredtendrilsnagano sakuraconvertibletopireid
double scoop
tiny tether
pedicure sockshederanautie
blossomkatjafelted tea cosy

I live in an old farmhouse that was built in 1751 in the hills of western Massachusetts. Quaint as it is, in the winter it is a chore to keep it warm. And cooking is another story. Whip up a little dinner and in the time that it takes to put it on the table, it is cold. Hot beverages warm the frigid body but keeping them from turning into ice cubes is another challenge. Enter the tea cosy! I have started to amass a collection. They are useful and they sure are fun to make. Tea cosies have gotten a bad rap in the past but they are just darn useful and are lots of fun to knit! Ideas are endless for decoration and techniques. Start with this simple one that is striped, felted and embroidered and begin designing your own!

For my latest book, Colorful Stitchery, I made a super cute tea cosy out of a recycled wool blanket ->. It is four layers thick so a pot of tea stays nice and warm, even in my cold house. I decorated it with embroidered spider web polka dots and sewed it all together with blanket stitch.

For Knitty, I did a felted take-off on the polka dot tea cosy. My knitted version is striped and polka dotted --a favorite pattern combination of mine. It is a really simple pattern -- if you can knit a hat, you can knit a tea cosy. It is a small project which is portable and not too hot or heavy for summertime knitting.

I chose my own "Julia" Wool/Alpaca/Wool Yarn which is now available nationwide (distributed by Nashua Handknits, a division of Westminster Fibers). It felts easily and makes a warm thick fabric = perfect for insulating a pot of tea. I used 4 colors -- 3 for the stripes and a beautiful spring green for the body of the tea cosy. After I felted the piece, I applied contrasting colors of embroidered "spider web" stitch. At the base, I used the 3 striping colors and on the striped section, I used the green.

Make up your own combinations to suit your kitchen. Tea cosies also make great wedding and housewarming gifts. Packed with a box of tea and a teapot, what other gift could make a house feel so warm and cosy when just starting out?

photos: Kristin Nicholas

SIZE
one
 
FINISHED MEASUREMENTS

Before Felting:
Circumference:36 inches
Height: 17 inches

After Felting:
Circumference: 25.5 inches
Height: 11 inches

This will fit a medium-sized teapot.

Shrinkage: My tea cosy shrunk 30% in width and 35% in length. Yours will shrink differently depending on your washing machine and the heat of the hot and cold water. You will also get different results if you use a different yarn.


MATERIALS

Nashua Handknits Julia (50% Wool, 25% Alpaca, 25% Mohair; 93yd/85m per 50g ball)
[MC] #5185 Spring Green; 2 balls
[CC1] #3983 Blue Salvia; 1 ball
[CC2] #5084 Zinnia; 1 ball
[CC3] #5178 Lupine Blue; 1 ball

1 24-inch US #10/6mm circular needle
1 set US #10/6mm double-point needles
Stitch marker
Blunt tapestry needle

GAUGE
13 sts = 4 inches
 
PATTERN NOTES

[Knitty's list of standard abbreviations and techniques can be found here]

 
DIRECTIONS

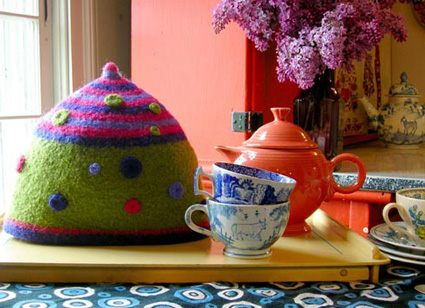
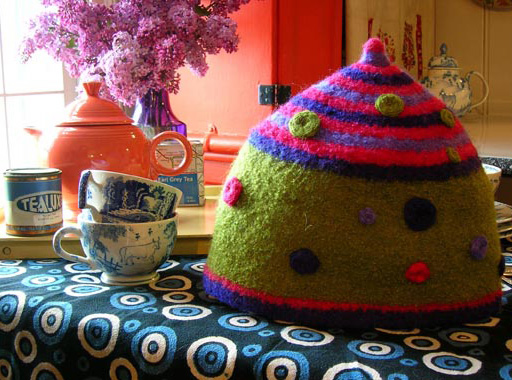
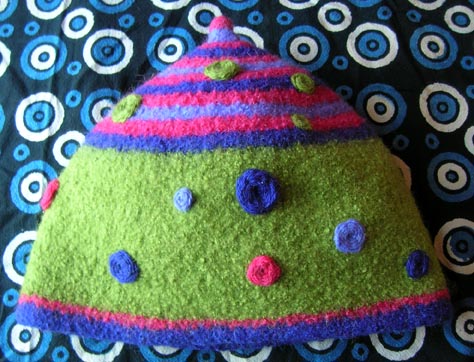
Using circular needle and CC1, CO 120 sts. Place marker and join to begin working in the round, being careful not to twist. Work 5 rounds in garter st, beginning with a p round. Break CC1.

Using CC2, work 2 more rounds in garter st. Break CC2.

Using MC, work in stockinette st until work measures 9 inches. Break MC.

Note: When working decreases that follow, switch to double-point needles when necessary.

Using CC1, k 1 round. P 3 rounds. Break CC1.

Decrease Round 1: Using CC2, [k10, k2tog] to end. 110 sts.
P 3 rounds.
Break CC2.

Decrease Round 2: Using CC3, [k9, k2tog] to end. 100 sts.
P 3 rounds.
Break CC3.

Decrease Round 3: Using CC2, [k8, k2tog] to end. 90 sts.
P 3 rounds.
Break CC2.

Decrease Round 4: Using CC1, [k7, k2tog] to end. 80 sts.
P 3 rounds.
Break CC1.

Decrease Round 5: Using CC2, [k6, k2tog] to end. 70 sts.
P 3 rounds.
Break CC2.

Decrease Round 6: Using CC3, [k5, k2tog] to end. 60 sts.
P 3 rounds.
Break CC3.

Decrease Round 7: Using CC2, [k4, k2tog] to end. 50 sts.
P 3 rounds.
Break CC2.

Decrease Round 8: Using CC1, [k3, k2tog] to end. 40 sts.
P 3 rounds.
Break CC1.

Decrease Round 9: Using CC2, [k2, k2tog] to end. 30 sts.
P 3 rounds.
Break CC2.

Decrease Round 10: Using CC3, [k1, k2tog] to end. 20 sts.
P 3 rounds.
Break CC3.

Decrease Round 11: Using CC2, [k2tog] to end. 10 sts.
P 3 rounds.

Decrease Round 12: [K2tog] to end. 5 sts.
Break yarn, draw through remaining sts and pull tight.

FINISHING

Weave in all ends.

Felt
Place tea cosy in a washing machine with a small amount of soap. Add a few other items, like old towels or canvas running shoes; avoid newer towels, as their fuzz can embed itself in the wool piece you are felting. Run machine through a hot wash/cold rinse cycle, removing cosy before the spin cycle begins. Mold cosy to desired shape (it will be fairly pliable when wet) and allow to dry thoroughly.

Embroidery
Using photo as a guide, embroider polka dots as follows:

Note: It is important to use a blunt tip needle for spider web stitch -- a pointed needle is difficult to use because it will pierce the thread you are weaving on. You can also use the back end of a sharp pointed needle to weave.

Step 1: Build the base for the spider web

You must have an odd number of spokes in order for the weaving to work -- 5, 7 or 9 work well.

Bring yarn up in the center of the circle (A), and make a stitch from B to A. Continue in the same way to make stitches all the way around the outside of the circle to the center (from C to A, D to A, etc.)

Step 2: Begin Weaving

Come up in the center of the spokes.

Step 3: Fill in the spokes

Weave over and under every other spoke, spiraling outward until the entire shape is filled. Pack the stitches down as the spokes fill up to create a filled-in weaving. As you weave and pack down the yarn, the spokes disappear under the weaving. End by drawing the yarn through to the back side under a spoke and finish off.

If you are a knitter who hasn't ever done embroidery before, never fear! It is easy -- especially when you are using wool which fills in nicely and covers up mistakes. When you first start the spider webs, they won't look like much. Keep weaving around the base spokes and fill them solidly. The spider webs will become puffy and slightly sculptural.

On the lower green section of the tea cosy, work at least 4 spider web polka dots in Colors A, B and D. Make them different sizes.

On the striped section of the tea cosy, work at least 8 varying size spider webs in Color C.

Brew up a pot of tea and enjoy!

ABOUT THE DESIGNER

Kristin Nicholas is a knitwear and stitchery author and designer who lives on a sheep farm in western Massachusetts with her husband and daughter and dog, Phoebe.

She is the author of several knitting and embroidery books, the newest being Colorful Stitchery (Storey, 2005). Her yarn Julia is available nationwide (distributed by Nashua Handknits/ Westminster Fibers) and her stitchery kits are distributed by JCA.

Visit her website & blog at kristinnicholas.com.