You have
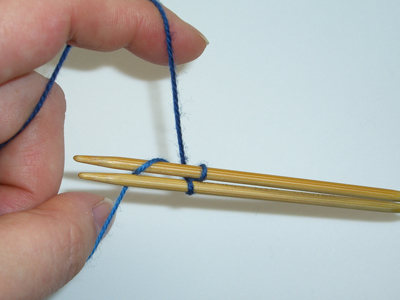
cast one stitch on to needle #1.
5.
Bring needle #2 over the yarn tail
on your thumb, around and under the
yarn and back up, making a loop around
needle #2. Pull the loop snug around
the needle.
You have
cast one stitch on to needle #2.
There are
now two stitches on needle #2 Ñ the
stitch you just cast on plus the anchor
loop.
The top yarn
strand always wraps around needle
#1 (the bottom needle), and the bottom
yarn strand always wraps around needle
#2 (the top needle). Just remember:
Top around bottom, bottom around top.
6.
Repeat step 4 to cast a second stitch
on to needle #1. (bottom around top)
7.
Repeat step 5 to cast a third stitch
on to needle #2. (top around bottom)
8.
Continue repeating steps 4 and 5,
alternating between needle #1 and
needle #2, until you have cast on
the desired number of stitches and
ending with step 4. You will have
the same number of stitches on each
needle.
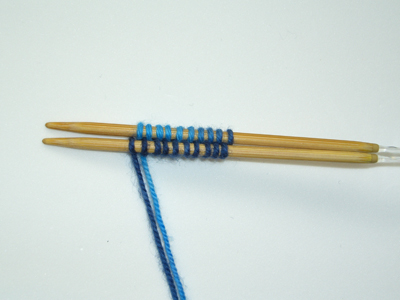
In this picture,
a total of 20 stitches, or 10 stitches
on each needle, have been cast on.
The outside of the sock toe looks
like two rows of offset loops. If
you turn the needles over, you will
see that the wrong side of the work
(the inside of your sock) features
a row of twists that look like purl
bumps between the two needles.
Turn back
to the right side to begin knitting.
9.
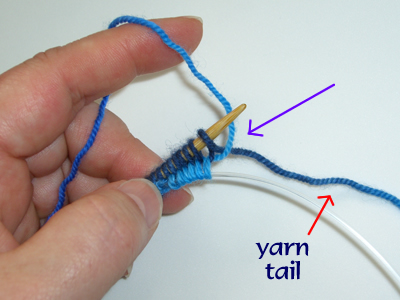
Round 1: Drop the yarn tail
and let it dangle. Turn the needles
so that needle #1 is on the top. Pull
needle #2 to the right until the stitches
lie on the cable. Pick up the working
yarn. Be sure that the yarn tail lies
between the working yarn and the needle.
In the picture, you can see how the
tail passes under the working strand
(purple arrow).
Knit the
row of stitches from needle #1. The
first stitch will probably become
loose while you are knitting it. Pull
gently on the tail to snug it back
up.
You will
see a row of stitches appear between
the two needles.
10.
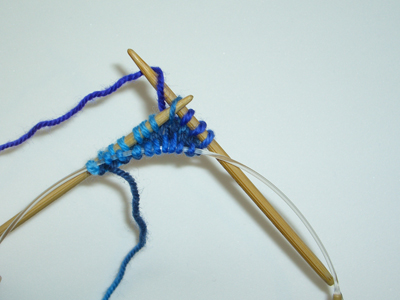
Turn the work so that the working
yarn is on the right and needle #2
is on the top. Pull needle #1 to the
right so that the stitches you just
knit lie along the cable. Pull needle
#2 to the left so that its point is
towards the right and the stitches
are ready to knit from it. Knit the
stitches from needle #2.
Be careful!
The cast-on loops on needle #2 are
twisted. On the first round only,
be sure to knit them through the back
of the loops in order to untwist
them. After this round the stitches
will be "normal."
You have
completed one round and are back where
you started.
Note:
Do the stitches between the needles
appear too loose or "sloppy?" Make
sure when you cast on that you have
tightened each loop up individually
as you placed it around the needle.
Try to keep the loops at your regular
gauge. If you find that your cast-on
stitches are too tight, you can try
casting on to a pair of larger needles.
There are
two rows of stitches between the needles
now. The absolute center of your sock
toe lies between the two rows of stitches.
We now return
you to your regularly scheduled toe-up
sock pattern. Work the toe increases
as specified by your pattern. If your
pattern specifies a different type
of toe, the following instructions
are for a typical toe-up sock that
starts at the very end:
Round
2: on first needle, * K1, M1,
K each stitch to within one stitch
of the end of the row, M1, K1, turn
to second needle. Repeat from *
Round
3: K all stitches on both needles
(no decreases).
Repeat these
two rounds, increasing 4 stitches
every other round, until the total
number of stitches has been reached.
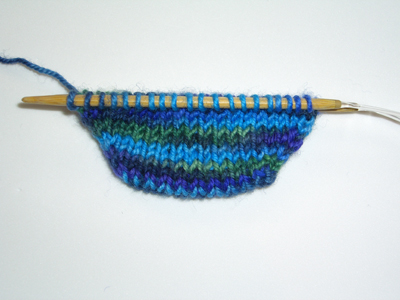
In this picture,
10 rounds have been worked and there
are 20 stitches on each needle (40
stitches total.

In this the
toe has been spread out and the very
end of the toe where the cast-on was
made is right in the center. The left
image is the outside of the sock and
the right image is the inside.
You can see
that the stitches flow over the center
of the toe with no visible break or
seam. The cast-on is invisible on
both sides.
The tail
can be woven in and trimmed at any
time after you've worked at least
one non-increase round. I usually
let it dangle until I've finished
the toe increases. Since the tail
hangs at the beginning of the first
round, it makes a handy way of telling
which side of the sock each round
starts on.
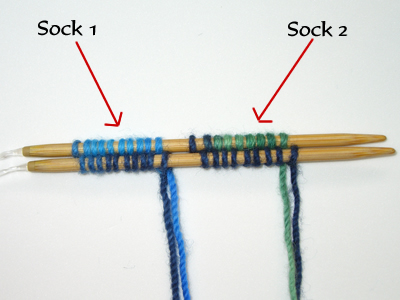
To use the
Magic Cast-On for two-at-once socks,
drop both the tail and the working
strands when you have cast on the
total number of stitches for the first
sock. Push the stitches back along
the needles so there is room at the
tips for another set of stitches.
Starting from a new ball of yarn,
cast a second set of stitches on to
the same needles.
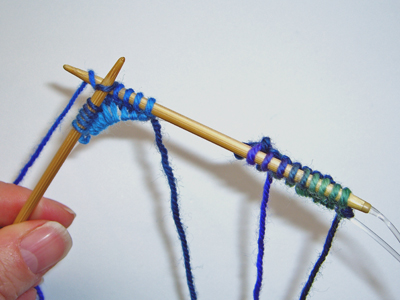
Work step
#9 on sock #1. Drop the yarn and pick
up sock #2's yarn. Repeat step #9
for sock #2.
Work step
#10 on sock #2. Drop the yarn and
pick up sock #1's yarn. Repeat step
#10 for sock #1. (Don't forget to
work the stitches through the back
of the loop on this round only.)
Continue
with the subsequent steps, always
being careful to work each sock with
its own ball of yarn.

If you are
knitting with DPNs, Cast on to two
needles.
Work step
#9 by knitting 1/4 of the stitches
using one needle and the remaining
1/4 of the stitches using a second
needle. The stitches may be tight
and rather awkward to work. This will
improve after the first round.
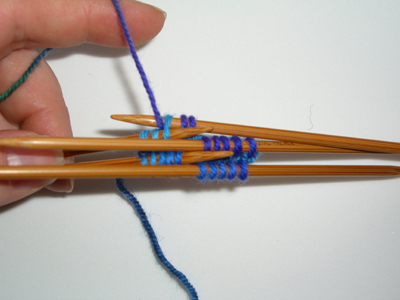
Work step
#10 by knitting 1/4 of the stitches
using a third needle, and the remaining
1/4 of the stitches using a fourth
needle. (Don't forget to work the
stitches through the back of the loop
on this round only.)
On subsequent
rounds, work the increases 1 stitch
from the beginning of needles #1 and
#3, and one stitch from the end of
needles #2 and #4.
So, is
this good for anything but socks?
Absolutely!
It can be used for almost any pattern
that requires casting on and working
in a small closed circle. For example:
Ð When casting on a center-out pinwheel,
cast on 5 total stitches, three on
the bottom needle and two on the top.
Work round one and at round 2, begin
the pattern's standard yo increases.
Ð To knit the bottom of an oblong
bag or purse, cast on enough stitches
to equal the length of the bag minus
the width (i.e., if the bag will be
10" long and 3" wide, cast on 7" worth
of stitches). Work rounds 1, then
increase 4 stitches every round until
the bottom of the bag is the right
size.
And when
anyone asks you how you accomplished
that wonderful, invisible cast-on,
you can say, "It's magic!"

