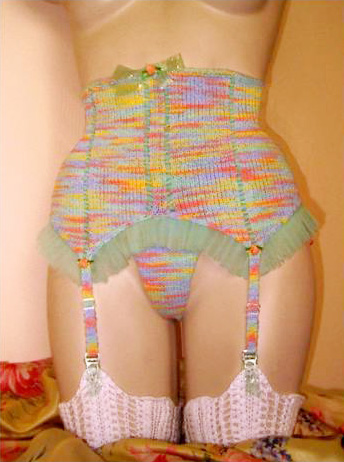
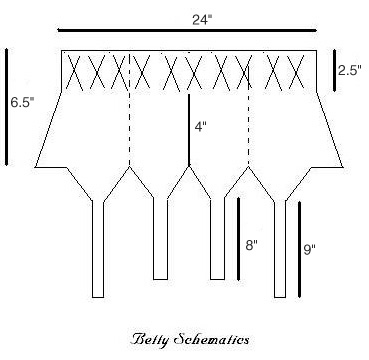
Grandma Knitty Home
Knitty: little purls of wisdom
letter from the editorfeatured articlesKnitty's fabulous pattern selectionarchive of back issuestell us what you think of KnittyKnitty's favorite linkshelp knitty keep on keepin' onknitty's virtual sNbjoin the Knitty notifylistknitty's tiny little shopping malltake home something Knitty


Elann

the Knitty FAQ

submission guidelines for designers and writers

the obligatory legal statement

the rabbit

© Knitty 2002-2006. All rights reserved. Unauthorized reproduction prohibited. This means you.


vicky1930bettyhush-hushmon petit chouallusioniris
men's thong-th-thonglolita legs velvet oblivion 302 calories
do not disturbcozieson the moonflicksheerly therezaftig!

Betty is a throwback to an earlier time when bare legs were a no-no and pantyhose was just a dream. Pulling a look together meant the proper foundation garment that would keep everything in place. A peek at such a garment on a beautiful lady was the height of sexy!

My newer version of the old waist cincher/garter belt/ panty features stretchy yarn, delicate feminine trim and a thong panty to add spice.

A wide hidden band of elastic at the waist helps sweater girls keep their hourglass shape.

photos: Joan McGowan-Michael

SIZE
One size fits waists from 25-30"
 
FINISHED MEASUREMENTS

Waist circumference: 24"


MATERIALS

White Lies Designs Cascade Fixation [98.3% cotton, 1.7% spandex; 100yds per 50g ball]; color: 9478; 2 balls

US 5[3.75mm] 24 inch circular needle
Waste yarn
Stitch markers
1 yard 2.5-inch elastic
1 yard of .5-inch elastic
Tapestry needle
Sewing needle and thread
15 denier tricot fabric in matching color, 1 yd
Set of garter grips and slides
3 ribbon rosettes
.25 yd hook and eye tape

GAUGE

22 sts and 40 rows = 4" in stockinette stitch

 
DIRECTIONS
CO 138 sts. Work in garter st for 4 rows.
Change to st st and work setup row and all following RS rows as follows:
K34, pm, k15, yo, ssk, k15 yo, ssk, k2, k2tog, yo, k15, k2tog, yo, k15, pm, k34.
When piece measures 2.5 inches from garter st edge, with RS facing work across to 1 st before first marker, inc 1 st before and 1 st after marker, work across to second marker, maintaining est st patt and rep as for first marker.
Work this increase row every foll 4th row 3 times then every 6th row 2 times.
Cont to work evenly in st patt until piece measures 6.5 inches from beg.
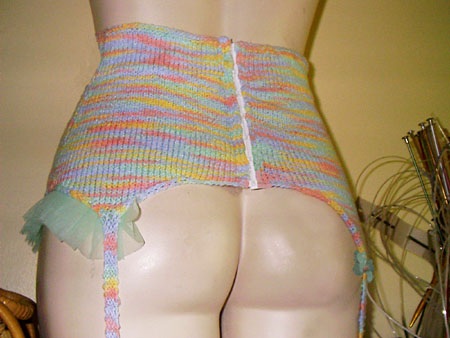
Right Back
Next row: BO 10 sts, ssk, work to 3 sts before marker, k2 tog, k1, turn.
Next row: dec in 2nd st from beg and end of needle. Continue decreasing 1 st at each end of needle on every row until 4 sts rem.
Work in garter st until strap measures 8 inches.
BO.

Left Back
Attach 2nd ball of yarn at other end of garment, work as for Right Back, reversing shaping.

Front points [make 2, one on each side of front]
With RS facing, attach yarn to front and work ssk dec in 2nd st from end, work across 32 sts and k2 tog, k1. Turn work and dec in 2nd st from end of needle, work across and dec in 2nd st from end of needle.
Cont as for backs until 6 sts rem on needle.
Next row: K2, k2tog, k2.
Work in garter st until strap measures 9 inches.
BO.

THONG PANTY
CO 34 sts.
Work 3 rows in st st
Dec 1 st at each end of next then every foll 4th row until 6 sts remain.
Change to garter st and work evenly until entire piece measures 15" long from beg.
BO.

Casing
CO 98 sts, then pick up 34 sts across top front of thong. Knit back across all sts.
Next row: K1,*yo, k2 tog, rep from * to end.
BO.

 
FINISHING

Cut tricot fabric into 1.5-inch-wide horizontal strips. With needle, thread and running stitch, pleat or gather fabric at top edge to make ruffle. Sew along lower edge of body to correspond with photo.
Fold another strip of tricot in half lengthwise and weave through yo columns.
Make bow from tricot and sew at center front.
Sew on rosettes to correspond with photo.
Using any adjustable bra strap as a reference, make garters with slides on front and back, sewing strap through slides.
With tapestry needle threaded with knitting yarn, work a row of X-shaped stitches around inside of waistband 2.5 inches high for elastic casing. Run elastic through casing and cut to size 2 inches smaller than waist measurement. Secure ends with needle and thread.
Sew on hook and eye tape securely [a sewing machine gives the most secure stitching for this area] and fold under ends slip-stitching in place.
Sew panty casing invisibly to left front side of panty and for thong, sew upper back thong to center back of casing. Measure .5 inch elastic to fit and weave through eyelets, sewing securely at center back.

Note: I have found that Fixation lies very flat in stockinette st after steaming, and so the sides of the panty needed no trim. You may prefer an edging of single crochet to finish it off.

ABOUT THE DESIGNER

Joan McGowan-Michael is the owner of and designer for White Lies Designs.

See more of her romantic designs at Whiteliesdesigns.com.

Editor's note: the pattern for the lace stockings shown may be purchased at White Lies Designs.