If planning a lace edging at the bottom of the
garment, use a provisional cast on.
If planning a plain edge, use a tubular cast on
for a more polished look, or choose your own favorite
cast on method.
With smaller needles, CO 6 multiplied
by X plus 3 sts. [for value of "X", see
SIZE instructions above.]
Row 1 (RS): K2, *p1, k1, rep from * to last
st, slip last st kwise with yarn in front.
Row 2: *k1, p1, rep from * to last st, slip
last st kwise with yarn in front.
Rep these two rows until piece measures 3 inches
or desired length from lower edge to bottom of rib
cage. End with RS facing.
Divide sts into thirds: pm after (2 multiplied by
X plus 1) sts and second marker after (4 multiplied
by X plus 2) sts. From this point the piece will
be worked on three needles in two different sizes.
The two outer portions will be in linen stitch with
selvege sts on larger needles while the central
section continues in k1, p1 rib on smaller needles.
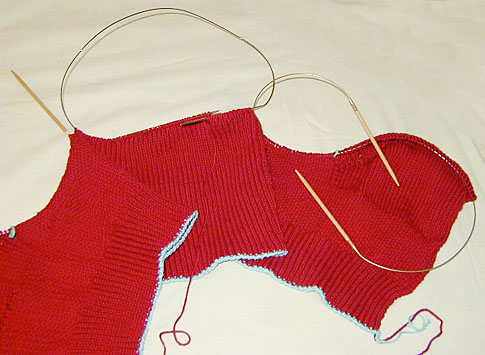 Continue
as follows [see image at right]:
Continue
as follows [see image at right]:
Row 1a(RS): With larger needle, k2, *sl 1
wyif, k1, rep from * to first marker. With smaller
needle, work in rib patt as est. With second larger
needle, *sl 1 wyif, k1, rep from * to last st, slip
last st kwise wyif.
Row 2a: With larger needle, k1, p2, *sl 1
wyib, p1, rep from * to marker. With smaller needle,
work in rib patt as est. With second larger needle:
*p1, sl 1 wyib, rep from * to last 3 sts, p2, sl
last st kwise wyif.
Rep these two rows until piece measures 6 inches
or desired length from lower edge to "bra band"
line. End with RS facing.
PM after (X plus 1) sts on the first needle, and
before the last (X plus 1) sts on the last needle.
From this point the piece will be worked in panels
of st st, linen st, 1x1 rib, linen st and st st.
Continue selvedge stitches.
Row 1b(RS): With larger needle, k to first
marker. Work linen st as est to end of first needle.
Work middle section in k1, p1 rib on smaller needle
as est. With second larger needle, work in linen
stitch as est to last marker, k to last st, slip
last st kwise wyif.
Row 2b: With larger needle, k1 then p to
first marker. Work linen st as est to end of needle.
Work rib as est across smaller needle. With second
larger needle, work linen st as est to last marker,
p to last st, slip last st kwise wyif.
Rep these two rows for 1 inch.
 For
A cup, skip to ***
For
A cup, skip to ***
For B cup and larger, work short row shaping
as foll:
Continue to work selvedge st as est throughout.
Step 1: K to 1 st before marker. Turn. With
yarn in back, insert right needle into first st
as if to purl, bring yarn forward and work to end
of row. This will make a YO at the short row turning
point.
For B cup, skip to **
For all other sizes, continue:
Step 2: K to 2 sts before YO. Turn. Make YO
as before, and work to 2 sts before end of row.
Turn. Make YO by bringing yarn forward before continuing
with next step.
Step 3: K to 2 sts before newest YO on left
needle. Turn. Make YO as before. Work to YO.
Purl YO tog with next st. Work selvedge st as est.
For C cup, skip to **
For D cup, rep steps 2-3 once more.
**K
to first YO. K following st tog with YO. *k1, k2
tog, rep from * to marker.
Work across rem sections in patt as est.
Reverse short row shaping for left side.
***Continue to work alternating
rows 1b and 2b as est until piece measures 8 inches
or desired length from beg (measure over linen stitch
areas). End with RS facing.
Transfer all stitches to smaller needle and work
in k1, p1 rib with selvedge sts as at beginning
(rows 1 and 2) for 1 inch.
For plain edge:
BO all sts
using grafted BO.
For fun fur edging:
Join CC and k to (X plus 1) sts on larger needles
(that is, above the area that was st st). Turn.
K to end. Bind off CC only. Change to MC and work
grafted BO across (4 multiplied by X plus 1) sts.
Change to CC and k rem (X plus 1) sts on larger
needles. K one more row on these sts, then BO in
CC.
For lace edgings:
Edgings are knit lengthwise and joined to the
edge of the garment as they are made. When directed
to p2tog, purl together one stitch from the edging
and one stitch from the body of the garment. Use
smaller needle.
Small lace pattern (for upper
edges):
CO 1 additional st at beg of row. K2, turn.
Row 1: K1, yo, k1.
Row 2: K1, (k and p into yo), p2tog.
Row 3: K4.
Row 4: BO 2 sts, p2tog.
Rep these four rows until you reach the last st
above the st st panel. Cut yarn, leaving a long
tail for working grafted bind off. Work grafted
bindoff until you reach the stitch above the last
st st panel. Rejoin yarn and rep small lace pattern.
Remove prov CO and transfer all stitches to smaller
needle.
Large lace pattern (for lower
edge):
Starting at left front corner with right side facing,
k first st of garment and CO 3 additional sts. K4,
turn.
Row 1: K1, yo, k2, yo, k1.
Row 2: K1, (k and p into yo), k2, (k and
p into yo), p2tog.
Row 3: K8.
Row 4: BO 4 sts, k2, p2tog.
Rep these 4 rows until last st is reached; BO.
Front bands:
Using larger needles, pick up one st in each
selvedge st along one front edge. Work 3 rows in
garter st or seed st. BO all sts. Rep for other
side.