  by
Clara Parkes by
Clara Parkes

The next time you want a few stolen
moments with your sweetie, hang this sign on your
door for guaranteed privacy. Bring one with you when
you travel, too. You never know when it'll come in
handy!
A nice thing about this project
is that you don't have to worry about achieving a
precise fit or perfect gauge. You can also use up
extra yarns from your stash, since it requires very
little.
Just remember that the thicker the
yarn, the farther away you'll have to stand to read
the sign. City dwellers in tight spaces may want to
stick with DK or finer gauge unless they plan on reading
the sign from their neighbor's doorway. [Then again,
if you're trying to dissuade your neighbors from interrupting
you, that may be perfect!]
If working with multiple colors
makes you nervous, you can always knit the front in
plain stockinette and add the pattern later using
duplicate stitch.
|
|  photos: Clara
Parkes
 |
|
| One |
| |
Width: 3 inches
Height: 8 inches plus handle
|
| |
| |
|  [MC] Rowan Cotton Glacé [100% cotton; 125yd/115m
per 50g skein];
color: Bubbles (724); 1 skein
 [CC] Rowan Cotton Glacé [100% cotton; 125yd/115m
per 50g skein];
color: Glee (799); 1 skein
 1 set US #3/3.25mm straight needles
 yarn needle
 2.5 x 7.5" piece of cardboard (optional)
|
|
|
| 24 sts/40 rows =
4" in stockinette stitch |
| |
Front
With MC, CO 18 sts.
Row 1 (RS): *K1, p1* rep to end.
Row 2: *P1, k1* rep to end.
Rows 3 and 5: K all sts.
Rows 4 and 6: K2, p14, k2.
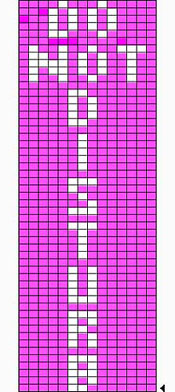
Row 7: K2, work from chart beg at bottom
arrow, k2.
Rows 8-53: K2, work from chart, k2.
Rows 54 and 56: K2, p14, k2.
Rows 55 and 57: K all sts.
Row 58 (WS): *P1, k1* rep to end.
Row 59: *K1, p1* rep to end.
BO.
Back
With MC, CO 18 sts.
Row 1 (RS): *K1, p1* rep to end.
Row 2: *P1, k1* rep
to end.
Row 3: K all sts.
Row 4: K2, p14, k2.
Rep rows 3 and 4 until you've formed 35 ridges along
the garter edge (one ridge equals two rows). The
back should be just a few rows shorter than the
finished front at this point.
Next row: *K1, p1* rep to end.
Next row: *P1, k1* rep to end.
BO.
|
|
 Block
front and back pieces to identical size. This is also
a good time to fix any gaps, uneven stitches, or chart
errors you may discover. (Duplicate stitch is perfect
for last-minute touch-ups.) Block
front and back pieces to identical size. This is also
a good time to fix any gaps, uneven stitches, or chart
errors you may discover. (Duplicate stitch is perfect
for last-minute touch-ups.)
With WSs facing each other, sew
front and back pieces tog beg at the bottom of the
piece and working up each side. On sides, achieve
an even edge by stitching together the garter "ridges"
closest to each edge (see close-up photo). Don't close
up the top yet!
Handle
With MC, CO 5 sts.
Row 1: *K1, p1*, rep to end.
Rep row 1 until piece measures
6 inches from beg, or whatever length is necessary
for the handle to slide easily over your doorknob.
BO.
Form a U shape with the handle and
insert each end into the open top of the sign (between
the front and back pieces). Sew front and back pieces
tog, beg at one corner and passing the yarn from front
to back, securing the handle as you go.
If you prefer a more rigid sign,
cut out a piece of cardboard slightly smaller than
the sign front. Slide this piece of cardboard in between
the front and back of the sign before you close up
the top.
Weave in any loose ends, then grab
your sweetie and take the sign for a test drive!
|
Clara Parkes is the
founder and publisher of
Knitter's Review.
When not trying to destroy innocent yarn swatches,
she can be found daydreaming on her back porch, sipping
tea, and planning yet more unfinished projects. |
| Pattern & images
© 2004 Clara Parkes. |
|

