  by
Rebecca Hatcher by
Rebecca Hatcher

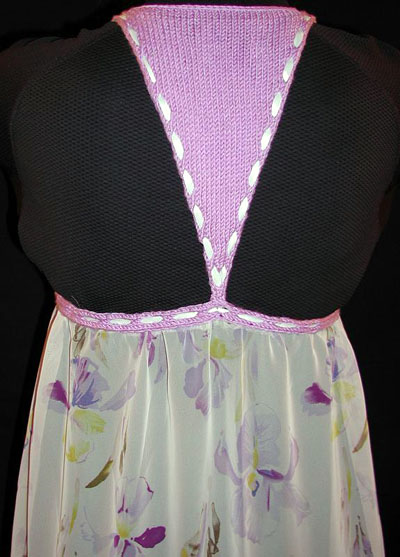
This nightie combines the advantages of knitted and
woven fabrics (stretchy and see-through, respectively),
to show off your arms, shoulders, back and chest,
while skimming over those other bits you might not
be as crazy about (ahem, not to mention any names,
Waist and Hips).
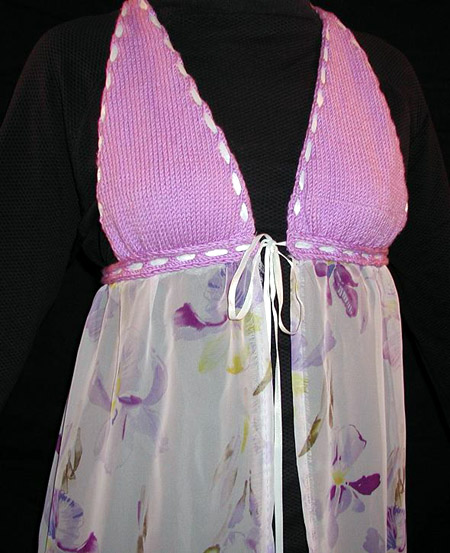
The ribbon trim assures that nothing gaps, and can
be adjusted for a custom fit. If you choose 45-inch
wide fabric, the length can be anywhere from short
to ankle length.
For a closed front, replace the ribbon in the band
with quarter-inch elastic, sew the ends of the fabric
together, and position the seam in the back.
|
|
 photos: Kevin
Glick
photos: Kevin
Glick
|
|
| S[M, L, XL] |
| |
|
Front length (top of shoulder to band, over bust):
11[13, 15, 17] inches
Back length (center back to top of shoulder): 11 inches
Triangle width (ungathered): 8[9.5, 11, 12.5] inches
|
|
|
|
|
|
Lion Brand Microspun [100% Microfiber Acrylic; 168
yd/154 m per 70 g skein]; color: Lavender (#143);
1 [1, 2, 2] skeins
1 set US #6/4mm straight needles
tapestry needle
5 yds 0.25 inch-wide ribbon
sewing needle
thread to match ribbon
length of sheer fabric, at least 45 inches wide and
approximately 1.5 times hip measurement
|
|
|
|
22
sts/30 rows = 4" in stockinette
stitch
|
| |
|
Eyelet
pattern:
Row 1 (RS): Sl 1, k1, yo, k to last 2 sts,
yo, k2.
Rows 2 and 4 (WS): Sl 1, p to end.
Row 3 (RS): Sl 1, k to end.
|
Back
CO 4 sts.
Beg with a WS row, work 3 rows in st st, slipping
the first st of each row.
First eyelet row: sl 1, k1, yo, k2. (5 sts)
Work 3 rows in st st as before, slipping the first
st of each row.
Beg with row 1, work eyelet pattern 16 times,
ending with row 2. (37 sts)
Right Front
Next row (RS): Sl
1, k1, yo, k2. *Turn, and work 3 rows on st st on
these 5 sts only, beg with a p row.
Then, sl 1, k1, yo, k2tog, k1. (5 sts)
Work 3 rows in st st, as before, sl the first st
of each row.
Beg with row 1,
work eyelet pattern 19[23, 27, 31] times. (43[51,
59, 67] sts)
BO.
Left Front
Returning to live sts of
back and working on RS, join yarn and BO center
29 sts.
On rem 4 sts, k2, yo, k2.
Beg from *, work left front same as right.
Band
Co 5 sts. Sl1, P across.
Row 1 (RS): Sl 1, k1, yo, k2tog, k1
Rows 2 and 4 (WS): Sl 1, p across.
Row 3 (RS): Sl 1, k across.
Rep these 4 rows until band reaches around rib cage
below bust, ending with row 3 and taking
care to work an even number of 4 row reps. BO.
|
|
Using yarn, and being careful
not to twist, sew BO edges of triangles to ends of
band, gathering triangle edges slightly. Sew CO edge
to center back of band.
Cut 2 pieces of ribbon 22[24,
26, 28] inches long and 2 pieces 12[14, 16, 18] inches
long.
Thread remaining ribbon (2-2.5
yds long) through band. Center, so ties at each end
are the same length. Adjust tension so band fits rib
cage, then sew band to ribbon at ends and center back.
(It may be easier to sew one end, then adjust the
tension, then sew the second end -- it's ok if the
ties are slightly different lengths.)
Thread longer pieces of ribbon
through outer edges of front and back triangles, so
ends are on the WS. Adjust tension so triangle edges
lie flat, and trim ribbon if necessary. Sew ribbon
to band at front and back.
Thread shorter pieces of ribbon
through inner edges of front triangles, so ends are
on WS. Adjust tension so triangle edges lie flat,
and trim ribbon if necessary. On WS, sew ribbon to
band at front and to strap at shoulder.
Hem 2 short edges and one
long ends of fabric. Fold over remaining edge .5 inches,
and iron. If this edge is not a selvage, fold raw
edge to fold line, and iron again. Using large sts
(about 0.25 inches), sew along this edge. Do not tie
off thread. Tighten thread, creating gathers, until
gathered edge measures same as band. Sew in place
on WS.
To create closed-front nightie,
replace ribbon in band with 0.25 inch-wide elastic.
Sew short edges of fabric together, hem one long egde,
fold and iron other edge, as above. Gather this edge,
and sew to edge of band.

|
|
 Rebecca
lives outside of Boston, where knitting is beginning
to interfere with her day job. Rebecca
lives outside of Boston, where knitting is beginning
to interfere with her day job.
|
| Pattern & images
© 2004 Rebecca Hatcher. Contact Rebecca |
|