
  by
Song Palmese by
Song Palmese

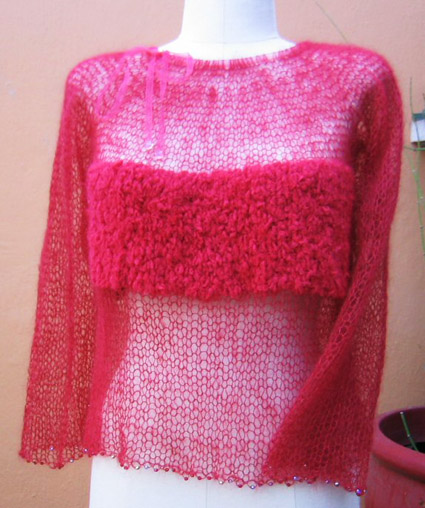
I've wanted to make this sweater
for years.
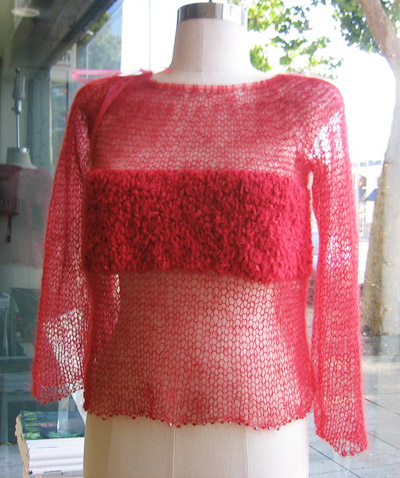
I like the way this design allows
everything to be seen -- except the fun parts. Fluffy
bits to cover my fluffy bits, don't-cha-know.
This pattern is both easy
to knit and slightly tricky. Since it's made to fit
you, you'll have to work out some of the numbers
yourself. So, for example, the width of the stripe
of fluff will depend on how much you want to cover
up. I chose 6", so that's what I've included
as a base number.
|
|
 photos: Song
Palmese [thanks to Article
Pract for the mannequin!]
photos: Song
Palmese [thanks to Article
Pract for the mannequin!]
|
|
| XXS[XS, S, M, L, XL, XXL, XXXL] |
| |
|
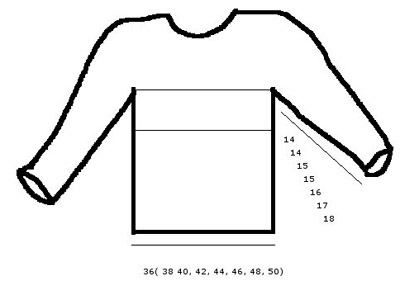
Chest: 36[38, 40, 42, 44, 46, 48, 50] inches
Length: To fit
|
| |
|
|
|
[MC] K1 C2 Douceur et Soie [70% baby mohair, 30% silk;
225yds/202.5m per 25g skein];
color #8549 Deep Garnet; 1[1, 2, 2, 2, 2, 3, 3] skeins
[CC] Muench Yarns Esprit [100% Nylon; 88yds/79.2m
per 50g skein];
color #24 Dark Red; 1[1, 1, 1, 1, 1, 1, 2, 2] skeins
1 set US #13/9mm straight needles
24 inch (60cm) US #13/9mm circular needle
3 yds sheer ribbon in complimentary color
tapestry needle
2 stitch holders
126[134, 140, 148, 154, 162, 168, 176] 4mm beads
Optional
flat-backed beads (cabochons)
fabric glue
|
|
|
|
2.5 sts/3.5 rows = 4" in stockinette
stitch using MC
|
| |
|
Measure
yourself:
Before you begin knitting,
measure how wide you'll want to make the stripe. Stand
in front of a mirror. Holding the top of the measuring
tape at the highest point you'll want covered, drape
the tape down over the fullness of your bust. Then,
drop your hand down the tape to the lowest point you
want covered. This is the total width of the stripe
of Esprit. Before you put away the tape, see how far
down from the stripe you want to have the bottom of
the sweater. Mine hits me just at the top of my hip,
but you might want it longer or shorter. Note both
the measurement from top of stripe to the bottom of
the stripe and the measurement from the top of the
stripe to the bottom of the sweater. Subtract the
stripe width from the total and you have how many
inches you should knit before you start the stripe.
You'll also need to measure the total length from
your underarm to the bottom of the sweater, over the
fullest part of your bust. This tells you how many
inches you need to knit above the stripe. In my case,
that measurement was 1.5 inches.
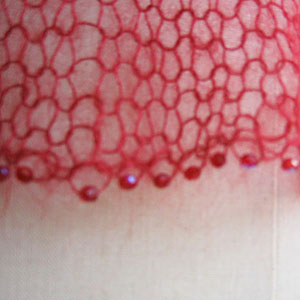 Beads
& stringing techniques: Beads
& stringing techniques:
I used czech firepolished crystals. Go to your local
bead store with the yarn you'll be using; it's easier
to match bead color to yarn than the reverse.
Casting on is done with the
beads in the cast-on stitches, and requires concentration.
After that, the sweater is fairly easy to knit. Most
beads of the size called for in this pattern come
pre-strung on plain cotton thread. You will need to
string the beads onto the yarn before you cast on.
The easiest way is to use the cotton thread the beads
are on as a bridge to the Douceur et Soie.
Carefully untie the knot in
the cotton thread.
Tie an overhand knot in the cotton thread and before
you tighten it, stick several inches of the MC yarn
through it.
Tighten up the overhand knot. You should have the
cotton thread knotted around the yarn.
Now carefully draw a bead down toward the knot. You
will be able to pull the bead over the knot and down
onto the yarn. This will feel precarious at first,
but will get easier (and less nervewracking!) with
practice. After a few beads are strung onto the yarn,
you should be able to draw groups of beads over the
knot at a time. I usually bring beads over in groups
of 5; it's easier for me to keep count that way.
If your beads don't come pre-strung, there's
a way to do this same thing with a sewing needle and
thread. Cut several feet of sewing thread. Tie a knot
in one end, knotting it around the yarn as given for
pre-strung bead thread above. Then, thread the other
end of the thread through the needle and scoop up
beads onto it and over the knot onto the yarn. Continue
as above with pulling the beads over the knot and
onto the yarn.
Beaded Loop Cast On
Make a slip knot 6 inches from the end of the yarn.
Then slide a few of the beads down near the needle.
Leave a few inches between the beads and the needle.
Using that few inches, slide one bead down to the
needle, then twist the yarn once (making a loop) and
put that loop on the needle. Slide another bead down
to the needle and make another loop. Continue this
way until you have cast on the correct number of stitches.
Make sure there is a bead between every cast on stitch.
You will need to be careful when you knit this first
row, but after this it's all easy.
I know this sounds scary,
but it's really easy -- and quick. And, this is the
hardest part of the whole sweater, so once you're
done with this, the rest is easy as pie.
|
 Body Body
String
90[96, 100, 106, 110, 116, 120, 126] beads onto
MC. [see pattern notes above]
CO 90[96, 100, 106, 110, 116, 120, 126] sts using
a loop cast on and catching one bead in each CO
loop.
K1 row.
Join and work in st st until
piece measures at least 6 inches from beg or to
your chosen length.
Change to CC and work in
st st for 5 inches or to your chosen length.
Change to MC and work in
st st for 1.5 inches or to your chosen length.
Break yarn, leaving a 6 inch
tail. Leave sts on needle.
Sleeves (make 2)
String
18[19, 20, 21, 22, 23, 24, 25] beads onto MC.
CO 18[19, 20, 21, 22, 23, 24, 25] sts using a loop
cast on and catching one bead in each CO loop.
Working back and forth in st st, inc one st at each
edge every 4th row to 36[38, 40, 42, 44, 46, 48,
50] sts.
Work even in st st until
piece measures 14[14, 15, 15, 16, 17, 17, 18] inches
from beg.
Place all sts on a holder.
Yoke
With
MC, k across 45[48, 50, 53, 58, 60, 63] sts from
body. *Leaving first 4 sts of one sleeve on holder,
k to last 4 sleeve sts. Place rem 4 sleeve sts on
holder. Place next 8 sts from body on a holder*
and k 45[48, 50, 53, 58, 60, 63] sts from body.
Rep from * to *. (130[ 141, 148, 159, 158 169, 176,
187] sts)
Join and work in st st, in
the round for 2 inches.
Next rnd (dec rnd):
*K1, k2tog rep from * to end. (86[93, 98, 105, 104,
111, 116, 123] sts)
Work even in st st for 2
inches.
Rep dec rnd. (57[61, 64,
69, 69, 74, 77, 81] sts)
Work even in st st for 0.5
inches.
Break yarn, leaving a 6 inch
tail. Leave sts on needle.
|
|
 Thread
3 yards of ribbon onto tapestry needle. Carefully
draw ribbon through all sts on needle, leaving equal
lengths at beg and end. Cut ribbon ends to desired
length. Thread
3 yards of ribbon onto tapestry needle. Carefully
draw ribbon through all sts on needle, leaving equal
lengths at beg and end. Cut ribbon ends to desired
length.
Seam sleeves.
Use Kitchener St or 3 needle
BO to close armholes.
Optional: use fabric glue to
fasten cabochons to ends of ribbon. If not using cabochons,
tie an overhand knot at each end of ribbon.
|
|
 Song
Palmese lives in Oakland, where she does daily battle
with her two creative cats, very bouncy daughter,
crotchety husband and bossy guinea pig. Song
Palmese lives in Oakland, where she does daily battle
with her two creative cats, very bouncy daughter,
crotchety husband and bossy guinea pig.
She has started up a design business and is planning
on making 2004 a big year for SongBirdGifts.
|
| Pattern & images
© 2004 Song Palmese. Contact Song |
|


