PROVISIONAL CAST ON [PCO]
Using the crochet hook and waste
yarn make a chain of stitches that equal the number
of sts you need plus 6 extra and secure the tail.
With the appropriate size needle and yarn pick up
sts by going into the "bump" st that is
on the underside of the crochet chain. You will
start in the 4th st from the end of the chain and
will have a few crochet sts at the end when you
are done.
MITTENS-Left and Right
Flap
Using a PCO, CO 42 sts in MC using
US #10.5 circular needle. Work in St st for 2 rows
starting with a K row.
Row 3: *K7, m1* 5 times, k7. [47
sts]
Rows 4 & 5: Work in St st.
Row 6: P7, *m1, p8* 5 times. [52
sts]
Rows 7 & 8: Work in St st.
Row 9: *K9, m1* 5 times, k7. [57
sts]
Rows 10 & 11: Work in St st.
Row 12: P7, *m1, p10* 5 times.
[62 sts]
Row 13: K to end.
Short row shaping: Work to designated
st on needle, bring yarn to front or back depending
on whether it is a k or p row. Slip last st purlwise
and take yarn to back or front as needed. Turn work
and slip first st on right needle back to left needle.
Row 14-21: Short Rows
Row 14: P 61, short row
Row 15: K 60, short row
Continue in this manner, always
knitting or purling one less st than previous rows.
On Row 21 you will not wrap the st. Cut MC and slip
all sts to right hand needle. [62 sts]
Cuff Edge
With RS facing join CC in the
upper left hand corner where the PCO is. Pick up
8 sts along left edge, being sure not to catch PCO
yarn. K live sts from needles and then pick up 8
sts from right edge. [78 sts]
Row 2: K
Row 3: P
Row 4: K
Row 5: Use US #5 circular needle
and pick up sts on back side of work. To do this,
look for CC loops that will show at bottom of CC
band. Pick up those loops and keep them on your
US#5/ 3.75mm needle. Now bring both needles together
and form a tube with the purl side of the fabric
facing out. Knit one st from both needles together,
while at same time casting off until you have 1
st remaining. Do not cut yarn.
Wrist Detail-Left Mitten-read
through this section BEFORE knitting.
With RS facing you, using CC,
pick up 1 st from edge of tube you just formed.
Remove waste yarn from PCO as you knit these sts
and then pick up 2 sts from tube edge at left side
of flap. [46 sts]
The remainder of mitten will be
worked in the round and the set up is as follows:
With RS facing you, keeping left side, AS YOU LOOK
AT IT IN THE ROUND, over right side of flap, take
a spare needle and slip first 8[6] sts off left
needle. Alternate slipping 1 st from right needle
and 1 st from spare needle until all sts have been
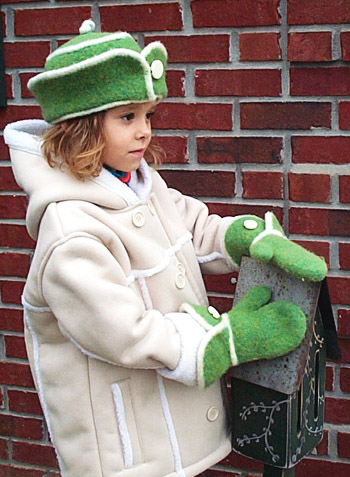
placed back on left needle. Refer to picture of
left hand mitten for clarification. You want the
Àflap to wrap around wrist from the left side of
hand. Transfer sts to DPNs at this point for ease
in handling, make sure working yarn is at the start
of a DPN. Still working in CC, knit one round. Purl
next 3 rounds.
Form these purl rounds into a
tube as before, omitting cast off: using a smaller
needle [either circular or DPNs], pick up enough
back loops of 1st CC row to match number of sts
on 1st DPN. Knit 1 st from each needle together.
Continue in this manner until all sts have been
knit and you are back to the 1st needle.
Place markers: Place markers at
the 5th & 6th [6th & 7th] sts to right of
the point where the overlap was made. These markers
are for the gusset increases, the left one will
denote Beginning Of Round [BOR]. Cut CC.
Wrist Detail-Right Mitten
Start as for Left Mitten, however
the overlap will go in the opposite direction.
With RS facing you, take a spare
needle and slip first 8[6] sts off right needle.
Now alt slipping one st from left needle and one
from spare needle until all sts have been placed
back on right needle, keeping right side, AS YOU
LOOK AT IT IN THE ROUND, of flap over top of left
flap. Continue as for Left Mitten.
Place markers: Place markers at
the 5th & 6th[6th & 7th] sts to left of
the point where the overlap was made. The left marker
will denote BOR. Cut CC.
Mitten Body-Left &
Right Mitten
Join MC after the BOR marker and
knit one round even, making sure to knit 2 sts together
where you alternated the 8[6] sts for the overlap.
[38[40] sts]
Round 2: Knit to 1st marker and
slip it, m1L [lift bar between sts with right leg
forward], k1, m1R [lift bar between sts with left
leg forward], slip marker, k to end of round.
Round 3 & 4: Knit
Repeat these 3 rounds 4[5] more
times -- 48[52] sts.
Place the gusset sts, 11[13] on
holder.
Knit another rnd, place BOR marker,
add 1 st by e-wrap CO and join piece in the round
again. [38[40] sts]
Knit around until piece measures
4[5] inches from e-wrap CO row.
Top Shaping
Round 1: *K8, k2tog* 3[4] times,
k8[0] --35[36] sts.
Round 2: Knit.
Round 3: *K7, k2tog* 3[4] times,
k8[0] -- 32 sts.
Round 4: Knit.
Continue in this manner by knitting
one less st between decreases every other round
until 20 sts remain. Then decrease every round until
8 sts remain. Cut yarn and pull tail through live
sts, weave in the end.
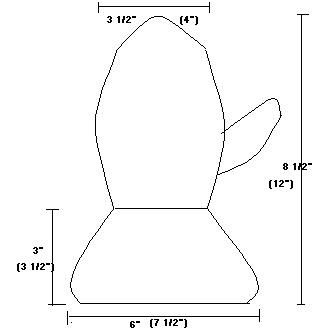
Thumb Gusset
Slip gusset sts to 2 DPNs and
use DPNs to pick up sts around thumb opening. Pick
up 7 and knit straight for 2[2.5] inches from pick
up sts --18[20]sts.
Shape the Thumb
Child Size
Round 1: *K2tog, k2*, k2tog. [13
sts]
Round 2: Knit.
Round 3: *K2, k2tog* k3. [10 sts]
Round 4: *K2tog*. [5 sts]
Cut yarn, pull it through live
sts on needles, weave in ends.
Adult Size
Round 1: *K2tog, k2*. [15 sts]
Round 2: Knit.
Round 3: *K2tog, k1*. [10 sts]
Round 4 *K2tog*. [5 sts]
Cut yarn, pull through live sts
on needles, weave in ends.
HAT
Flap
Using PCO and US #10.5 circular
needle, CO 80[90] sts with MC. Work in St st, starting
with k row, work 2 rows.
Row 3: *K10, m1* 7[8] times, k10
-- 87[98] sts.
Row 4-6: Work in St st.
Row 7: *K11, m1* 7[8] times, k10
-- 94[106] sts.
Rows 8-10: Work in St st.
Row 11: *K12, m1* 7[8] times,
k10 -- 101[114] sts.
Row 12: Work in St st.
For child size only:
Rows 13-20: Do short rows following
instructions for mitten flap.
Row 13: K 100, short row.
Row 14: P 99, short row.
Continue in this manner, knitting
or purling one less stitch than row before. On Row
20 omit the wrap. Slip all sts to right hand needle
and cut MC.
Join CC and pick up 8 sts along
top left corner, starting where PCO is made. Try
not to pick up waste yarn. Knit live sts from needle
and then pick up 8 more sts on right curved edge
of the piece. [117 sts]
For adult size only:
Row 12-14: Work in St st.
Rows 15: K13, m1 7[8] times, k10.
[122 sts]
Rows 16: Work in St st.
Rows 17-24: Do short rows following
the instructions for mitten flap.
Row 17: K 121, short row.
Row 18: P 120, short row.
Continue in this manner knitting
or purling one less st than row before. On Row
24 no wrap is necessary, just
stop purling 1 st before last purl row. Slip all
sts to right hand needle and cut MC.
Join CC and pick up 12 sts on
left edge, knit live sts and pick up 12 sts on right
edge. [146 sts]
For all sizes:
Knit I row, work in rev St st
for 2 more rows and using same technique from mittens
join CC into a tube, at same time cast off all but
1 stitch.
Brim Detail
Using same method as in mittens,
pick up 1 st of tube edge and knit across all sts,
removing waste yarn from PCO, and pick up 2 sts
from tube edge at opposite end of flap -- 80[94]
sts.
Refer to Mitten [wrist detail]
and use same method to overlap edges, this is where
you can choose which flap to overlap. Slip 8 sts
onto spare needle for both sizes. Once the sts are
on the needle knit one round making sure to k2tog
when you come to sts of overlapped edges -- 72[86]
sts.
Work 5 rounds in rev St st. Use
joining method as in mitten pattern, join purl stitches
to form a tube. Cut CC and turn work inside out
so wrong side is facing you.
Hat Body
Join MC and knit 1 round even.
Round 2: *K10, m1* 7[8] times,
k2[6] -- 79[94] sts.
Knit in St st for 30[32] rounds.
You do not need to cut MC, it will join up again.
Join CC and knit one round, knit
in rev St st for 5 rounds. Join tube together as
in previous band and cut CC.
Hat Crown
Join MC and knit one round decrease
1[4] sts evenly -- 78[90] sts.
Place markers at following places:
Child's size, after every
13th stitch.
Adult size, after every
15th stitch. These mark the decrease points.
Decrease method: *Work to marker,
slip marker, slip 2 sts tog knitwise, k1, p2sso*-12
sts decreased.
Round 2: Decrease round.
Round 3 & 4: Knit.
Repeat these 3 rounds until 6
sts are left, switching to DPNs as needed. Cut MC
and join CC and make I-cord for 5-6 inches, pull
yarn tail through sts on needle and weave in ends.