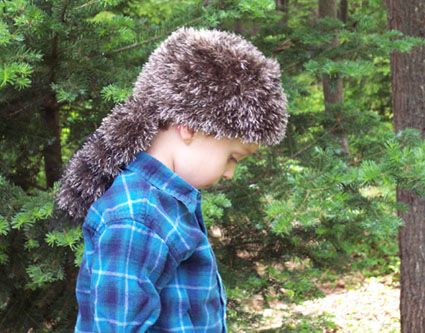
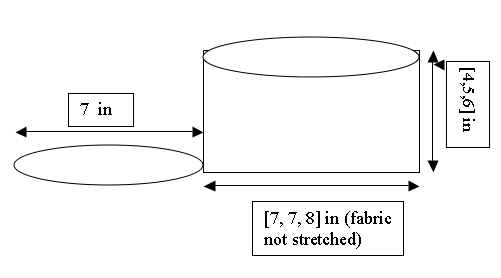
Body of the Hat
Using the circular needle, CO
62[62, 66] sts with MC. Being careful not to twist
the CO row, join and mark the beg of the round with
a stitch marker.
*K1P1* around for 2 inches.
Then work in St st for 2[3, 4]
more inches.
To Create the Top Ridge of the Hat
This step requires some patience
because the yarn is fuzzy so stitches can be difficult
to see. But it is an important to give the hat some
structure so that it looks like a hat and not a
wig!
Using one of your double pointed
needles, on the WS of the fabric, pick up the stitch
that is 4 rows directly below the stitch you are
about to knit on your left needle. Pull this picked
up stitch and slide it onto the left needle. K tog
[so that you are knitting the picked up stitch with
the first stitch on the needle]. Repeat around to
complete the ridge.
Top of Hat
Begin decreasing as follows and
change to double pointed needles when you have too
few stitches to continue on the circular needles:
For the youth sizes:
Row 1: K2tog, k29, k2tog, k29
-- 60 sts.
Row 2: *K4, k2tog* around -- 50
sts.
Row 3: Knit.
Row 4: *K3, k2tog* around -- 40
sts.
Row 5: Knit.
Row 6: *K2, k2tog* around --30
sts.
Row 7: Knit.
Row 8: *K1, k2tog* around -- 20
sts.
Row 9: Knit.
Row 10: *K2tog* around -- 10 sts.
Row 11: *K2tog* around -- 5 sts.
For the adult size:
Row 1: Knit.
Row 2: *K4, k2tog* around --55
sts.
Row 3 and 4: Knit.
Row 5: *K3, k2tog* around -- 44
sts.
Row 6: Knit.
Row 7: *K2, k2tog* around -- 33
sts.
Row 8: Knit.
Row 9: *K1, k2tog* around -- 22
sts.
Row 10: Knit.
Row 11: *K2tog* around -- 11 sts.
Row 12: *K2tog* around, K1 --
6 sts.
Break yarn and thread through
the remaining stitches.
Tail
[one size for all hats]
Using double point needles, CO
6 sts with CC. [To make the striping more prominent,
use the contrasting yarn doubled. If you want the
striping on the tail to be more subtle, then use
a single strand.]
Distribute sts on 3 needles [2
sts each needle]. Place marker between the first
and second sts of needle #1 so that you can keep
track of when you start a new row.
Row 1: Knit.
Row 2: Inc in every st [12 sts].
Row 3 and 4: Knit.
Change to MC [Because the yarn
is carried on the inside of the tail, you do not
break the yarn when changing colors. Just carry
the strand loosely.]
Rows 5: Knit.
Row 6: *K1, inc in the next stitch*
around [18 sts].
Rows 7 and 8: Knit.
Change to CC
Row 9: Knit.
Row 10: *K1, inc in the next stitch*
around [27 sts].
Row 11: Knit.
Rows 12 to 15: Knit with MC.
Rows 16 to 18: Knit with CC.
Rows 19 to 22: Knit with MC.
Rows 23 to 25: Knit with CC.
Change to MC. Work in St st until
tail is 7 inches long.
Then *K1, k2tog* around for 2
rows [12 sts].
Bind off [this is the end that
you will sew to the hat].