Using a tape measure, measure
the chest circumference of the wearer, at the widest
point of the chest. Add six inches of ease and begin
your calculations:
|
Calculation
|
Unit
|
|
Sample
|
My #s
|
|
Chest circumference plus 6 inches ease,
measured in inches
|
inches
|
A
|
43
|
|
|
Stitch gauge per inch
|
sts/inch
|
B
|
4.5
|
|
|
Row gauge per inch
|
rows/inch
|
C
|
6
|
|
|
Multiply A and B, round to nearest multiple
of 4
[Number of sts around body of sweater]
|
sts
|
D
|
192
|
|
|
Multiply D by 0.9, round to nearest multiple
of 8
[Number of sts to CO]
|
sts
|
E
|
176
|
|
|
Multiply A and C
[Length in rows, doubled; used for other
calculations]
|
rounds
|
F
|
258
|
|
|
Divide E by 2. Subtract 4.
[Number of sts between side "seams"
]
|
sts
|
G
|
84
|
|
|
Multiply F by 0.05, round to nearest whole
number
[Number of rows of ribbing to be worked;
also number of sts in gusset]
|
rnds
|
H
|
13
|
|
|
Subtract E from D
[Number of sts to be increased after ribbing]
|
sts
|
I
|
16
|
|
|
Divide E by I (include fractions)
[Approx. number of sts between increases]
|
sts
|
J
|
11
|
|
|
Divide F by 2. Add H.
[Length in rows]
|
rnds
|
K
|
142
|
|
|
Multiply F by 0.06, round to nearest whole
number
[Minimum number of rows in stockinette st
section] |
rnds
|
L
|
15
|
|
|
Subtract L from K. Subtract 9.
[Maximum
number of rows in patterned section]
|
rnds
|
M
|
118
|
|
|
Divide M by 16, round DOWN to nearest whole
number
[Number of whole repeats of Chain Cable
Pattern]
|
repeats
|
N
|
7
|
|
|
Multiply N by 16
[Actual number of rows
to be worked in patterned section]
|
rnds
|
O
|
112
|
|
|
Subtract O from M
[Number of rows to be
added to stockinette st section]
|
rnds
|
P
|
6
|
|
|
Add L and P
[Number of rows in stockinette
st section]
|
rnds
|
Q
|
21
|
|
|
Multiply D by 0.2, round to nearest multiple
of 4
[Number of back neck stitches; also
number of sts in cuff]
|
sts
|
R
|
40
|
|
|
Add 4 to R
[Number of sts in center panel]
|
sts
|
S
|
44
|
|
|
Divide D by 2
[Total number of sts for front or back]
|
sts
|
T
|
96
|
|
|
Subtract S from T. Subtract 28.
[Number of sts in side panels]
|
sts
|
U
|
24
|
|
|
Divide U by 2
[Number of sts to be worked in stockinette
st, in each side panel]
|
sts
|
V
|
13
|
|
|
Divide F by 4, round to nearest whole number
[Number of rows from top to start gusset]
|
rnds
|
W
|
65
|
|
|
Divide F by 6, round to nearest whole number.
Add 16.
[Number of rows from top to start Anchor
Panel]
|
rnds
|
X
|
59
|
|
|
Add 3 to O. Subtract W.
[Number of row in patterned section in
which to begin gusset]
|
rnds
|
Y
|
50
|
|
|
Add 3 to O. Subtract X. If necessary, round
down to nearest even number.
[Number of row in patterned section in
which to begin working Anchor Panel]
|
rnds
|
Z
|
56
|
|
|
Subract 24 from S, divide by 2
[Number of sts in center panel on either
side of Anchor Panel]
|
sts
|
AA
|
10
|
|
|
Add Y and H
[Row number at which Front and Back will
be divided and worked separately]
|
rnds
|
BB
|
62
|
|
|
Multiply D by 0.15, round to nearest multiple
of 4
[Number of front neck stitches]
|
sts
|
CC
|
28
|
|
|
Subtract CC from R
[Difference between front and back neck
sts]
|
sts
|
DD
|
12
|
|
|
Add 1 to O. Subtract DD.
[Row number at which front neck shaping
will begin]
|
row
|
EE
|
101
|
|
|
Add 8 to T. Subtract CC. Divide by 2.
[Number of sts to work before placing neck
sts on st holder]
|
sts
|
FF
|
38
|
|
|
Divide DD by 2. Subtract from FF. Subtract
5.
[Final Number of sts in each shoulder]
|
sts
|
GG
|
27
|
|
|
Subtract H from T
[Number of sts in sleeve after gusset sts
have been decreased]
|
sts
|
HH
|
83
|
|
|
Multiply D by 0.24; round to nearest odd
number if HH is odd, or to nearest even number
if HH is even
[Number of sts rem in sleeve before final
decrease round for cuff]
|
sts
|
II
|
47
|
|
|
Multiply H by 4. Subtract from K.
[Number of rounds in sleeve, between end
of gusset and decrease round for cuff]
|
rnds
|
JJ
|
90
|
|
|
Subtract II from HH
[Number of sts to be decreased over JJ
rows]
|
sts
|
KK
|
36
|
|
|
Divide JJ by KK. Multiply by 2, round to
nearest whole number.
[Number of sleeve rounds worked per pair
of sleeve decreases]
|
rnds
|
LL
|
5
|
|
|
Subtract R from II
[Number of sts to decrease in final decrease
round before cuff]
|
sts
|
MM
|
7
|
|
|
Multiply D by 0.45, round to nearest multiple
of 4
[Number of sts in collar]
|
sts
|
NN
|
88
|
|
|
Add R and CC. Subtract from NN. Divide by
2.
[Number of sts to pick up along each side
of front neckline]
|
sts
|
OO
|
10
|
|
Bottom Ribbing
Using circular needle, CO _____
(E) sts.
(My favorite CO method for ribbing is the Twisted
German Cast-On. If you aren't familiar with it, you
can find instructions online here.
Place marker and join to begin working in the round.
Work the first round of ribbing as follows:
P1,
[k2, p2] for _____ (G) sts, k2, p1, place marker,
p1, [k2, p2] for _____ (G) sts, k2, p1.
Work
in rib as set until _____ (H) rounds of ribbing
have been worked.
If you would like a narrower or wider band of ribbing
at the hips, feel free to work more or fewer rounds.
Stockinette St Section
The
next row will be an increase row. You will be increasing
_____ (I) sts, evenly distributed around the circumference
of the sweater. This corresponds (roughly) to increasing
every _____ (J) stitches. Your number for (J) may
not be a whole number. If this is the case, use
your best judgment to distribute the increases evenly.
For example, if (J) = 8.25, you may choose to increase
after every 8th st three times, then after the 9th
st once, then repeat this increase pattern around
the sweater.
Work the increase row as follows:
P1,
k to 1 st before second marker, increasing evenly
as described above, p2, k to 1 st before end-of-round
marker, increasing evenly as described above, p1.
Note: I found the best increase to use is m1kf.
Do not work increases in the purl sts on either
side of the markers.
After the increase row,
you should have _____ (D) sts on the needle. Continue
working for _____ (Q) rounds, knitting all sts except
for the two purl sts on either side of each marker.
These purl sts will serve as mock seams (a design
element); these vertical columns of purl sts will
extend all the way up both sides, around the underarm
gussets, and down the undersides of each sleeve.
If you feel comfortable
doing so, you may remove the markers once the columns
are established; the mock seams also serve to delineate
the front and back, and you can distinguish the
beginning of the round by looking for your cast-on
tail. From now on, I will refer to the beginning-of-round
mock seam as the left seam (since it goes up the
left side of the garment when worn), and to the
other mock seam as the right seam.
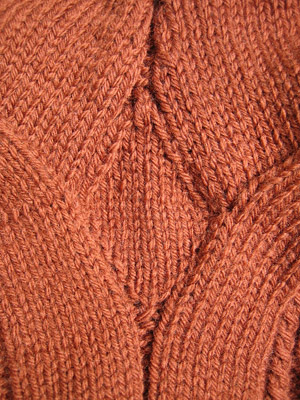
Definition Ridge and
Patterned Section
After
working _____ (Q) rounds, work 5 rounds in Garter
Stitch.
These rounds create what
Beth Brown-Reinsel calls a "definition ridge"
which separates the area of plain knitting (which
you just finished) from the beginning of the patterned
section (which you will begin in the next round).
The next two rounds are
set-up rounds. Since a cable pattern will be introduced,
it is necessary to increase some stitches to compensate
for how the cable will pull in the fabric. Five
stitches will be added for each of the four cable
panels, for a total increase of 20 stitches.
Work the set-up rounds
as follows:
Set-up Round 1: [P1,
k _____ (V), [p1, m1p, k2] four times, p1, m1p,
k _____ (S) (Row 1 of Dot Stitch), [p1, m1p, k2]
four times, p1, m1p, k _____ (V), p1] twice. You
should now have (D) + 20 sts on the needle.
Set-up Round 2:
[P1, k _____ (V), [p2, k2] four times, p2, [k1,
p1] over _____ (S) sts (Row 2 of Dot Stitch), [p2,
k2] four times, p2, k _____ (V), p1] twice.
Now you will begin working
the patterned area. For the cable panels, refer
to the Chain Cable chart. Since you are currently
working in the round, read the chart from bottom
to top, right to left on every row. Use only the
Right Side directions.
Pattern Round 1:
[P1, k _____ (V), work Row 1 of Chain Cable, work
_____ (S) sts in Dot Stitch as set, work Row 1 of
Chain Cable, k _____ (V), p1] twice.
Work in patt as set. Dot
Stitch repeats every four rows; Chain Cable repeats
every sixteen rows. All in all, you will be completing
_____ (N) repeats of the Chain Cable. However, before
you knit away, you first need to determine whether
the next significant event of the pattern is the
Anchor Panel or the underarm gussets. (In most cases,
it will be the gussets; however, for smaller sizes
worked in heavier yarn it may be the panel.)
What
is an underarm gusset?
In most garments with sleeves, the underarm
is a point where three seams meet: the body
seam, the sleeve seam, and the sleeve-to-body
seam. This places stress on that point,
making it more susceptible to wear. Gansey
knitters of old recognized this fact and
developed triangular or diamond-shaped underarm
gussets to relieve the stress point and
to allow greater arm movement.
On the first row
of the gusset, you will increase one stitch
between the two purl stitches. From then on,
you will work paired increases every other
row just inside the purl stitches, until all
gusset increase rows have been worked.
Before you begin
working the gusset, make a note of your calculation
for (Z). If (Z) is less than (Y+3) then you
will need to begin the Anchor Panel on Round
Z, and work the gussets and the Anchor Panel
simultaneously.
|
 |
Underarm
Gussets
and Anchor Panel Placement
Compare your calculated values
for (W) and (X). If (W) is greater than (X), then
you will start the gussets first; otherwise, you
will start the Anchor Panel first.
Note:
Although the Anchor Panel appears to encompass 25
sts, it begins and ends with 24 sts. One stitch
is increased in row 6 and one stitch is decreased
in row 28.
When
you are working in the round, read the chart from
bottom to top and right to left on every row, using
the Right Side directions only. When you finish
the underarm gussets and begin working flat, you
will read the chart back and forth, using both Right
Side and Wrong Side directions.
IF YOU ARE STARTING
THE ANCHOR PANEL FIRST:
Work
in established patterns until you reach Pattern
Round _____ (Z).
Pattern Round _____
(Z ):
P1, k _____ (V),
work 18 sts of Chain Cable as set,
work _____ (AA) sts in Dot Stitch as set, work Row
1 of Anchor Panel (24 sts),
work _____ (AA) sts in Dot Stitch as set, work 18
sts of Chain Cable as set,
k _____ (V),
p2 (right seam),
k _____ (V),
work 18 sts of Chain Cable as set,
work _____ (S) sts in Dot Stitch as set, work 18
sts of Chain Cable as set,
k _____ (V), p1.
Continue working in patt
as set until you reach Pattern Round _____
(Y), the first gusset round. Follow the directions
below under "If you are starting the
gussets first" -- however, keep working
the anchor panel as established (it will not
be indicated in the directions that follow).
IF YOU ARE STARTING
THE GUSSETS FIRST:
Work in established patterns until you reach
Pattern Round _____ (Y).
Pattern
Round _____ (Y): [M1kb, p1, k _____ (V), work
18 sts of Chain Cable as set, work _____ (S) sts
in Dot Stitch as set, work 18 sts of Chain Cable
as set, k _____ (V), p1] twice.
You should now have (D) + 22 sts on the needle.
Pattern Round _____
(Y+1): [K1, p1, k _____ (V), work 18 sts of Chain
Cable as set, work _____ (S) sts in Dot Stitch as
set, work 18 sts of Chain Cable as set, k _____
(V), p1] twice.
Pattern Round _____
(Y+2): [K1, m1kf, p1, k _____ (V), work 18 sts of
Chain Cable as set, work _____ (S) sts in Dot Stitch
as set, work 18 sts of Chain Cable as set, k _____
(V), p1, m1kb] twice. You should now have (D) +
24 sts on the needle.
Continue working the gusset
as established; increasing two sts every other row
as in Row Y+2, until _____ (H) rounds of the gusset
have been worked, remembering to begin the Anchor
Panel when you have reached Row Z. (See above, in
the section marked "If you are working the
Anchor Panel first" for instructions on placement
of the panel.)
There is a very slight
chance that you will complete the gusset before
beginning the Anchor Panel (this would only occur
if you are working the gansey for a very large person
using thinner yarn); if this is the case, skip down
to the section on dividing into front and back,
but remember to start the Anchor Panel on Row Z
-- you will be working back and forth for the entire
panel.
Divide Front and Back
Pattern
Row _____ (BB): Work gusset including left side
seam st, then place entire gusset, including both
seam sts, onto a stitch holder or waste yarn. Continue
working row: k _____ (V), work 18 sts of Chain Cable
as set, work _____ (AA) sts of Dot Stitch as set,
work Anchor Panel as set, work _____ (AA) sts of
Dot Stitch as set, work 18 sts of Chain Cable in
established pattern, k _____ (V).
Set aside the current ball of yarn but do not break
yarn; you will use this ball later to complete the
front. Place the right underarm gusset sts on a
stitch holder or waste yarn, then join a new ball
of yarn and continue
working across the back: k _____ (V), work 18 sts
of Chain Cable as set, work _____ (S) sts of Dot
Stitch as set, work 18 sts of Chain Cable as set,
k _____ (V). Place all front sts on stitch holder
or waste yarn.
Working back and forth, continue working the back
in patt as set. You should have (U) + (S) + 36 sts.
On wrong side rows, begin using the Wrong Side row
directions on charts and stitch patterns. Continue
until you have completed _____ (O) rows in the Patterned
Section.
Work one RS row in patt as set.
Back Finishing Row [WS]: P _____ (V), [ssk,
p2] four times, ssk, work _____ (S) sts in Dot Stitch
as set, [ssk, p2] four times, ssk, p _____ (V).
You should now have (U) + (S) + 26 sts.
Place back stitches on a stitch holder or waste
yarn.
Upper Front
Place
front stitches on needle and continue working in
established patterns until you have completed the
row before Pattern Row _____ (EE).
Pattern Row _____ (EE): Work _____ (FF) sts
in patt as set , place next _____ (CC) sts on stitch
holder or waste yarn, join new ball of yarn and
work remaining _____ (FF) sts in patt as set.
Working both shoulders at once, shape neckline by
decreasing one st at neck edge of each side every
other RS row. Use an appropriate slanting decrease
for each side: ssk on right side, k2tog on left.
Cont until Pattern Row _____ (O) has been
completed.
Work 1 RS row in patt as set, continuing decreases
at neck edges.
Front Finishing Row [WS]: Right Shoulder:
P _____ (V), [ssk, p2] four times, ssk, work in
Dot Stitch as set to neck edge; Left Shoulder: Work
in Dot Stitch as set to beginning of Chain Cable
panel, [ssk, p2] four times, ssk, p _____ (V). You
should have _____ (GG) sts remaining on each shoulder.
Join shoulders using Three-Needle Bind Off.
____ (R) back neck sts and _____ (CC) front neck
sts remain on hold.
 Sleeves
Place
held sts from one gusset on a double-pointed needle.
Rejoin yarn and using double-pointed needles, work
these sts in patt, then pick up and k ____(HH-2)
sts around armhole. _____ (T) sts on needles, including
gusset sts.
Work one round in stockinette st, maintaining seam
sts on either side of gusset. (Seam and gusset sts
will mark beginning of round.)
Next Round: P1, ssk, k to last 2 sts of gusset,
k2tog, p1, k to end.
Work 1 round in stockinette st, maintaining seam
sts.
Repeat these 2 rounds until
3 gusset sts remain.
Next Round: P1, slip
next 2 sts together as if to k2tog, k next
st, pass both slipped sts over last st, p1,
k to end.
Work 1 round as set.
Next Round: p2tog, p1, k to end.
You should have _____ (HH) sts on the needles.
Work 1 round as set.
Decrease Round: P2, k2tog, k to last
2 sts, ssk.
Repeat this round every _____ (LL) rounds
until ______(II) sts remain.
Cont in stockinette st, maintaining seam sts,
until you have worked (JJ + H) sleeve rounds
(including gusset rounds).
On the next round, decrease _____ (MM) sts
evenly. You should have _____ (R) sts remaining.
Next Round: Using smaller double-pointed
needles, [p2, k2] around.
Repeat this round until _____ (H) rounds have
been worked, or until the cuff is desired
length. BO loosely in patt.
Work other sleeve in the same manner.
Neckband
Place
back and front neck stitches on smaller double-pointed
needles. Join yarn at left shoulder, k back neck
sts, pick up and k _____(OO) sts along right side
of front neckline, k held front neck sts, pick up
and k _____(OO) sts along left side of front neckline.
You should have _____ (NN) sts.
Next Round: [K2, p2] around.
Repeat
this round until neckband is desired depth. BO all
sts loosely in patt.