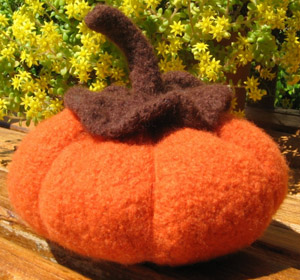
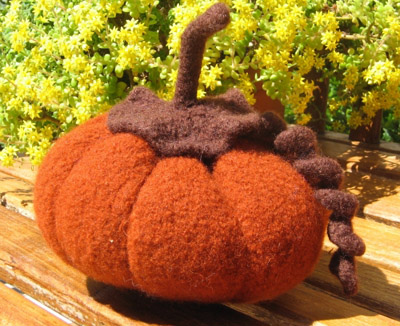
Grandma Knitty Home
Knitty: little purls of wisdom
letter from the editorfeatured articlesKnitty's fabulous pattern selectionarchive of back issuestell us what you think of KnittyKnitty's favorite linkshelp knitty keep on keepin' onknitty's virtual sNbjoin the Knitty notifylistknitty's tiny little shopping malltake home something Knitty


Elann

the Knitty FAQ

submission guidelines for designers and writers

the obligatory legal statement

the rabbit

© Knitty 2002-2006. All rights reserved. Unauthorized reproduction prohibited. This means you.


arisaigsamuscinxiajosephineblackberryrevolutionlacey
leaves in reliefbloomellaflorahipsterfalling leavesbubby
edgarastrodomepumpkinstit bitsyorick

Last year I saw a small photograph of a pile of pumpkins on a knitting website. I thought they were felted and got excited. But no, they were real pumpkins. So, I decided to write a pattern myself.

These pumpkins are very easy to make. And if you do make a mistake, felting will erase it.

photos: Jordana Paige

SIZE
Little [big]
 
FINISHED MEASUREMENTS

Circumference: 17.5 [21] inches
Height (not including stem): 3.25[4.25] inches


MATERIALS

Cascade 220 [100% wool; 220 yd/198m per 100g skein]
[MC] Color: Burnt Orange #7824 or Ginger #2414; 1 skein
[CC] Color: Chocolate Brown #8686; 1 skein

1 set US 10.5/6.5mm double-point needles
1 set US 10.5/6.5mm straight needles
Waste yarn
Tapestry needle
Sewing needle
Sewing thread
Plastic grocery bags
Stuffing

GAUGE
16 sts/20 rows = 4 inches in stockinette stitch
 
PATTERN NOTES

[Knitty's list of standard abbreviations can be found here]

The little pumpkin was made with the Burnt Orange yarn and the big pumpkin was made with the Ginger yarn. If you do not leave excessively long yarn tails, one little and one big pumpkin can be made from a single MC skein.

I-cord
When working I-cord, work is not turned. Instead of turning the work around to work back on the WS, slide all sts to the other end of the needle, switch the needle back to your left hand, bring the yarn around the back of the work, and start knitting the sts again. After the first 2 sts, give the yarn a sharp tug

Repeat this row to form I-cord. After a few rows, the work will begin to form a tube.

 
DIRECTIONS
Pumpkin Body

Wedge (Make 7[8])

Using MC and straight needles, CO 7 sts.
Beg with a RS row, work 5 rows in stockinette st.
Increase Row [WS]: P1, m1, p to last st, m1, p1.
Repeat these 6 rows twice more. 13 sts.

Work 5[17] rows in stockinette st.

Decrease Row [WS]: P1, p2tog, p to last 3 sts, p2tog, p1.
Work 5 rows in stockinette st.
Repeat these 6 rows twice more. 7 sts rem.

BO all sts.

Stem
Using CC and double-point needle, CO 7 sts.
Work 3[4] inches of I-cord.

Distribute sts evenly between 3 double-point needles and place marker, ready to begin working in the round

Next Round: [Kfb] in each st. 14 sts.
K 1 round.

Next Round: [Kfb] in each st. 28 sts.
K 2 rounds.

Next Round: [Kfb] in each st. 56 sts.
K 2 rounds.

BO all sts loosely.

Vine
Using CC and straight needles, CO 28 sts.
[K into front, then back, then front again] of each st. 84 sts.
BO sll sts, twist piece into corkscrew.

 
FINISHING

Sew Wedges together along long, shaped edges to form round pumpkin body. Weave in ends on body, stem and vine.

Run yarn through lower edges of each wedge and pull tight to close bottom of pumpkin. Secure yarn and weave in end. Weave in ends on body, stem and vine.

Felt pumpkin body, stem and vine in washing machine using low water/economy setting on hot water wash with a couple pairs of jeans or other heavy garment to provide agitation. Add a small amount of detergent or dishsoap to the pieces. Check every 10 - 15 minutes. Once stitch definition is no longer visible, remove pieces from machine and rinse with cold water.
Stuff pumpkin with plastic bags. Wrap yarn very tightly around pumpkin at seam lines, and knot to secure. Repeat for each seam line. This will cause grooves to form along body of pumpkin during felting. Allow to dry completely.

Remove plastic bags and scrap yarn tied around seams. Stuff pumpkin.

ABOUT THE DESIGNER

Jordana graduated!

To answer everyone's question of "what now?"...Jordana Paige full-time!