Grandma Knitty Home
Knitty: little purls of wisdom
letter from the editorfeatured articlesKnitty's fabulous pattern selectionarchive of back issuestell us what you think of KnittyKnitty's favorite linkshelp knitty keep on keepin' onknitty's virtual sNbjoin the Knitty notifylistknitty's tiny little shopping malltake home something Knitty


Elann

the Knitty FAQ

submission guidelines for designers and writers

the obligatory legal statement

the rabbit

© Knitty 2002-2006. All rights reserved. Unauthorized reproduction prohibited. This means you.


arisaigsamuscinxiajosephineblackberryrevolutionlacey
leaves in reliefbloomellaflorahipsterfalling leavesbubby
edgarastrodomepumpkinstit bitsyorick

On one of my many visits to Marietta, Georgia, my extremely talented friend Chelsea Darling handed me a huge stack of fabulous design sketches done on the backs of various homework assignments, and she told me I could use any of them. After the initial state of awe, I chose one sketch of a sort-of American Revolution-type jacket.

I decided that with such a classic design, I ought to try to do it with a modern twist. I decided to use a stitch I had been working with that I haven't seen used elsewhere for the main part of the jacket. I guess I wanted to be a bit revolutionary myself.

model: Ryan Marnell photos: Brendan Marnell

SIZE

XS [S, M, L, XL, XXL] (shown in size M)
To fit chest sizes: 32[36, 40, 44, 48, 52] inches

 
FINISHED MEASUREMENTS

Width across back at underarm: 17[19, 21, 23, 25, 27] inches
Length: 31.5[32, 33, 34, 35, 36] inches

MATERIALS

Brown Sheep Lamb's Pride Worsted [85% wool, 15% mohair; 190 yd/171m per 4oz skein]
[MC] M03 Grey Heather; 8 [9, 11, 13, 15, 17] skeins
[CC] M18 Khaki; 3 skeins

32-inch US #10/6mm circular needle
12-inch or 16-inch US #10/6mm circular needle
12 7/8 inch buttons
8 5/8 inch buttons
Stitch holder
Stitch marker
Tapestry needle

GAUGE
15 sts/18 rows = 4 inches in Split Stitch (see Pattern Notes)
 
PATTERN NOTES

[Knitty's list of standard abbreviations can be found here]

Note: for all variations of Split Stitch, you are knitting with two strands of yarn held together. You will be working with one strand from two different stitches as instructed.

Split Stitch
When Worked Back and Forth:
Row 1
[RS]: Working with double strand of yarn, k into first strand of first st on needle, [k second strand of first st on needle together with first strand of next st on needle] until 3 strands remain (second strand of second-last st and both strands of last st), k these 3 rem strands together.
Row 2 [WS]: Cont with double strand of yarn, p into first strand of first st on needle, [p second strand of first st on needle together with first strand of next st on needle] until 3 strands remain, p 3 rem strands together.
Repeat these 2 rounds for Split Stitch.

When Worked in the Round:
Set-up Round: K into first strand of first st on needle, [k second strand of first st on needle together with first strand of next st on needle] until 1 strand remains.
Round 1: Slip last strand of previous round to right needle, remove st marker, slip strand back to left needle, k this strand together with first strand of first st, replace st marker, [k second strand of first st on needle together with first strand of next st on needle] until 1 strand remains.
Round 2: Slip last strand of previous round to right needle, remove st marker, slip strand back to left needle, replace st marker, k this strand together with first strand of first st, [k second strand of first st on needle together with first strand of next st on needle] until 1 strand remains.
Repeat Rounds 1 and 2 for Split Stitch.

Split Stitch Decrease Row (Can be worked on RS or WS):
Work both strands of first st together with first strand of second st on needle, [k second strand of first st on needle together with first strand of next st on needle] until 5 strands remain, k 5 rem strands together. 1 st decreased at each end of row.

Seed Stitch (Worked over an odd number of sts)
Row 1: [K1, p1] to last st, k1.
Every row is the same.

Intarsia
When working color work in Intarsia, different sections of each row are worked with different colors. For this pattern, it is necessary to use a different ball of yarn for each area of color. When switching from one color to the next, drop the color you have been knitting with, and bring the yarn for the next color up under the yarn of the previous color before you continue knitting. This will twist the 2 yarns around each other. It is very important to do this; if you do not wrap the yarns in this way, the areas of color will not be joined, and you will have holes in your work.

W2tog
Work next 2 sts tog in patt (if next st is a k st, k2tog; if it is a p st, p2tog).

W2tog tbl
Work next 2 sts tog in patt through back loops (if next st is a k st, k2tog through back loops or ssk; if it is a p st, p2tog tbl).

Three-Needle Bind Off
Hold both pieces of knitting with right sides together.
*Insert needle into first st on front needle and first st on back needle, and knit them together. Repeat this for the next st on the front and back needles. Draw the first st worked over the second st.*
Repeat from * to * until all sts have been bound off. Break yarn and draw through remaining st.

 
DIRECTIONS

Note: This garment is worked with two strands of yarn held together.

Lower Left Body
Using longer needle and two strands of yarn held together, CO 13 sts using CC, then 50[57, 62, 68, 74, 80] sts using MC. Do not join.

Beg with a RS row, work MC sts in Split Stitch and CC sts in Seed Stitch, wrapping yarns between MC and CC sections as described in Intarsia notes (see Pattern Notes above). Cont in patt as set until work measures 8 inches, ending with a WS row. Place all sts on st holder or waste yarn; break MC but not CC.

Lower Right Body
Using longer needle, CO 50[57, 62, 68, 74, 80] sts using MC, then 13 sts using CC. Do not join.

Beg with a RS row, work CC sts in Seed Stitch and MC sts in Split Stitch until work measures 8 inches, ending with a WS row.

Lower Body
Place Lower Left Body on needle with Lower Right Body, with MC sections adjacent.

Next Row [RS]: Work Lower Right Body in patt as set until second strand of last st remains, k this strand tog with first strand of first st of Lower Left Body, cont in patt to end of row. 126[140, 150, 162, 174, 186] sts on needle (100[114, 124, 136, 148, 160] MC sts).

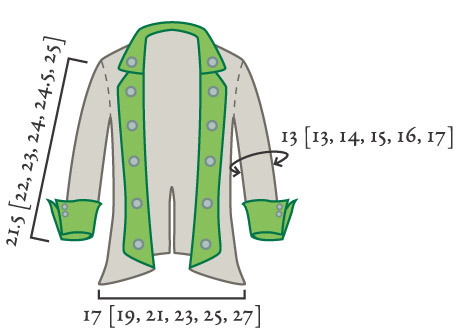
Cont in patt until work measures 21.5[22, 22.5, 23, 23.5, 24] inches, ending with a RS row.

Upper Body
Next Row [WS]: Work 25[28, 30, 32, 34, 36] sts in patt, BO 12 sts, work 52[60, 66, 74, 82, 90] sts (including st on right needle from BO) in patt, BO 12 sts, work rem 25[28, 30, 32, 34, 36] sts in patt.

Next Row [RS]: Work 25[28, 30, 32, 34, 36] sts in patt, place rem sts on st holders
Next Row [WS]: Work in patt to last 2 sts, w2tog.

Upper Right Front
Next Row [RS]: W2tog, work rem CC sts in patt, work to end in patt.
Next Row [WS]: Work in patt to last 2 sts, w2tog.
Repeat these 2 rows 4 times more. 2 CC sts rem.

Next Row [RS]: W2tog, break CC, draw yarn through rem CC st and pull tight, work to end in patt. 12[15, 17, 19, 21, 23] sts rem.

Cont in patt until work measures 10[10, 10.5, 11, 11.5, 12] inches from base of armhole, ending with a RS row. Place sts on st holder.

Upper Left Front
Replace sts for Left Front on needle with RS facing and rejoin yarn.
Work 1 row in patt.

Next Row [WS]: W2tog, work rem CC sts in patt, work to end in patt.
Next Row [RS]: Work in patt to last 2 sts, w2tog.
Repeat these 2 rows 5 times more. At end of last row, break CC, draw yarn through rem CC st and pull tight. 12[15, 17, 19, 21, 23] sts rem.

Cont in patt until work measures 10[10, 10.5, 11, 11.5, 12] inches from base of armhole, ending with a RS row. Place sts on st holder.

Upper Back
Replace sts for Back on needle and rejoin yarn.
Work in patt until work measures 10[10, 10.5, 11, 11.5, 12] inches from base of armhole, ending with a WS row (work 1 less row than for Fronts).

Next Row [RS]: Work 12[15, 17, 19, 21, 23] sts in patt, BO 28[30, 32, 36, 40, 44] sts, work in patt to end.
Join Fronts to Back at shoulders using Three-Needle Bind Off.

Sleeves (Make 2)
Note: Sleeves are worked using a 12 inch or 16 inch circular needle. If you are using a 16 inch needle and you find that you do not have enough stitches to reach comfortably around the needle when working in the round, you may want to work 1 row with your 16 inch needle, and the next row with your 32 inch needle, alternating needles each row. Using double-point needles, two circular needles for each row, or the magic loop technique, are not recommended due to the nature of the stitch pattern.

Using shorter circular needle and two strands of CC held together, CO 49[49, 53, 57, 61, 65] sts. Do not join.
Work in Seed Stitch until work measures 6 inches.

Switch to MC, place marker and join to begin working in the round.
Work in Split Stitch until work measures 16.5[17, 17.5, 18, 18.5, 19] inches from beginning of Split Stitch section, or desired length to underearm.

(Cuff will be folded back 4 inches.)

Next Round: Remove marker, work 19[19, 21, 23, 25, 27] sts in patt, BO 12 sts. 37[37, 41, 45, 49, 53] sts rem.

Sleeve Cap
Working back and forth, work 8 rows in patt.
Work Split Stitch Decrease Row.
Work 3 rows in patt. Work Split Stitch Decrease Row.
Work 2 rows in patt. Work Split Stitch Decrease Row.
Repeat these 3 rows once more. 29[29, 33, 37, 41, 45] sts rem.

Work 1 row in patt.
Work Split Stitch Decrease Row.
Repeat these 2 rows 4 times more. 19[19, 23, 27, 31, 35] sts rem.

Work Split Stitch Decrease Row each row 3[3, 5, 7, 7, 7] times. 13[13, 13, 13, 17, 21] sts rem.

BO rem sts.

Right Collar
Using two strands of CC held together, CO 13 sts.
Work 4 rows in Seed Stitch.

Next Row [RS]: Ssk, work in patt to end.
Work 3 rows in patt.
Repeat these 4 rows 7 times more. 5 sts rem.

Cont in patt until work measures 10.5[11, 12, 13.5, 14.5, 15.5] inches. BO rem sts.

Left Collar
Using two strands of CC held together, CO 13 sts.
Work 4 rows in Seed Stitch.

Next Row [RS]: Work in patt to last 2 sts, k2tog.Work 3 rows in patt.
Repeat these 4 rows 7 times more. 5 sts rem.

Cont in patt until work measures 10.5[11, 12, 13.5, 14.5, 15.5] inches. BO rem sts.

FINISHING

Sew sleeves into armholes.

Sew short edges of collar together, and sew collar to neckline of jacket along shaped edges of collar, lapping ends of collar over lapels (see photo).

Fold cuffs back 4 inches, and sew 2 small buttons to each side of cuff (4 buttons on each cuff), sewing through both layers on each side of slit.

Fold back lapels and sew 5 large buttons, evenly spaced, along each lapel, sewing through both lapel and body of jacket.

Sew 1 large button to each corner of collar, sewing through both collar and body of jacket.

Block to minimize curling of fabric.

ABOUT THE DESIGNER
Chelsea Darling moved from New Jersey to Marietta, Georgia, in 2003. At her new
school, she joined the journalism class where she became intrigued by the young
and mysterious entertainment editor, Ryan Marnell. They became great friends and soon both became obsessive knitters. In 2004, Ryan moved to Allentown,
Pennsylvania where he became an international knitting star (sort of) thanks to Knitty and his website, where he sells some of the stuff he knits. Chelsea is currently trying to establish herself as a graphic designer, and although she is not [yet] an international knitting star, she is still a pretty groovy chick.