  by
Kate Kuckro by
Kate Kuckro

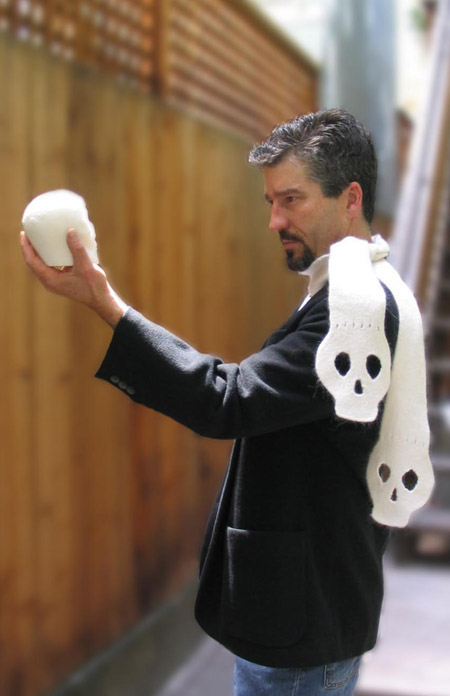
If you have to wear a scarf, why
not have one with some personality? I'd been searching
around for scarf ideas that aren't too cutesy when
I noticed some sugar skulls I had unearthed while
cleaning out a disturbingly disorganized cupboard.
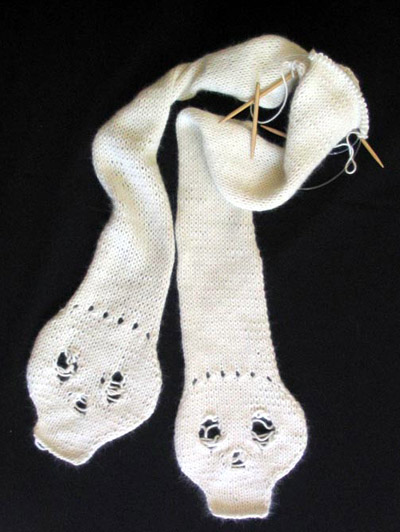
I wanted a pattern that was relatively
straightforward -- preferably with no partial rows
needed to create the holes. I settled on felting,
which allowed me to knit straight across each opening
and then cut out the yarns crisscrossing the eye and
nose openings without having to worry about anything
unraveling.
The yarn for this scarf -- Classic
Elite Lush -- is one of my favorite felting yarns.
It takes a bit of effort to get the felting underway,
but the resulting fabric is incredibly soft and pliable.
|
|
 model:
Alan Fairhurst, Mindi Canner
photos:
Kate Kuckro
model:
Alan Fairhurst, Mindi Canner
photos:
Kate Kuckro
|
|
| One |
| |
|
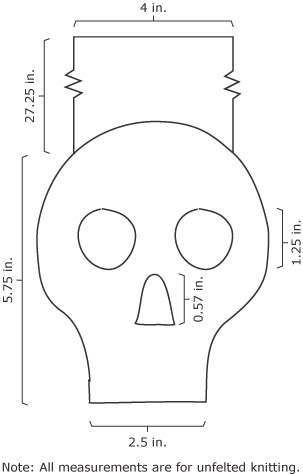
Length: 66 inches before felting, approx. 60 inches
after felting
|
| |
|
|
|
Classic Elite Lush [50% Angora,
50% Wool; 124yd/111m per
50g skein]; color: Cream #4416; 2 skeins
1 set US #8/5mm needles
Stitch holder or spare needle
Tapestry needle
Sharp scissors
|
| |
| 22 sts/24 rows = 4 in
stockinette st in stockinette stitch, before felting
|
| |
|
[Knitty's list of standard abbreviations
can be found here]
To make the skulls identical,
the scarf is knit in two pieces from the skulls up
and then grafted together at the middle. Since I don't
like long scarves, I designed a finished length of
about 60 inches. If you prefer longer scarves or just
hate the idea of have left-over yarn, continue knitting
each half until close to the end of each skein; just
be sure to leave about one yard for grafting the two
sides together.
If you substitute yarns,
be careful to check that the yarn you choose felts
properly. In some cases, white yarns and other light
colors may not felt as well (or at all) as dark colors
in the same brand.
|
|
|
 *Skull: *Skull:
CO 14 sts.
Rows 1-8: Work in stockinette st.
Row 9 [RS]: K1, m1, k to last st, m1,
k1. 16 sts.
Row 10 [WS]: P.
Row 11 [RS]: [K1, m1] twice, k to last
2 sts, [m1, k1] twice. 20 sts.
Row 12 [WS]: P.
Rows 13 & 14: Work as for Rows
11 & 12. 24 sts.
Nose
Row 15 [RS]: K1, m1, k9, BO 4 sts, k to last
st, m1, k1.
Row 16 [WS]: P11, yo 3 times, p to end of
row. 25 sts.
Row 17 [RS]: K1, m1, k9, k2tog, yo, k1 (in
center yo), yo, ssk, k9, m1, k1. 27 sts.
Row 18 [WS]: P11, p2tog, k1, p2tog tbl, p
to end. 25 sts.
Row 19 [RS]: K1, m1, k9, m1, k2tog, drop
next st from left needle, yo twice, ssk, m1, k to
last st, m1, k1. 28 sts.
Row 20 [WS]: P12, m1, p2tog, p2tog tbl, m1,
p to end. 28 sts.
Eyes
Row 21 [RS]: K1, m1, [k6, k2tog, yo twice,
ssk] twice, k to last st, m1, k1. 30 sts.
Row 22 [WS]: P8, p2tog, yo twice, p2tog tbl,
p6, p2tog, yo twice, p2tog tbl, p to end.
Row 23 [RS]: K7, k2tog, yo, k1, p1,
yo, ssk, k4, k2tog, yo, k1, p1, yo, ssk, k
to end. 30 sts.
Row 24 [WS]: P7, p2tog, k2, p2tog tbl, p4,
p2tog, k2, p2tog tbl, p to end. 26 sts.
Row 25 [RS]: K8, yo, k2, yo, k6, yo, k2,
yo, k to end. 30 sts.
Row 26 [WS]: P all sts.
Row 27 [RS]: K9, drop next 2 sts from left
needle, yo twice, k8, drop next 2 sts from left
needle, yo twice, k to end. 30 sts.
Row 28 [WS]: P10, [k1, p9] twice.
Rows 29 & 30: Work in stockinette st.
Shape Top of Skull
Row 31 [RS]: K1, ssk, k to last 3 sts, k2tog,
k1.
Row 32 [WS]: P all sts.
Repeat these 2 rows 3 times more. 22 sts rem.
Next Row [RS]: K3, yo, k2tog, k to last
5 sts, ssk, yo, k3.
Next Row [WS]: P6, [yo, p2tog, p1] 4 times,
p4.
Scarf
Work in stockinette st until work measures 33 inches,
or half of desired length. Place sts on st holder
or spare needle.*
Repeat from * to * once more.
|
|
|  Graft
the two halves together using Kitchener stitch;
for directions, see the Knitty Summer '04 Techniques
with Theresa. Graft
the two halves together using Kitchener stitch;
for directions, see the Knitty Summer '04 Techniques
with Theresa.
Weave in ends.
Begin fulling the scarf by
hand until the fabric is uniformly firm and the stitches
are only slightly distinct. I used a dollop of mild
soap, lots of rubbing, and alternating immersions
in hot and cold water. Once the fabric is firm, use
sharp scissors to cut the threads running across the
eye and nose openings on each skull. If necessary,
carefully cut any straggling bits around the openings
to even them out.
You can finish fulling the
scarf by hand or in a washing machine. To finish by
hand, continue as above. To finish by machine, carefully
place the scarf inside a small lingerie bag or a knotted
pillowcase. Set the machine to a normal wash cycle
with hot water, followed by a cold-water rinse. Choose
the lowest water level possible.
Add the bag or pillowcase
and about a teaspoon of mild detergent and start the
wash cycle. Check on the scarf's progress about halfway
through each cycle (you may need to run the scarf
through more than one cycle to acheive the desired
result), and remove it once the fabric has reached
the desired texture and density.
Once the fabric is very firm
and the stitches are no longer distinct (at least
on the right side -- purl stitches may still show
a little on the wrong side), rinse it by hand in cold
water and roll it in a towel to remove any excess
water. Lay the scarf flat on a dry towel and pat/pull
it into shape where needed. Allow the scarf to dry
completely.
|
|
 Kate Kuckro lives in San Francisco, where she
spends as much time as possible knitting, crafting,
and baking. After a number of dismal attempts
at scarves and doll blankets when she was little,
Kate abandoned knitting until college. She has
been happily experimenting, designing and knitting
ever since.
Kate Kuckro lives in San Francisco, where she
spends as much time as possible knitting, crafting,
and baking. After a number of dismal attempts
at scarves and doll blankets when she was little,
Kate abandoned knitting until college. She has
been happily experimenting, designing and knitting
ever since.
To read more about her knitting
inspirations and experiments, please visit her
blog; see more of her knits and patterns here.
|
| Pattern &
images © 2005 Kate Kuckro. Contact Kate |
|