Putting it all together
Seam
(v) :
to join by sewing
You may be aware by now
that I have a fondness for circular
needles and patterns that don't require
any sewing up. I've said repeatedly that seaming
is not one of my strong points and I've avoided
learning how to do it properly like the plague.
The term "mattress stitch" has struck
fear into my heart any number of times.
Nevertheless
I am well aware that there are truckloads
of marvelous patterns out there that are knit
flat and that seaming is the key
to giving them a well-made, professional finish.
After all, there's waaaay too many hours involved
in the knitting to have the finished object
wind up a disappointment simply because the
seams look sloppy. So I've bitten the bullet
and learned how to do some seaming. And guess
what I've found out: it wasn't as hard as
I feared.
In general, you'll
want to use the same yarn for seaming that
you've used for knitting. [I've used
a different color yarn for this tutorial so
you can more clearly see what's happening.]
If the yarn is unsuitable for sewing up, like
a novelty or very loosely plied yarn, or if
it's a bulky weight yarn that will make a
thicker seam than you'd like, you might try
using embroidery yarn. Since there's such
a wide range of colors to chose from in embroidery
yarns, you'll have a good chance of finding
a color to match your knitting. Be sure whatever
you're sewing up with can be washed in the
same manner as your knitting yarn and test
it before starting for colorfastness.
Block the knitted pieces before starting.
Let me repeat: Block first.
One more time: Block before you start seaming.
Your seaming
experience and the finished results will be
so much nicer.
Baste or pin the garment
together in order to try it on before you
start seaming. [Note: a basting stitch is
loose, temporary running stitch you'll remove
before you start the actual seaming.] It'll
be easier to correct any sizing errors that
you may find now rather than after you've
gone to all the trouble of sewing up. By basting,
you'll also be able to find out beforehand
if the two pieces you're sewing together match
up perfectly. If they don't, it is possible
to fudge a little bit by an extra row or stitch
every few inches on the longer side. For a
difference of more than an inch you'll be
better off doing some ripping out and reworking.
Sorry.
Find a comfortable,
well-lit spot with a flat working surface.
Have a yarn needle ready and the yarn you're
going to use to sew. By the way: use a piece
of yarn no more than 18 inches long since
it will start to weaken from the friction
created by sewing.
If the tail from your
cast-on row is long enough [and you may want
to leave a longish tail just for this purpose]
use it to begin the seam. Thread the tail
on a yarn needle and insert the needle into
the lowest corner stitch on the opposite piece
from back to front :
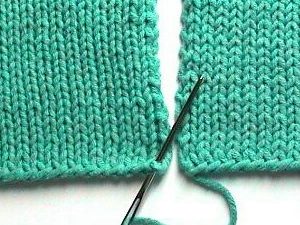
Then insert the needle from back to front in the lowest corner stitch on the
piece that had the yarn attached.
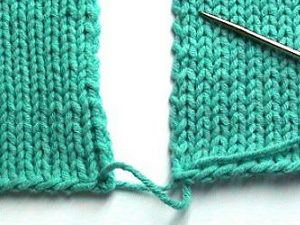
Pull tightly to close
the gap then continue seaming using one of
the methods described below. If the cast-on
tail is long enough to work with, leave it
on the yarn needle and use it to seam at least
the first couple of inches. If not, use another
length of yarn to start your seaming, being
sure to leave a tail of at least a few inches
that can be securely woven in on the wrong
side.
There are many types
of seaming to choose from, but I'm going to
focus on two here: invisible vertical seaming
on stockinette stitch and garter stitch.
This technique joins
two pieces of stockinette stitch in such a
way that the knitting appears to be continuous.
Mattress stitching is done in the space between
the edge [selvage] stitch and the stitch next
to it, so it has the added advantage of hiding
that often misshapen stitch that appears at
the end of every row of stockinette stitch.
This also means that the seam winds up being
as bulky as two stitches, since those two
edge stitches wind up hiding on the back side.
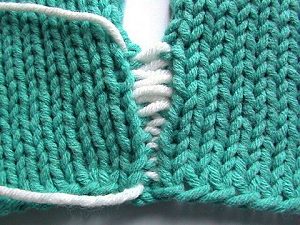
Begin by laying the blocked pieces out side by side with the right side facing
you.
Pull the edge stitch slightly away from the stitch next to it. You will see
a horizontal bar running between the edge
stitch and its neighbor. Insert your yarn
needle under that bar.
Pull the yarn through
the bar (it doesn't have to be pulled tightly
just yet) and then insert the needle under
the parallel horizontal bar on the opposite
piece. Work back and forth, inserting the
needle under the bar on one piece then the
other piece until you've worked a few rows.
Gently but firmly pull the yarn in the direction of the seam (rather than out
towards you) and the two rows of second stitches
will start to cozy up to one another.
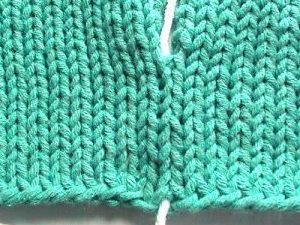
Stop pulling on the yarn before the seam starts to pucker. Adjust as necessary
so that the seam lays flat and neat.
Continue until you
reach the top of the pieces. Finish off by
connecting the top two corner stitches like
you did at the lower edge and weave the remaining
yarn in securely on the wrong side.
Okay, okay, I have
a confession to make. I've known how to do
this kind of seaming almost as long as I've
been knitting. And I've felt just as strongly
about it as I felt about mattress stitch but
in the opposite direction. I find seaming
on garter stitch positively fun. This is one
of those things I've realized it's not too
smart to go around declaiming to non-knitters.
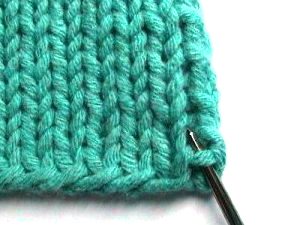
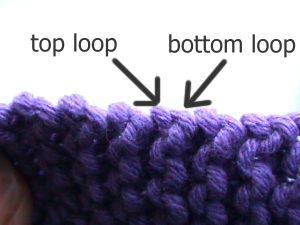
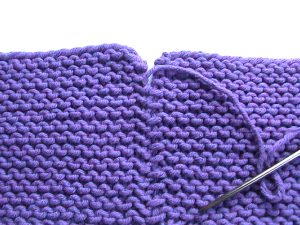
Before you start,
you'll need to inspect the edge stitch that's
created when working in garter stitch. Each
garter stitch ridge leaves a edge stitch with
a top loop and a bottom loop. Garter stitch
seaming joins these loops to create the appearance
that the knitting is continuous.
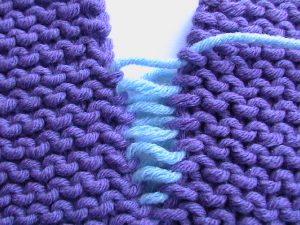
Lay the blocked pieces
out flat with the right sides facing you.
Begin the seam as explained above. Then insert
the yarn needle first into the top loop of
one piece then into the corresponding bottom
loop of the opposite piece.

Work back and forth, consistently using the top loop on one piece and the bottom
loop of the other piece for a few inches.
Pull the yarn end,
gently yet firmly in the direction of the
seam, and the two pieces will come together.
Adjust as necessary so the seam lays flat.
This is only a tiny sampling of the techniques that can be used to sew two pieces
of knitting together. There are special techniques
for sewing in sleeves, seaming techniques
utilizing crochet hooks as well as techniques
such as backstitching and overcasting.
I've used the following
two books as guides to overcome my mattress
stitch phobia and can't recommend them enough:
The
Knitter's Companion by Vicki Square (Interweave
Press, ISBN: 1883010136)
Vogue
Knitting (Sixth&Spring Books; ISBN:
193154316X)
Coming
up next issue:
Grafting : Joining
two sets of "live" stitches without
a seam.