|   Blocking Blocking
Place bag in washing
machine without
detergent, and
run machine on
warm setting for
a short wash cycle.
It is crucial
to use a washing
machine for this
step- the hemp
cord will leach
yellow liquid
that the wash
cycle rinses out.
Do
not dry bag --
it is now ready
for blocking.
Using
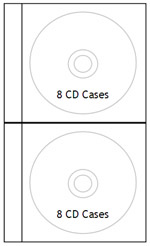
CD cases, make
two stacks, each
with 8 cases.
Place stacks next
to each other,
with wide edges
of stacks touching.
Wrap
the two piles
of CDs together
with plastic wrap.
You will have
a rectangular
block that measures
5.25 x 3.25 x
9.75 inches. This
is what you will
use to block your
bag.
Slide
damp bag over
cds, adjusting
so that the hem
is straight. Place
in warm well ventilated
area to dry.
  I-cord
Handles I-cord
Handles
CO 4 stitches
onto one double-pointed
needle, leaving
a 12 inch tail.
The tail will
be used for sewing
the handle to
the bag. K these
sts onto another
double-pointed
needle.
Next Row: Slide 4
stitches just worked to other end of needle,
bring yarn around back of work (pull taut but
not tight enough to make knitting difficult)
and k these 4 stitches again.
Repeat
this row until
cord is approximately
11 inches long.
Give cord a firm
tug every few
rows to pull the
stitches into
place. Once cord
is desired length,
break yarn leaving
a 12-inch tail,
draw yarn through
all sts on needle,
and pull tightly.
Make
a second handle
in the same manner
as the first.
Once
bag is completely
dry, use yarn
tail at each end
of i-cord to attach
handles to bag.
Pin each handle
end about 1 inch
down from top
of bag and 1 inch
in from side of
bag and secure
by sewing first
the end, and then
each side of the
i-cord into place.
Weave in ends.
Optional
Lining
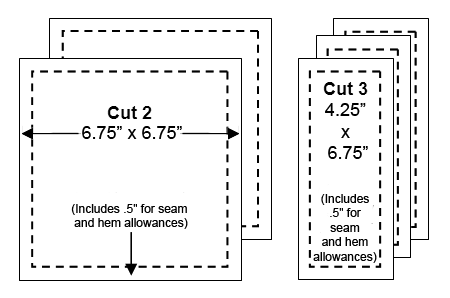
On paper, measure
and cut out a
square measuring
6.75 x 6.75 inches,
and a rectangle
measuring 4.25
x 6.75 inches.
Using these as
pattern pieces,
cut two squares
and three rectangles
from lining fabric.

With
right sides together
and leaving a
half-inch seam
allowance, sew
long edge of one
rectangle to edge
of one square,
as shown below.
Sew second square
to opposite side
of rectangle.
Sew short edges
of remaining two
rectangles to
each end of bottom
rectangle, and
sew long edges
of these two rectanlges
to edges of adjacent
squares.

Press seams flat, so that
seam allowances are open. Fold top of lining
one half inch to wrong side and press. Insert
lining into bag, and stitch into place around
top using sewing thread.
With
needle and thread,
stitch fringe
into place around
top of bag, folding
over ends to prevent
fraying. Stitch
approximately
12 monkeys into
place by sewing
into a knitted
stitch and then
around top of
monkey's tail
several times.
Place one every
two inches or
so, stitching
some closer to
top of bag and
some slightly
further down-
that way the monkeys
can make faces
at each other!
*You
can make leftover
monkeys into super
funky stitch markers:
dip their tails
into a mug of
boiling water
long enough that
they become pliable,
and then use tweezers
to grab the end
of the tail and
bend it into a
ring. |

