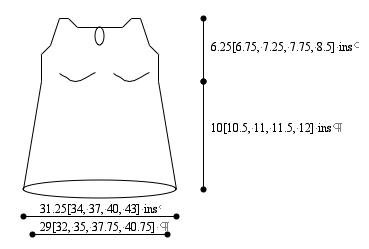
 Lower
Body
Lower
Body
Using circular needle, CO 172 [188, 204, 220, 236]
sts.
Place marker and join to begin working in the round,
being careful not to twist. K 86[94, 102, 110, 118],
place second marker, k to end.
K 26[26, 28, 28, 30] rows.
Next Round: K1, ssk, k to 3 sts before second marker,
k2tog, k2, ssk, k to last 3 sts, k2tog, k1.
K 15[17, 19, 21, 23] rounds.
Work these 16[18, 20, 22, 24] rounds twice more.
160[176, 192, 208, 224] sts rem.
Work even until piece measures 10[11, 12, 13, 14]
inches. (Unroll edge when measuring.) Break yarn.
Elastic
Casing
VERY, VERY IMPORTANT: From
this point on, the sizing is for cup sizes
A, B, C, D, and DD. Make sure you are working
the correct size.
Place 90[98, 106, 114, 122] sts from
front and sides (45 [49, 53, 57, 61] sts on
each side of center front) onto a stitch holder,
removing markers.
Reattach yarn to rem sts (back sts).
Work 6 rows in stockinette stitch. BO these
sts.
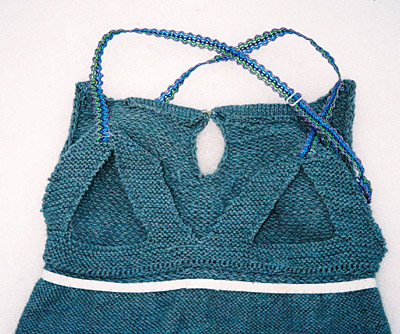
Bra
Cups
NOTES:
- This section is worked entirely in Two-End
Knitting, unless otherwise indicated. Directions
that instruct you to k or p a certain number of
sts, mean to k or p those sts in Two-End Knitting.
- The first st of all RS and WS rows is slipped
purlwise.
Place held sts on needle.
With WS facing, join 2 strands of yarn to
begin working in Two-End Knitting, changing
needle size if necessary.
P 26[29, 32, 35, 38], place marker, p 38[40,
42, 44, 46], place marker, p 26[29, 32, 35,
38].
The next row will be Row 1 on the Short-Row
Shaping Chart (see below).
Begin Short-Row
Bust Shaping
To work short-row bust shaping, find your
cup size in the chart below.
When working a row with short-row shaping,
k to first marker, k indicated number of sts
past first marker, w&t, p to marker, p
same number of sts past marker, w&t, k
to second marker, repeat short rows as for
first marker. Pick up wraps as you encounter
them and work it together with the st it is
wrapped around. When a row has no number indicated
for your cup size, work that row without short-row
shaping.
IMPORTANT:
Read through all remaining Bra Cup directions
before proceeding!
Short-Row Shaping
Chart
| |
Cup
Size |
| Row |
A |
B |
C |
D |
DD |
| 1 |
16 |
17 |
18 |
19 |
20 |
| 3 |
|
|
|
|
20 |
| 5 |
|
17 |
18 |
19 |
20 |
| 7 |
16 |
|
|
|
|
| 9 |
|
13 |
16 |
19 |
20 |
| 11 |
|
|
|
|
|
| 13 |
11 |
|
16 |
17 |
17 |
| 15 |
|
10 |
|
|
|
| 17 |
|
|
14 |
13 |
14 |
| 19 |
5 |
|
|
|
|
| 21 |
|
6 |
|
13 |
11 |
| 23 |
|
|
7 |
|
|
| 25 |
|
|
|
8 |
|
| 27 |
|
|
|
|
9 |
AT THE SAME TIME:
On
row 17[19, 21, 23, 25], sl 1, k2tog twice, k 39[43,
47, 51, 55], BO 2 sts, k to last 5 sts, ssk twice,
k1.
Right Cup:
Next Row [WS]: Sl 1, p 41[45, 49, 53, 57],
place rem sts on hold for Left Cup.
Next Row [RS]: Sl 1, k2tog, work next row
of short row shaping, work to last 5 sts, ssk twice,
k1.
Next Row [WS]: Sl 1, p to end.
Repeat these 2 rows once more.
NOTE: Instructions follow for
armhole shaping and neckline shaping (including
keyhole); work both sets of instructions at the
same time, starting on the next row.
Armhole Shaping:
D and DD cup only:
Next Row [RS]: K to last 5 sts, ssk twice,
k1.
Next Row [WS]: Sl 1, p to end.
All Sizes:
Next Row [RS]: K to last 3 sts, ssk, k1.
Next Row [WS]: Sl 1, p to end.
Repeat these 2 rows 2[3, 3, 1, 3] times more.
Next Row [RS]: K to last 3 sts, ssk, k1.
Work 3 rows without armhole shaping.
Repeat these 4 rows 2[2, 2, 4, 3] times more.
Cont working Two-End Knitting, completing keyhole
and neckline shaping.
Keyhole and Neckline Shaping:
Work 6 rows even.
Next Row [RS]: Sl 1, m1, k to end.
Next Row [WS]: Sl 1, p to end.
Repeat these 2 rows twice more.
Work 4 rows even.
Next Row [RS]: K 23[24, 24, 25, 26], place
these sts just worked on hold, sl1, k2tog, k to
last 5 sts, ssk twice, k1.
Next Row [WS]: Sl 1, p to end.
Next Row [RS]: Sl1, k2tog, k to last 3 sts,
ssk, k1.
Repeat these 2 rows 0[0, 2, 2, 3] times more. 5[7,
7, 8, 8] sts rem.
Shoulder
Facing:
Break one strand of yarn and continue in regular
stockinette stitch.
Next Row [WS]: P2tog, p to last 2 sts, p2tog
tbl.
Work 5 rows even. BO all sts.
 Neckline
Facings:
Neckline
Facings:
Place 23[24, 24, 25, 26] held sts from Right cup
on needle. Using one strand, work 6 rows in stockinette
st, decreasing one st at keyhole edge every row.
BO rem sts.
Left Cup:
Place held sts for Left Cup on needle, and rejoin
2 strands of yarn with WS facing. P all sts in Two-End
Knitting. (Continue in Two-End Knitting until instructed
to do otherwise.)
Next Row [RS]: Sl 1, k2tog twice, work next
row of short row shaping, work to last 3 sts, ssk,
k1.
Next Row [WS]: Sl 1, p to end.
Repeat these 2 rows once more.
NOTE: Instructions follow
for armhole shaping and neckline shaping (including
keyhole); work both sets of instructions at the
same time, starting on the next row.
Armhole Shaping:
D and DD cup only:
Next Row [RS]: Sl 1, k2tog twice, k to end.
Next Row [WS]: Sl 1, p to end.
All Sizes:
Next Row [RS]: Sl 1, k2tog, k to end.
Next Row [WS]: Sl 1, p to end.
Repeat these 2 rows 2[3, 3, 1, 3] times more.
Next Row [RS]: Sl 1, k2tog, k to end.
Work 3 rows without armhole shaping.
Repeat these 4 rows 2[2, 2, 4, 3] times more.
Cont working Two-End Knitting, completing keyhole
and neckline shaping.
Keyhole and Neckline Shaping:
Work 6 rows even.
Next Row [RS]: Sl 1, k to last st, m1, k1.
Next Row [WS]: Sl 1, p to end.
Repeat these 2 rows twice more.
Work 3 rows even.
Next Row [WS]: P 23[24, 24, 25, 26], place
these sts just worked on hold, p to end.
Next Row [RS]: Sl1, k2tog twice, k to last
3 sts, ssk, k1.
Next Row [WS]: Sl 1, p to end.
Next Row [RS]: Sl1, k2tog, k to last 3 sts,
ssk, k1.
Repeat these 2 rows 0[0, 2, 2, 3] times more. 5[7,
7, 8, 8] sts rem.
Shoulder
Facing:
Break one strand of yarn and continue in regular
stockinette stitch.
Next Row [WS]: P2tog, p to last 2 sts, p2tog
tbl.
Work 5 rows even. BO all sts.
Neckline
Facing:
Place 23[24, 24, 25, 26] held sts on needle. Using
one strand, work 6 rows in stockinette st, decreasing
one st at keyhole edge every row. BO rem sts.
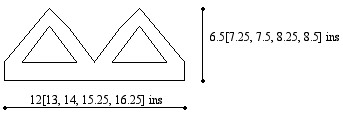
Inner Cups
with Nursing Openings:
NOTE: The Inner Cups section is worked using
only one strand of yarn. When directed to join a
second strand of yarn, do not begin working in Two-End
Knitting Æ this second strand is joined so that
the two sides of the piece can be worked simultaneously,
each with one strand.
It may be helpful to use a safety pin to mark the
RS of the work.
Using same size needles as used for Lower Body,
CO 66[72, 78, 84, 90] sts. Work 8[10, 10, 10, 12]
rows in garter st.
Next Row [RS]: K 9[10, 10, 11, 11] sts, join
a second strand of yarn, BO 15[16, 19, 20, 23],
k 9[10, 10, 11, 11], place rem 33[36, 39, 42, 45]
sts on hold for Right Inner Cup.
Left
Inner Cup:
*Using separate strands of yarn, k across
each section of the Inner Cup.
Next row [RS]: k2tog,
k to last st, kfb; kfb in first st of second
section, k to last 2 sts, k2tog.
Work 3 rows even.
Repeat these 4 rows 6[6, 7, 8, 9] times more.
Break yarn attached to second section.**
Next row [RS]: k2tog, k
to last st, kfb; kfb in first st of second
section, k to last 2 sts, k2tog.
Join Left Inner Cup Sections:
Next Row [RS]: K2tog, k rem sts of first
section, using same strand of yarn k to last 4 sts
of second section, k2tog twice. 15[17, 17, 19, 19]
sts rem.
Next Row [WS]: K all sts.
Repeat these 2 rows 3[4, 4, 5, 5] times more. 6[5,
5, 4, 4] sts rem. BO all sts.
Right Inner
Cup:
Place held sts on needle, join yarn with RS facing.
K 9[10, 10, 11, 11] sts, join a second strand of
yarn, BO 15[16, 19, 20, 23], k 9[10, 10, 11, 11].
Work as for Left Inner Cup from * to **.
Join Right Inner Cup Sections:
Next Row [RS]: K2tog twice, k rem sts of
first section, using same strand of yarn k to last
2 sts of second section, k2tog. 15[17, 17, 19, 19]
sts rem.
Next Row [WS]: K all sts.
Repeat these 2 rows 3[4, 4, 5, 5] times more. 6[5,
5, 4, 4] sts rem. BO all sts.