  by
Rebecca Hatcher by
Rebecca Hatcher

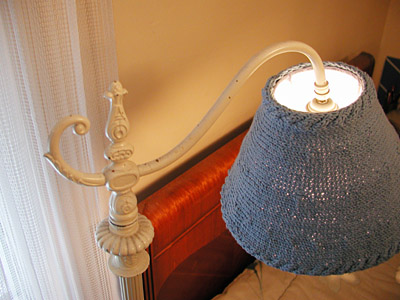
A few weeks ago, I saw a crocheted
lampshade in a design magazine, and started thinking
about knitting one. I originally thought of knitting
it in the round, with frequent increases, but it didn't
go well.
Trying to see how the light would
look shining through the stitches, I wrapped Blue
Collar (from Scarf Style, designed by Teva Durham)
around my lampshade (yes, my boyfriend does think
I'm crazy), and realized I could shape the shade by
short rowing instead of increasing.
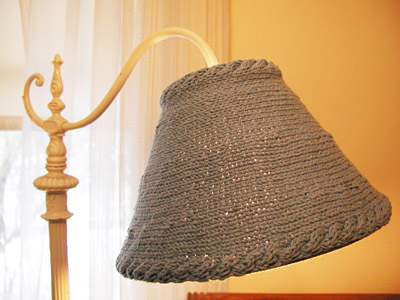
Essentially, you'll be doing 2 things
at once: working a cable at the beginning and end
of each row, and working short rows. The cables continue
through the short rows, so the two cables won't necessarily
cross in the same row, after the first repeat. However,
you should learn fairly fast how to tell when it's
time to cross, based on the distance from the last
cross.
|
|  photos: Rebecca
Hatcher
 |
|
| To fit a conical shade with dimensions
given below. |
| |
| Upper circumference: 13 inches
Lower circumference: 31 inches
Height: 7 inches
|
| |
| |
|  Lily Sugar'n Cream Cotton Yarn [100% cotton; 120 yd/110
m per 71g skein]; color: Cornflower Blue; 2
skeins
 1 set US #8/5 mm straight needles
 Tapestry needle
 Cable needle
 Stitch markers
 Conical lampshade, size as given above
|
|
|
| 22 sts
= 4" in stockinette stitch |
| |
|
[Knitty's list of standard abbreviations can be found here]
Cable Pattern
(Worked over 4 sts):
Row 1 [RS]: K all sts.
Rows 2 and 4 [WS]: P all sts.
Row 3 [RS]: Sl 2 sts to cn and hold
to front of work, k2, k2 from cn.
These 4 rows form Cable Pattern.
Note: When working
Short Rows, you will be wrapping stitches at the points
where the work is turned. On subsequent rows, when
you encounter one of these wraps, pick it up and place
it on the left-hand needle, then knit it together
with the stitch you are knitting.
|
|
  CO
38 sts. CO
38 sts.
Set-up row [WS]: Sl 1 place marker, p4, place
marker, p28, place marker, p4, place marker, p1.
Begin cable
pattern
Row 1 [RS]: Sl 1, k to end.
Row 2 and 4 [WS]: Sl 1, p to end.
Row 3 [RS]: Sl 1, work Row 3 of Cable
Pattern,
K 28, work Row 3 of Cable Pattern, k1.
*Short-Row
Section
Note: When working the following
sections, continue to work the Cable Pattern as
set, between the markers at each end of the work.
Row 1 [RS]: Sl 1, k9, w&t.
Row 2 and all [WS] Rows: P to end.
Row 3 [RS]: Sl 1, k18, w&t.
Row 5 [RS]: Sl 1, K27, w&t.
Row 7 [RS]: Sl 1, K18, w&t.
Row 9 [RS]: Sl 1, K9, w&t.
Section 1
[even]
Work 6 rows even across all sts, in patt as set.
Repeat Short-Rowed Section.
Section 2 [even]
Work 8 rows even across all
sts, in patt as set.**
Repeat from * to ** until shade measures 13 inches
along short edge and 31 inches along long edge when
slightly stretched, ending with any WS row of an
even section.
Cut yarn, leaving a one-yard tail.
Leave live sts on needle.
|
|
Graft live sts to CO row using
Kitchener
stitch.
(If you do not wish to graft, BO all sts and
sew edges together.)
Weave in ends, block
and slide cover over lampshade. The elasticity
of the knitted fabric will hold the shade in
place.
|
|
  Trained
as an archivist, Rebecca likes to think of her stash
as a processing backlog. Trained
as an archivist, Rebecca likes to think of her stash
as a processing backlog.
|
| Pattern & images
© 2005 Rebecca Hatcher. Contact Rebecca.
|
|

