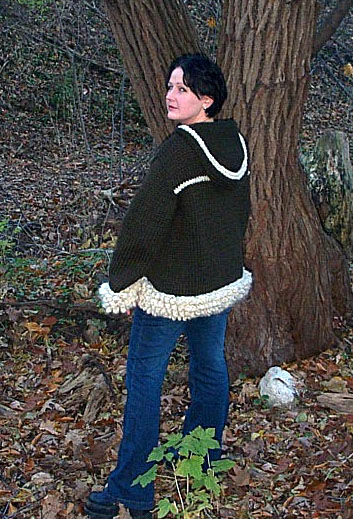
Grandma Knitty Home
Knitty: little purls of wisdom
letter from the editorfeatured articlesKnitty's fabulous pattern selectionarchive of back issuestell us what you think of KnittyKnitty's favorite linkshelp knitty keep on keepin' onknitty's virtual sNbjoin the Knitty notifylistknitty's tiny little shopping malltake home something Knitty


Elann

the Knitty FAQ

submission guidelines for designers and writers

the obligatory legal statement

the rabbit

© Knitty 2002-2006. All rights reserved. Unauthorized reproduction prohibited. This means you.


follyanticipationkyotoshimmerbanffeveembracefrontiertriaran
toddlebaby tart coronetflapperspink lady french marketSX3nakiska
corset

Inspired by the traditional shearling style, this coat features dense double-loop stitch trim and a thin decorative stripe around the body.

Worked in a thick yarn, it knits up quickly and can be keeping you toasty warm within days of casting on.

The super-soft merino wool will feel great against your arms while wearing it with a t-shirt in milder weather, but the coat can also brave the coldest winter as there's enough ease to allow for a sweater underneath.

The hood is shaped to prevent the dreaded pointy head look so you'll
actually want to wear it up. You might even find yourself wishing for colder weather just so you can.

model: Kate Wisson photo: Kali Exorin

SIZE

S [M, L]

S Bust size: 30 - 34 inches
M Bust size: 36 - 40 inches
L Bust size: 42 - 46 inches

 
FINISHED MEASUREMENTS

Chest: 40 [46, 52] inches
Length: 24 [26, 28] inches


MATERIALS

[MC] Rowan Big Wool [100% wool; 87 yd/80 m per 100g skein]; color: 23 - Camouflage; 7[8, 9] skeins
[CC] Rowan Big Wool [100% wool; 87 yd/80 m per 100g skein]; color: 16 - Sugar Spun; 4[4, 5] skeins

1 32-inch US #17/12mm circular needle [pieces will be worked flat, back and forth, on the circular needles]
22-inch Heavy-Duty Zipper
Tapestry Needle
Stitch Holders


GAUGE

9 sts/11 rows = 4" in stockinette stitch

 
STITCH PATTERNS

Loop Stitch

[adapted from Loop Stitch, pg 138, Knitter's Handbook by Montse Stanley]:

K1, but do not drop the st from the left hand needle.

Bring yarn forward, between the two needles.
Wrap yarn clockwise around your left thumb, back between the needles, around the right hand needle and around your thumb again. Bring the yarn back between the needles.

Slip the new "stitch" from the right hand needle purlwise onto the left hand needle. Knit this loop together with the original st. [Remove the loops from your thumb!]

YO from front to back [the opposite way from a yo increase].

Pass the last two sts [right hand needle] over the yo and off the needle [as though binding off].

NOTE: If you're interested in conserving yarn, work the single loop stitch as given in the referenced book. This will result in a less dense, but still pleasing, trim.

M1bf

Increase 1 stitch by lifting the top strand of the ladder before the next st from front to back and knit it through the back loop.

M1fb

Increase 1 stitch by lifting the top strand of the ladder before the next st from back to front and knit it through the front loop.

 
DIRECTIONS

Back

With CC, CO 34[38, 42] sts.

K 1 row even [WS].

K1, Loop st across to last st., K1.

Rep last 2 rows 3 times.

K 1 row, increasing 16 [18, 22] sts evenly across -- 50 [56, 64] sts.

Change to MC and work even in st st for 8 rows.

Next [Dec] Row: K1, k2tog tbl, k across to last 3 sts, k2tog, k1.

Working in St st, rep Dec Row every foll 8th row 2 times -- 44[50, 58] sts.

Work even until piece measures 15.5[16.5, 17.5] inches from CO edge.

BO 2[2, 3] sts at beg of next 2 rows. Repeat Dec Row 1[1, 2] times.

Work even until 2.5[2.5, 3] inches from beg of armhole, ending with RS facing.

Change to CC and K 2 rows [one garter ridge].

Change back to MC and work even until 22 [24, 26] inches from CO edge.

BO 6[7, 8] sts at beg of next 4 rows.

BO rem 14[16, 16] sts.

Left Front

With CC, CO 18[20, 22] sts.

K 1 row even [WS].

K1, Loop st across to last st., k1.

Rep last 2 rows 3 times.

K 1 row, increasing 9 sts evenly across -- 26 [29, 33] sts.

Change to MC and work even in St st for 8 rows.

Next [Dec] Row: K1, k2tog tbl, k across.

Working St st, rep Dec Row every following 8th row 2 times -- 23[26, 30] sts.

Work even until piece measures 15.5[16.5, 17.5] inches from CO edge, end with RS facing.

BO 2[2, 3] sts at beg of next row, k across.

Next row: P to last 3 sts, p2tog tbl, p1.

Next row, LARGE SIZE ONLY: K1, k2tog tbl, k across.

ALL SIZES: Work even until 2.5[2.5, 3] inches from beg of armhole, ending with RS facing.

Change to CC and K 2 rows [one garter ridge].

Change back to MC and work even until piece measures 20[22, 24] inches from CO edge, ending with RS facing.

K to last 3 sts, k2tog, k1.

P1, p2og, p to end.

Rep last 2 rows 3 more times.

Next row, MED and LARGE SIZES ONLY: K to last 3 sts, k2tog, k1.

ALL SIZES: Work 2[1, 1] rows even.

BO 6[7, 8] sts at beg of next row. Work 1 row even. BO rem 6[7, 8] sts.

Right Front

With CC, CO 18[20, 22] sts.

K 1 row even [WS].

K1, Loop st across to last st, k1.

Rep last 2 rows 3 times.

K 1 row, increasing 9 sts evenly across -- 26[29, 33] sts.

Change to MC and work even in St st for 8 rows.

Next [Dec] Row: K to last 3 sts, k2tog, k1.

Working in St st, rep Dec Row every following 8th row 2 times -- 23 [26, 30] sts.

Work even until piece measures 15.5 [16.5, 17.5] inches from CO edge, end with WS facing.

BO 2[2, 3] sts at beg of next row, p across.

Next row: K to last 3 sts, k2tog, k1.

Next row, LARGE SIZE ONLY: P1, p2tog, p across.

ALL SIZES: Work even until 2.5[2.5, 3] inches from beg of armhole, ending with RS facing.

Change to CC and K 2 rows [one garter ridge].

Change back to MC and work even until piece measures 20[22, 24] inches from CO edge, ending with RS facing.

K1, k2tog tbl, k to end.

P to last 3 sts, p2tog tbl, p1.

Rep last 2 rows 3 more times.

Next row, MED and LARGE SIZES only: K1, k2tog tbl, k to end.

Next row, SMALL SIZE ONLY: K 1 row even.

ALL SIZES: BO 7 sts at beg. of next row. Work 1 row even. BO rem. 7 sts.

Sleeves [make 2]

With CC, CO 18[20, 22] sts.

K 1 row even [WS].

K1, Loop st across to last st, k1.

Rep last 2 rows 3 times.

K 1 row, increasing 9 sts evenly across -- 26[29, 33] sts.

Change to MC and work 2 rows even.

Next [Inc] Row: K1, M1bf, K to last st, M1fb, k1.

Working in St st, rep inc row every following 8th row 4 times -- 36 [39, 44] sts.

Work even until piece measures 16[17, 17.5] inches from beg, ending RS facing.

Cap Shaping

BO 2[2, 3] sts at beg of next 2 rows.

*K1, k2tog tbl, K to last 3 sts, k2tog, k1.

P1, p2tog, P to last 3 sts, p2tog tbl, p1.*

Rep from * to * 4[5, 5] times.

Next row: K1, k2tog tbl, k to last 3 sts, k2tog, k1.

BO 2 sts at beg of next 2 rows.

BO rem 6[7, 8] sts.

Hood

With MC, CO 32[34, 34] sts. Work even in St st until 12 inches from beg, ending with RS facing.

Shape top - Left side

K14, k2tog, k1, place rem sts on holder.

*P1, p2tog, p across.

K to last 3 sts, k2tog, k1*

Rep from * to * 2 more times [10 sts].

P1, p2tog, p across.

Work even in St st until 15 inches from CO edge.

BO rem 9 sts.

Shape top - Right side

With RS facing, join yarn to sts on holder.

*K1, k2tog tbl, k across.

P to last 3 sts, p2tog tbl, p1.*

Rep from * to * 3 more times [9 sts].

Work even in St st until 15 inches from beg.

BO rem sts.


FINISHING

Mattress st shoulder seams.

Mattress st hood to body beg just above the "V' neck shaping and ending just before it on the other side.

Mattress st top hood seam with worsted/aran weight yarn in a matching color to reduce bulk.

Edge trim: With CC and RS facing, beginning at bottom right front, pick up 45[50, 54] sts up front, 8 sts up V-neck, 34 sts up to top hood seam, 34 sts down hood, 8 sts down V-neck, and 45[50, 54] sts down left front. 174 [184, 192] sts on needle. K 2 rows even. BO loosely in K [WS].

Mattress st sleeves in place.

Mattress st sleeve seams and side seams.

Hand sew zipper in place by basting it down with contrast thread then backstitch it with small sts in place, making sure that the contrast garter ridges and the bottom trims line up. Zipper should fit in from bottom edge to beg of v-neck shaping. Remove basting thread.


ABOUT THE DESIGNER

A professional knitter and freelance designer based in Toronto, Kate chronicles her trials and triumphs thereof through her webjournal.