


![Read exactly what FREE PATTERNS really means...respect our designers and authors rights [and thank you]](../images/OFFnavLEGAL.gif)
![Read exactly what FREE PATTERNS really means...respect our designers and authors rights [and thank you]](../images/OFFnavLYS.gif)

 
|
 |
 <click for more! <click for more!
|
 
 |
|
 |
|
This issue of Knitty is printer friendly. To print, simply click the option you wish from the buttons on the right: print all text, images, charts and schematics OR print all text, charts and schematics and just the first pattern image, to save paper and ink. |
|
 |
|
 |
|
|
 |
|
|
|
 |
 |
|
 model: Jude photos: Julia
Farwell-Clay model: Jude photos: Julia
Farwell-Clay |
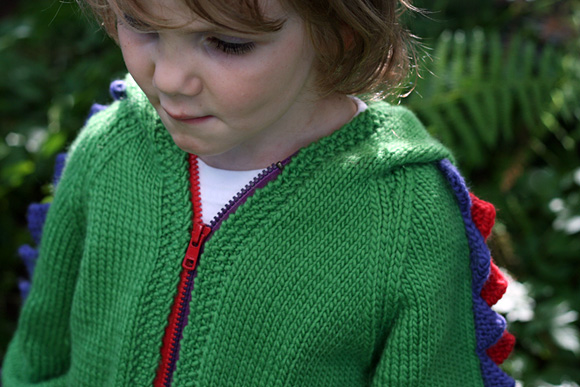
by Julia Farwell-Clay

I’ve spent the last few years
of my 6-year-old son’s life learning by osmosis
all about the geological
ages of the earth and
their associated fauna. Dinosaurs have evolved into almost
every aspect of my life,
as their various plastic,
rubber, and paper mache representations are slowly forming
a sedimentary sequence on the floor of my house.
Steggie
was my knitter’s
inevitable, perfect for
any enthusiast child
whether they know a Kentrosaurus
from a Tuojiangosaurus,
or not.
The spines are created
by a simple pattern repeat
worked at the edges of
an untraditional raglan sleeve.
The color switching is
perhaps a little fiddly at first, but rewarding when it
comes to sewing the sleeve together as the wrapped yarns
make a perfect set-up for grafting.
|
|
Child’s S[M, L, XL] (shown in
size L) |
Chest: 26[27.5, 30, 32] inches
Length: 13.5[14.25, 16, 17.25] inches |
| |
Classic
Elite Yarns Jil Eaton MinnowMerino (100% Extra Fine Superwash
Merino) 77yds/50g skein
[MC] #4781 Grass Green;
9[10, 11, 13] skeins
[CC1] #4779 Iris; 1 skein
[CC2] #4758 Rouge; 1 skein
Recommended needle size:
1
set US #7/4.5mm straight
needles
1 set US #8/5mm straight
needles
2 double-point or circular
needles, US #8/5mm or smaller
[always use a needle size that gives you the gauge listed below
-- every knitter's gauge is unique]
Stitch
holders or waste yarn
2 stitch markers
2 bobbins
Yarn needle
Separating zipper, 13[14, 15, 16] inch length
Sample
zipper is YKK #5 Molded
Plastic Separating zipper,
one half each of colors #8675
Vatican and #519 Hot Red from
zipperstop.com. |
| |
18 sts/24 rows = 4 inches in stockinette
st |
| |
[Knitty's list of standard abbreviations and techniques can be found here.] |
Seed
Stitch (Worked over
an even number of sts):
Row
1 [RS]: [K1, p1] to end.
Row
2 [WS]: [P1, k1] to end.
Repeat these 2 rows for Seed Stitch.
1x1 Rib (Worked over an odd number of sts):
Row 1 [RS]: [K1, p1] to
last st, k1.
Row 2 [WS]: [P1, k1] to
last st, p1.
Repeat these 2 rows for
1x1 Rib.
M1L (left-leaning increase): Insert left needle, from front
to back, under strand of yarn that runs between last stitch
on left needle and first stitch on right needle; knit this
stitch through back loop. 1 stitch increased.
M1R (right-leaning increase):
Insert left needle, from back to front, under strand of
yarn that runs between last stitch on left needle and first
stitch on right needle; knit this stitch through front loop.
1 stitch increased.
Intarsia: The colored sawtooth edging
in this pattern is worked using the intarsia technique.
When working color work in intarsia, different sections
of each row are worked with different colors, using a different
length of yarn for each area of color. When switching from
one color to the next, drop the color you have been knitting
with, and bring the yarn for the next color up under the
yarn of the previous color before you continue knitting.
This will twist the 2 yarns around each other. It is very
important to do this; if you do not wrap the yarns in this
way, the areas of color will not be joined, and you will
have holes in your work.
Sawtooth Edging
Note: This edging is worked
using CC, at the edge
of a piece worked in MC. Every time you switch from CC to
MC or vice versa, be sure to twist the strands (see note
about intarsia, above). The edging is worked in garter stitch,
with 1 st at the outer edge worked in stockinette st.
Row 1: Using CC, k1, yo;
switch to MC. 2 sts in edging.
Even-Numbered Rows 2-10: Work in MC to edging; using CC, k to last st, p1.
Row 3: Using CC, k2, yo;
switch to MC. 3 sts in edging.
Row 5: Using CC, k3, yo;
switch to MC. 4 sts in edging.
Row 7: Using CC, k4, yo;
switch to MC. 5 sts in edging.
Row 9: Using CC, k5, yo;
switch to MC. 6 sts in edging.
Row 11: Using CC, BO 5
sts (1 CC st remains on right needle); switch to MC. 1 st
in edging.
Row 12: Work in MC to edging;
using CC, p1.
Repeat Rows 1-12 for Sawtooth
Edging.
Before beginning sawtooth edging, prepare bobbins of CC1
and CC2. Each 'tooth' requires approx. 42 inches of yarn,
and sleeves of size L (shown) have 9 'teeth' in each color. Winding
bobbins with 304[346, 388, 430] inches of yarn (approx.
8.5[10, 11, 12]yd/7.8[8.8, 10, 11]m) will allow enough yarn
for 7[8, 9, 10] teeth, plus 10 inches extra.
If you need to start a
new length of CC when working the edging, join the new yarn
on Row 12 of edging pattern. Note that if necessary, edging
may be ripped back without ripping back the rest of the
sleeve.
Instructions for grafting can be found here.
|

BACK
Using smaller needles and MC, CO 58[62, 68, 72] sts.
Work in Seed Stitch until
work measures 1.5 inches, ending with a WS row.
For size S only, increase
1 st when working next row: 59 sts.
Using larger needles, work in stockinette st until work
measures 8[9, 10, 11] inches, ending with a RS row.
Shape Raglan Armholes:
BO 4[5, 5, 6] sts at beginning
of next 2 rows. 51[52, 58, 60] sts.
P 1 row.
Next Row [RS]: K2, ssk,
k to last 4 sts, k2tog, k2.
Repeat these 2 rows 15[16,
17, 18] times more. 19[18, 22, 22] sts.
P 1 row. Break yarn and place all sts on st holder or
waste yarn.
LEFT FRONT
Using smaller needles and MC, CO 28[30, 34,
36] sts.
Work in Seed Stitch until work measures 1.5
inches, ending with a WS row.
Switch to larger needles and proceed as follows. For
sizes S and M only, increase 1 st when working next row:
29[31, -, -] sts.
Next Row [RS]: K to last 4 sts, work last 4 sts in Seed
Stitch.
Maintaining these 4 sts
in Seed Stitch and working all other sts in stockinette
st, work in pattern until work measures 8[9, 10,
11] inches, ending with a WS row.
Shape Raglan Armholes:
Next Row [RS]: BO 4[5,
5, 6] sts, work in pattern to end. 25[26, 29, 30] sts.
P 1 row.
Next Row [RS]: K2, ssk,
work in pattern to end.
Repeat these 2 rows 15[16,
17, 18] times more. 9[9, 11, 11] sts.
P 1 row. Break yarn and place all sts on st holder or
waste yarn.
RIGHT FRONT
Using smaller needles and
MC, CO 28[30, 34, 36]
sts. Work in Seed Stitch until work measures 1.5 inches,
ending with a WS row.
Switch to larger needles and proceed as follows. For
sizes S and M only, increase 1 st when working next row:
29[31, -, -] sts.
Next Row [RS]: Work first 4 sts in Seed Stitch, k to
end.
Maintaining these 4 sts
in Seed Stitch and working all other sts in stockinette
st, work in pattern until work measures 8[9, 10,
11] inches, ending with a RS row.
Shape Raglan Armholes:
Next Row [WS]: BO 4[5,
5, 6] sts, work in pattern to end. 25[26, 29, 30] sts.
Next Row [RS]: Work in pattern to last 4 sts, k2tog,
k2.
P 1 row.
Repeat these 2 rows 15[16,
17, 18] times more. 9[9, 11, 11] sts.
Break yarn and place all sts on st holder or waste yarn.
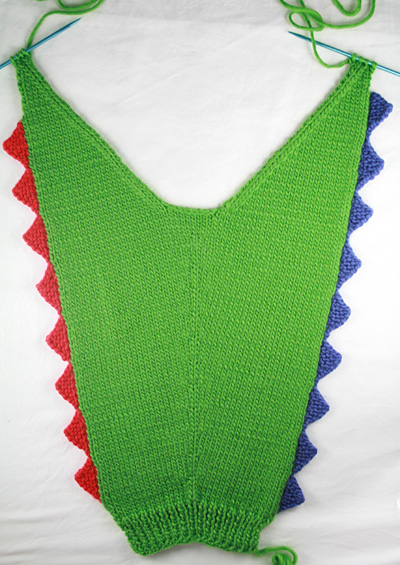
LEFT SLEEVE
Note: The sleeves are constructed with the
seam along the top. The Sawtooth Edging is worked along
the side edges as you knit, and the sleeve increases
are worked at the center of the piece.
Prepare one bobbin each
of CC1 and CC2. See Pattern Notes re. preparing bobbins.
Using smaller needles and MC, CO 31[33, 35, 37] sts.
Work in 1x1 Rib until work measures 1.5 inches, ending
with a WS row.
Switch to larger needles and proceed as follows. See
Pattern Notes re. intarsia, if you are not familiar with
this colorwork technique. When switching colors in each
row, be sure to wrap yarns tightly to produce a snug
join.
Row 1 [RS]: CO 1 st using CC1; wrap MC around
both ends of CC1, k15[16,
17, 18], M1R, place marker, k1, M1L, k15[16, 17, 18].
There are 33[35, 37, 39] sts MC, 1 st CC1.
Row 2 [WS]: P to last
st using MC, p1 using CC1.
Rows 3-5: Work MC sts in
stockinette st, working
Rows 1-3 of Sawtooth Edging
over CC1 section.
Row 6 [WS]: CO 1 st using
CC2; wrap MC around both
ends of CC2, p to CC1 sts,
work next row of edging pattern.
Row 7 [RS]: Work next row
of edging pattern over
CC1 sts; using MC, k to
marker, M1R, slip marker, k1, M1L, k to last st, p1
using CC2.
Row 8 [WS]: Work Row 1
of Sawtooth Edging pattern
over CC2 st; using MC,
p to CC1 sts; work next row of Sawtooth Edging pattern
over CC1 sts.
These rows set pattern for sleeve. Continue working
Sawtooth Edging over CC1 and CC2 sts; work MC sts in
stockinette st, increasing as set every 6th row 7[8,
8, 10] times more. When all increases have been worked,
there will be 49[53, 55, 61] MC sts.
Continue in pattern until work measures 11[12, 13, 14]
inches or desired length to underarms, ending with a
WS row.
Shape Raglan Sleeve Cap:
Next Row [RS]: Work CC1
sts in pattern; using MC, k21[22, 23, 25], place all
CC1 and MC sts just worked on st holder; BO 7[9, 9,
11] sts, k to end of MC sts; work CC2 sts in pattern.
As you work raglan sleeve cap, stop working Sawtooth
Edging when there are not enough rows left to work another
12-row repeat. (When there are 12[12, 12, 13] MC sts
or fewer remaining, there will not be enough rows to
work another repeat of edging.) After working Row 11
of last repeat of edging pattern, break CC and draw through
last CC st.
Work 1 WS row in pattern.
Next Row [RS]: K2, ssk,
work in pattern to end.
Repeat these 2 rows 15[16,
17, 18] times more. 5[5, 5, 6] sts.
Break yarn and place all
sts on st holder or waste yarn.
Place held sts of other half of sleeve on needle with
WS facing and rejoin MC (CC1 should still be attached).
Work 1 WS row in pattern.
Next Row [RS]: Work in
pattern to last 4 sts, k2tog, k2.
Repeat these 2 rows 15[16,
17, 18] times more. 5[5, 5, 6] sts.
Break yarn and place all
sts on st holder or waste yarn.
 RIGHT SLEEVE
Prepare bobbins as for left sleeve.
Using smaller needles and
MC, CO 31[33, 35, 37] sts. Work in 1x1 Rib until work
measures 1.5 inches, ending with a WS row.
Switch to larger needles
and proceed as follows.
Row 1 [RS]: Using MC, k15[16, 17, 18], M1R, place marker,
k1, M1L, k15[16, 17, 18]. 33[35, 37, 39] sts.
Row 2 [WS]: CO 1 st using
CC1; wrap MC around both ends of CC1, p to end.
Row 3 [RS]: K to last st
using MC, p1 using CC1.
Rows 4-6: Work MC sts in
stockinette st, working Rows 1-3 of Sawtooth Edging over
CC1 section.
Row 7 [RS]: CO 1 st using
CC2; wrap MC around both ends of CC2, k to marker, M1R,
slip marker, k1, M1L, k to CC1 sts, work next row of
edging pattern.
Row 8 [WS]: Work next row
of edging pattern over CC1 sts; using MC, p to marker,
M1R, slip marker, k1, M1L, k to last st, p1 using CC2.
Row 9 [RS]: Work Row 1
of Sawtooth Edging pattern over CC2 st; using MC, p to
CC1 sts; work next row of Sawtooth Edging pattern over
CC1 sts.
Pattern is established for right sleeve. Continue as
for left sleeve, working edgings
as set. |
Lightly block all pieces.
Using MC, graft edges of each sleeve together as shown.
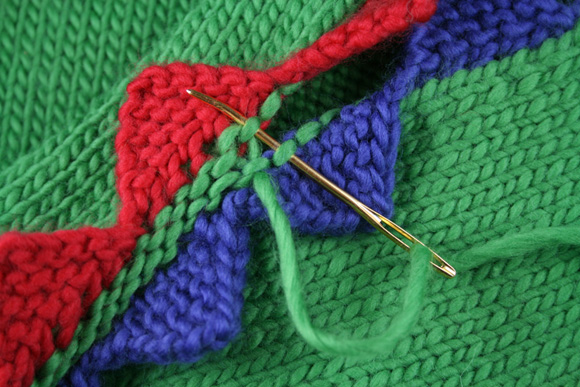
Sew back to fronts along side seams. Sew sleeves into
raglan armholes. Weave in ends.
Hood:
Place all held sts of front,
back and sleeves on larger needles with RS facing and
join MC. 57[56, 64, 68] sts on needle.
Set-up Row [RS]: Work 4 sts in Seed Stitch, k4[4, 6,
6], k2tog, k8[8, 8, 10], k2tog, k3[2, 3, 2], place marker,
k11[12, 14, 16], place marker, k3[2, 3, 2], k2tog, k8[8,
8, 10], k2tog, k4[4, 6, 6], work last 4 sts in Seed Stitch.
53[52, 60, 64] sts.
Work 5[5, 7, 7] rows in
stockinette st, maintaining 4 sts at each edge in Seed
Stitch.
Increase Row [RS]: Work in pattern to first marker,
M1R, slip marker, k to next marker, slip marker, M1L,
work in pattern to end.
Work 3 rows in pattern.
Repeat these 4 rows 5[5,
6, 6] times more. 65[64, 74, 78] sts.
Continue in pattern until hood measures 10[10, 11, 11]
inches, ending with a RS row. Break yarn, leaving a tail
twice as long as the width of the hood.
Slip sts to two double-point or circular needles, placing
half of sts on each needle, and fold hood in half with
WS together, so that front edges meet. Graft sts of Seed
Stitch edging together, then join remaining sts using
Three Needle Bind Off. This will form a ridge on outside
of hood.
Sawtooth Hood Trim:
Using CC2, CO 2 sts.
Row 1: K1, yo, k1. 3 sts.
Even-Numbered Rows 2-10: P1, k to last st, p1.
Row 3: K2, yo, k1. 4 sts.
Row 5: K3, yo, k1. 5 sts.
Row 7: K4, yo, k1. 6 sts.
Row 9: K5, yo, k1. 7 sts.
Row 11: BO 5 sts, k1. 2
sts.
Row 12: P2.
Repeat Rows 1-12 until
straight edge of trim is same length as hood bind-off
ridge or slightly shorter, ending with Row
10. BO all
sts. Break yarn, leaving a long tail.
Make a second piece of trim in the same way using CC1,
but work one less repeat than CC2 trim.
Sew trim to hood along
either side of bind-off ridge, off-setting so that
points of CC1 trim fall between points of CC2 trim.
Weave in all ends.
Pin and baste zipper inside front edges, then sew securely
in place. If desired, sew
twill tape or grosgrain ribbon over edges of zipper tape.
|
 Julia Farwell-Clay is the
features editor over at Twist
Collective, and sometimes even writes for her own blog, Moth
Heaven.
Julia Farwell-Clay is the
features editor over at Twist
Collective, and sometimes even writes for her own blog, Moth
Heaven.
She also prefers the Jurassic
to the Cretaceous, in case anyone’s asking.
|
| Pattern & images © 2009
Julia Farwell-Clay. Contact Julia |
|
|
|
|
|

