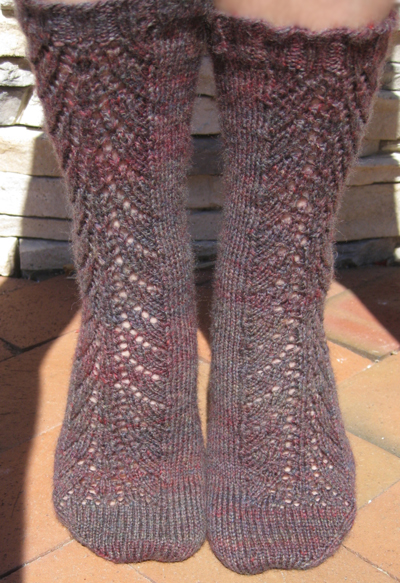
This pattern
is worked differently for right and left socks,
so that the lace pattern is always aligned with the outside front
of the sock. Ribbing,
heel and toe are worked
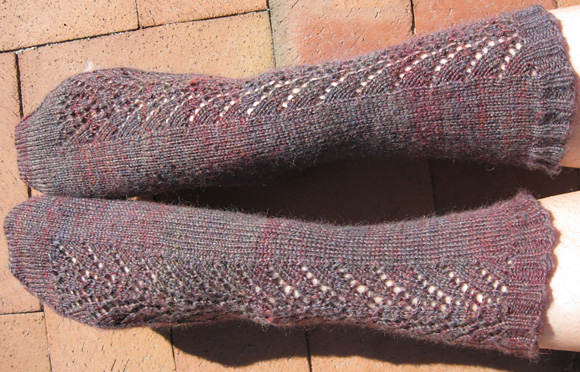
the same for both socks. Wristlets
are worked differently for each
hand, including ribbing.
Working with Two Circular Needles
This pattern is written for
the magic loop technique. It can easily be adapted for
working with two circular needles as written - simply
use 1 circular needle for each side of the magic loop.
Working with 5 Double pointed needles
For socks, place stitches
from the first side of
the magic loops so that the entire lace panel of 17 stitches are
on one DPN (on the first DPN for right sock, on the second DPN for
left sock), the remaining 13(15, 17, 19) stitches of the front of
the sock are on the other
DPN. Divide the 30(32,
34, 36) stitches of the second side evenly across
the third and fourth DPNs.
For wristlets, divide stitches
onto 4 DPN's as follows: 9 (11, 13, 15) stitches on first
and fourth DPN,
17 stitches each on second
and third DPN.
M1: Knit one stitch into back of bar
running between last stitch and next stitch.
SK2P: Slip
1 knitwise, k2tog, pass
slipped st over. 2 sts
decreased.
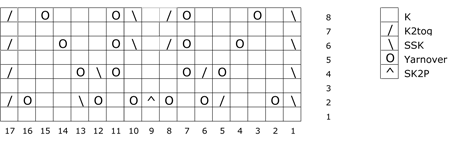
Blackrose Lace Pattern (over 17 sts):
Round 1 and all following
odd: K all sts.
Round 2: Ssk, yo, k2, k2tog,
yo, k1, yo, sk2p, yo, k1, yo, SSK, k2, yo, k2tog
Round 4: Ssk, k3, yo, k2tog,
yo, k3, yo, SSK, yo, k3,
k2tog.
Round 6: Ssk, (k2, yo) twice,
k2tog, k1, SSK, (yo, k2)
twice, k2tog.
Round 8: Ssk, k1, yo, k3,
yo, k2tog, k1, SSK, yo, k3, yo, k1, k2tog.
|
|
Socks
CO 60[64, 68, 72] stitches,
placing 30[32, 34, 36] on each side of your magic loop. Your
first side is the front of the sock, and your second side
is the back/underside of the sock. Join for working
in round.
Ribbing round: [K2, p2] to end.
Work 10 Ribbing rounds
in total.
Set up lace pattern as follows:
Right Leg: Work Blackrose lace pattern on
first 17 sts, k to end.
Left Leg: K 13[15, 17,
19] work Blackrose lace pattern on next 17 sts, k to
end.
Work 8 full repeats of the Blackrose lace pattern, and knit
one additional plain round.
Heel Flap
Work the heel flap only
on sts on second side of magic loop.
Rows 1 & 3 [WS]: Slip 1, purl to end.
Row 2 [RS]: [Sl 1, k1] to end.
Row 4 [RS]: Sl 1 [s1, k1] to last st, k1.
Repeat these 4 rows until
heel flap is 2.5 inches long or desired length -- approximately
33 rows. End after a WS row.
Turn Heel
Continuing on sts of
heel flap.
Row 1 [RS]: Sl 1, k16[17,18,19], SSK, k1, turn.
Row 2 [WS]: Sl 1, p5, p2tog, p1, turn.
Row 3 [RS]: Sl 1, k6, SSK, k1, turn.
Row 4 [WS]: Sl 1, p7, p2tog, p1, turn.
Row 5 [RS]: Sl 1, k8, SSK, k1, turn.
Row 6 [WS]: Sl 1, p9, p2tog, p1, turn.
Row 7 [RS]: S 1, k10, SSK, turn.
Row 8 [WS]: Sl 1, p10, p2tog, turn.
Repeat rows 7 and 8 until
all stitches of flap have been worked.
Final heel turn row [RS]: Sl 1, k to end.
Gusset Setup
Setup round 1: Using
a spare DPN, pick up
and knit one st along
edge of heel flap for
each slipped stitch
(approx 17 stitches),
plus one extra stitch
at upper corner of
heel flap.
For the right sock: work
17 stitches of row 2 of stitch pattern, k13[15, 17, 19].
For the left sock: K13[15,
17, 19] stitches, then work 17 stitches of row 2 of
stitch pattern.
Using another spare DPN,
pick up and knit one extra stitch from upper corner of heel
flap, then pick up and knit one stitch along edge of heel
flap for each slipped stitch (approx 17 stitches).
With second side of magic
loop, k all 12 heel flap stitches, then k9[10, 11, 12] stitches
from the DPN onto this side of the magic loop. Slip
all remaining picked up stitches to the first side of the
magic loop.
Setup round 2: With first side of magic loop, k
all but last of picked up stitches, k2tog with last gusset
stitch and first top of foot stitch, k all but last stitch,
then SSK with last stitch on magic loop and first gusset
stitch on DPN. Knit all but 9[10, 11, 12] stitches
from DPN onto first magic loop side. Slip rem 9[10,
11, 12] stitches to second side of magic loop, then knit
all sts on the second side of the magic loop.
Gusset decrease
Right sock – Round
1: K all gusset
sts, stopping before
the one you k2tog last
row. Work 17
stitches of next row
of stitch pattern,
then knit 13[15, 17,
19] plain stitches. Knit
all rem gusset sts,
and K30[32, 34, 36]
on bottom of foot.
Left sock – Round 1: K all gusset sts,
stopping before the one
you k2tog last row. K13[15,
17, 19] stitches, then work 17 stitches of row 2 of
stitch pattern. Knit
all rem gusset sts, and K30[32, 34, 36] on bottom of foot.
Both socks – Round 2: Knit all but last gusset
stitch, k2tog; k28[30, 32, 34], SSK, knit the rest
of the gusset stitches. K30[32, 34, 36] on bottom of
foot.
Repeat these 2 rounds (for left or right sock as appropriate)
until all gusset stitches have been used up and 30[32, 34,
36] stitches remain on the first side of your magic loop. 60[64,
68, 72] sts total.
Foot
Continue as you did for
leg until foot measures 1.75 [1.75, 2, 2] inches less than
full length of foot to end of toe. End after a plain
round.
Toe
Decrease round: SSK,
knit all but last 2
on top, k2tog. K2tog,
knit all but last 2
on bottom, SSK.
Alternate decrease rounds and even rounds until 14[16, 16,
18] sts remain.
Finishing
Graft toe and weave in
all ends.
Wristlets
CO 52[56, 60, 64] stitches,
placing 26[28, 30,
32] on each side of your magic loop. Join for working in
the round.
Work 8 rounds ribbing as follows:
Ribbing round – Sizes S & L, Right: [P2,
k2] to end.
Ribbing round – Sizes
S & L, Left:
[K2, p2] to end.
Ribbing round – Sizes
M & XL, Right: [K2,
p2] to end.
Ribbing round – Sizes
M & XL, Left: [P2,
k2] to end.
Work 8 rounds ribbing in total, as established.
Body round – Right: K26[28, 30, 32], work
17 sts in Blackrose pattern, k9[11, 13, 15].
Body round – Left: K9[11,
13, 15], work 17 sts
in Blackrose pattern,
k26[28, 30, 32].
Work in pattern as established until piece measures 3.5
inches from cast-on.
End after an even numbered row.
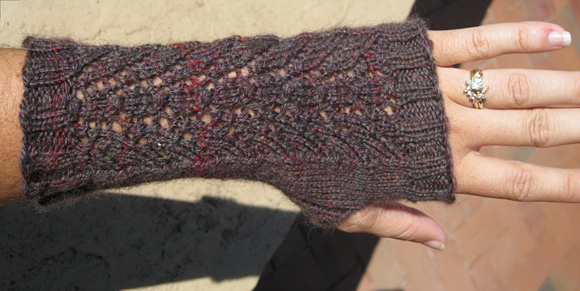
Thumb Gusset
Round 1: Work
to last st in pattern
as established, M1,
K1.
Round 2: K1,
M1, work to end of
round in pattern as
established.
Work these 2 rounds 5[5,
7, 7] times more for a total of 12[12, 16, 16] rounds.
Thumbhole
Round 1: K
to last 7 sts, p2,
k2, p2, k1.
Rounds 2-6:
K1, p2, k2, p2, work
in pattern as established
until 7 sts rem, p2,
k2, p2, k1.
Round 7: K1,
p2, k2, p2, work in
pattern until 7 sts
rem, p2, k1, BO 4[4,
6, 6].
Round 8: BO
an additional 4[4,
6, 6] sts. Continue
in pattern as established
until you reach the
first of the bound-off
sts. Turn. From here,
you'll work back and
forth in rows.
Row 9 & 11 [WS]: S1, work in pattern as established,
turn.
Row 10 & 12 [RS]:
SSK, work in pattern
as established until
2 sts rem, k2tog, turn.
Row 13 [WS]:
Sl 1, p to end of row,
turn.
Row 14 [RS]:
Sl 1, work as established
to end of row. Do
not turn.
For a larger thumb hole,
repeat rows13 and 14 as needed before continuing.
Hand
At end of last thumbhole
row, instead of turning, join for knitting in the round
again by simply knitting into the first stitch of the round.
Work in pattern as before for 1 inch or until entire piece
measures just under 7 inches.
Work 8 rows ribbing as
before. Bind off loosely.
|