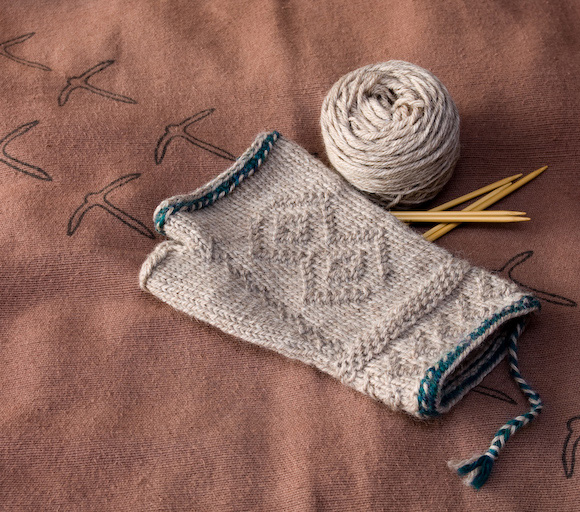
Twined knitting: Twined
knitting is a folk knitting technique from Scandinavia.
The Winter 2005 Knitty article “Twined
knitting” is a great introduction to this technique.
For every “twined knit” stitch, remember to
bring the back strand over the front strand. For
this project, use the twined knitting technique throughout,
except where otherwise noted. This means you will
twine the cast-on round, the increases, the pickup for the
thumb, and the bind off.
Twined purl: To work a single purl
st surrounded by knit sts, simply bring the strand
to be used to the front, purl as usual, and return the strand
to the back of the work.
To work a full twined purl round, bring both strands to
the front. Purl every st, alternating the two strands. Always
pick up the strand farthest from the tip of the needle (the
back strand) and bring it under the front strand
before working the stitch. A row of twined purl worked in
two colors forms a two-color twist on the surface of the
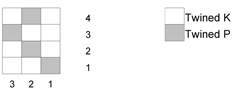
work.
Twined increase: To increase in twined
knitting, simply work the specified stitch twice. In
twined knit, k up to the st where the increase will take
place and work a twined knit st and but do not draw the
loop through; bring the second strand forward over the first
strand and k the st again; draw both loops through; one
st increased. Cont in patt after the inc.
Crook stitches: Surface patterns
featuring a strand of yarn left at the front of the work
for a knit between two purl stitches are called crook stitches
(Swedish: krokmaskor). To work a crook st,
bring one strand to the front and p the next st as normal;
drop the purl strand and leave it at the front of the work;
using the other strand, work a knit st; drop this strand
and return to the strand waiting at the front. purl the
next st on the front side and bring the front strand to
the back of the work to continue twined knitting as usual.
The inactive strand will lie at the front, on top of the
knit stitch, between the two purl sts. Clever
placement of this 3-st combination – twined p, “crook
knit”, twined p – forms raised designs.
Crook round: A crook round is worked by
alternating knit and purl sts, working as in the crook stitch
technique, leaving the strand just used at the front after
each purl st. Explained a different way, you're leaving
the inactive strand at the front when working the knit stitch. (Swedish: krokvarv).
There is one crook round at the bottom of each mitt.
Chain path: A “chain path” (Swedish: kjedjegång)
is two or more complete crook rounds. A chain path requires
an odd number of stitches so that the front-side strands
of the second round will fall above the purl bumps of the
first round, making the links of the chain.
Managing twist: Cascade 220 is plied (twisted)
in the S direction. The motion of twined knitting
also twists in the S direction, which will add twist to
the yarn, compressing it a bit and tightening the strands. In
a small project like these mitts, the twist won’t
affect the quality of the yarn too much. But there
is a second aspect of twist, which will be significant.
If you are using both the inside and outside strands from
a center-pull ball, the two strands will become twisted – hopelessly
twisted, if you work too far without releasing the twist. To
save your sanity, stop occasionally and use your free double-pointed
needle to pin the strands to the ball; hold one strand in
each hand and let the ball twirl in the air to spin the
extra twist out. You can also use a spare needle to
limit how far the twist can go while you are knitting. Pull
out a length of both strands; stick the spare needle through
the ball and wind a few inches of yarn around this “pin” in
a figure 8.
Working mitts on dpns: To keep track of
which part of the hand you are working, it is helpful to
know where the middle of the round is. Try to divide the
work so that half the stitches are on the first two needles
and the remaining half are on the last two needles (if using
5 dpns) or the last needle (if using 4.) This helps
when thinking about where the gusset decoration and back-of-hand
motif will be worked. The markers for the thumb increases
will be on two different needles in this setup.
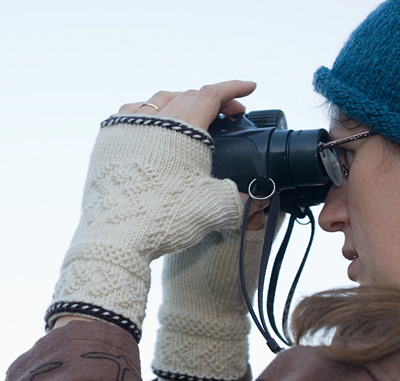
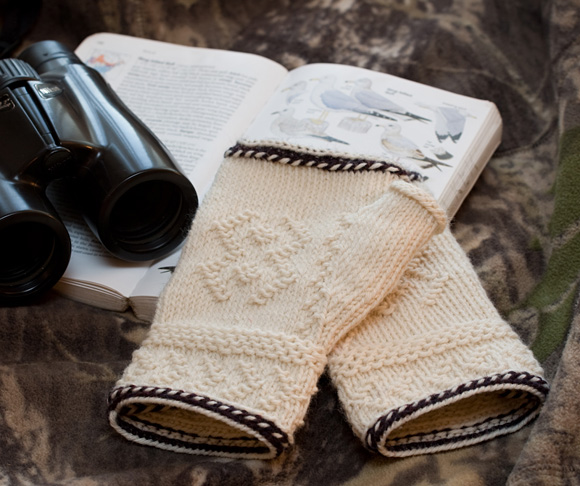
Chart A
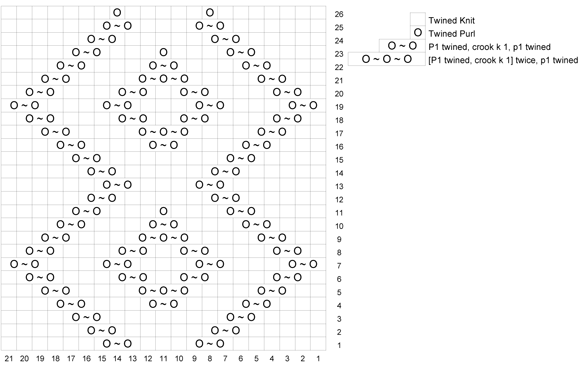
Hand Patterning Charts
Please note: Charts B and C show the placement of crook stitches, using
a ~ between two Os to represent a strand carried across the surface
of the work. It may help to review the explanation of crook stitches
[above] before working this chart.
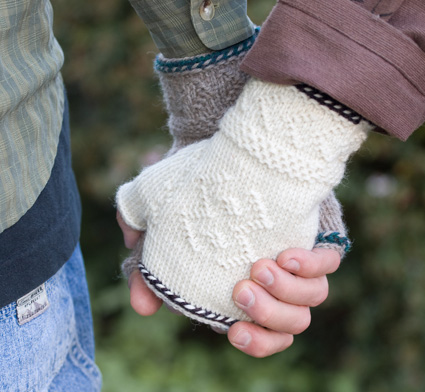
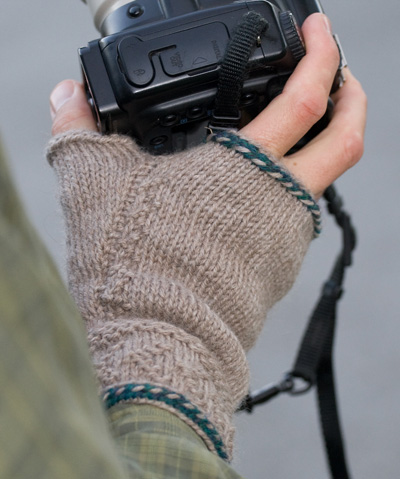
Back-of-hand patterning is optional;
see picture of Larus [brown
version] below for a non-patterned example.
Chart B [optional] – Ardea hand patterning
(size S)
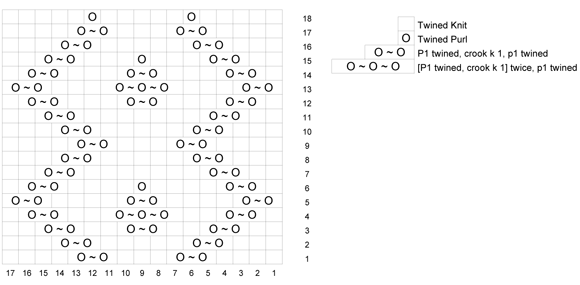
Chart C [optional] – Larus hand patterning
(sizes M and L)
|
|
RIGHT HAND
Three-strand cast-on
Leaving a tail of approx 12 inches
if you plan to braid the cast-on strands, hold two strands
of MC and one strand of CC together; make a slip knot to
begin the CO – this
slip knot is not counted as a stitch. Use all three
strands in the CO, holding CC in the left hand and the two
strands of MC in the right hand. Place the slip knot on a
double-pointed needle and form a loop of CC around the left
thumb; pick up the thumb loop with tip of the needle; use
one of the strands of MC to work a twined knit stitch; drop
the loop off the thumb and snug the stitch to the needle,
1 st CO. Cont in this manner, alternating the two strands
of MC between each st CO. Always bring the back strand
over the front strand as usual for twined knitting. Repeat
twined CO until you have 60[66, 72] sts. Remove the
slip knot and join for working in the round.
Right cuff
Round 1: With a single strand of CC, k all sts
(without twining).
Round 2: Using
one strand of MC and
one strand of CC, work
one round of twined
purl, starting with
MC and alternating
MC and CC every other
st. End by taking
both strands to the
back of the work. Drop
CC.
Round 3: Using
two strands of MC,
work one crook round:
[p1 twined, k1 with
the inactive strand
in front],
rep to end. Be
sure to start with
p1 so that the front-side
strands cover the CC
sts from Round 2. Bring
the front side strand
to the back at the
end of the round.
From here, you'll continue
with two strands of MC.
Rounds 4-5: Work twined knit.
Round 6: [P1
twined leaving
the yarn in front,
crook k1, p1 twined,
k3 twined] rep to end.
Round 7: [K1
twined, p1 twined leaving
the yarn in front,
crook k1, p1 twined,
k2 twined] rep to end.
Round 8: [K2
twined, p1 twined leaving
the yarn in front,
crook k1, p1 twined,
k1 twined] rep to end.
Round 9: [K3
twined, p1 twined leaving
the yarn in front,
crook k1, p1 twined]
rep to end.
Round 10: As
per round 8
Round 11: As
per round 7.
Round 12: As
per round 6.
Round 13 Work
twined knit.
Round 14: Work
twined knit to last
2 sts, k2tog.
59[65, 71] sts.
Round 15: Using two strands of MC, work a
crook round: [p1 with the inactive strand in back,
k1 with the inactive strand in front], rep to end.
This forms a chain path:
because of the odd number of sts, the knits will line up
above the purls in the second round. One strand remains at
the front of the work throughout these four rows.
Rounds 16-18: Repeat Round 15.
Right wrist
Round 19: Work in twined knit and dec 5 st evenly
around. 54[60, 66] sts.
Round 20: Start
gusset decoration:
K22[25, 28], work row
1 of Chart A, pm, k2
(you have reached the
middle of the round),
k2 on the next needle,
pm, k25[28, 31] to
end of round.
Rounds 21-23:
Work as established
for 3 more rounds,
following Chart A,
slipping markers when
you get to them.
Chart
A– Gusset
decoration
This gusset decoration
places twined purl sts
against a background of
twined knit sts, for a decorative effect. This is not the same as crook sts.
Right thumb
Round 24: Thumb increase round: Continuing
Chart A decoration as established, work to first marker,
slip marker, inc 1 in the next st, k to one st before second
marker, inc 1 in the next stitch, slip marker, work to end
of round.
Round 25:
Cont Chart A and work
even.
Right hand patterning
Round 26: K2[2, 3]; work row 1 of Chart B[Chart
C, Chart C]; k3[2, 4]; work Chart A over the next 3 sts;
work thumb incs as established between markers; work even
to end.
Cont as established, working hand patterning chart, Chart
A, and the thumb incs every other round, until there are
18[20, 24] sts between markers.
Next round, discontinue thumb incs and work 8[8, 9] more
rounds, cont hand patterning and Chart A as established.
For size S and L, you will complete the hand patterning chart
before you finish the 8 or 9 rows without increases. At that
point, work the back of the hand in twined knit until it
is time to set aside the thumb sts.
Hand above thumb
Next round: Continuing with the last row of Chart
C for size M only, work to the first marker and place the
next 18[20, 24] sts onto a stitch holder or piece of waste
yarn; using backwards loop cast-on and alt two strands of
MC, CO 6[6, 6] sts to bridge the gap; work to end of round.
56 [62, 68] sts.
Work in twined knit for 7[8, 8] rounds above the thumb.
Finishing round 1:, Using one strand of CC only,
k all sts (without twining).
Finishing round
2: Work
one round of twined
purl using one strand
each of CC and MC.
Finishing round
3: Using one strand
of CC, decrease evenly
around as follows:
[k3, ssk, k3, k2tog]
repeat to final 1[2,3]
sts, k1[2, 3].
Finishing round
4: Using both
strands of MC and twining
as usual, BO all sts
knitwise.
Thumb
Using two strands of
MC and twining between all sts, pick up 8 sts ove the cast-on
sts (including one stitch in each of the two corners) and
put the 18 [20, 24] thumb sts back on the needles (26 [28,
32] sts). Work in the round, starting with the thumb sts
from waste yarn..
Round 1: K17[19, 21] twined, ssk, k5 twined, k2tog,
borrowing the second st of the k2tog from the first needle
of the next round. Beginning of round moves one st
to the left 24[26, 30] sts.
Round 2: K
all sts twined.
Round 3: K,15,[17,
19] twined, ssk, k5
twined, k2 tog, again
borrowing the last
st of the round from
the next needle. 22[24,
28] sts.
Round 4: K
all sts twined.
Round 5: Work
one row of twined purl.
P with both strands
in front, picking up
the back strand under the
front strand for each
st.
Round 6: BO
all sts in twined knit.
LEFT HAND
Work as for RIGHT HAND, with
the following changes marked
in BOLD to the cuff, wrist, and hand patterning:
Left
cuff
Reverse the patterning on Rounds 6-12, if desired, so the chevrons point the other direction.
Round 6: [K3 twined, p1 twined leaving the
yarn in front, crook k1, p1 twined] rep to end.
Round 7: [K2
twined, p1 twined leaving
the yarn in front,
crook k1, p1 twined,
k1 twined] rep to end.
Round 8: [K1
twined, p1 twined leaving
the yarn in front,
crook k1, p1 twined,
k2 twined] rep to end.
Round 9: [P1
twined leaving
the yarn in front,
crook k1, p1 twined,
k3 twined] rep to end.
Round 10: As
per round 8
Round 11: As
per round 7.
Round 12: As
per round 6.
Continue as for RIGHT HAND up to Round 20.
Left wrist
Round 20: K25[28, 30], pm, k4, pm, work
row 1 of Chart A, k22[25,
28] to the end. (This
will place the thumb gusset decoration after the markers
for the thumb, rather than before)
Continue with RIGHT HAND instructions until Round 26.
Left hand patterning
Round 26: K25[28,
31]; work thumb incs
as established between
markers, work Chart A
over the next 3 sts; k3[2,4], work
row 1 of Chart B[Chart
C, Chart C], k2[2,3]. (This
will place the back-of-hand
patterning after the thumb
increases, rather than
before)
Cont as established, working thumb incs every other round,
Chart A and hand patterning chart, until there are 18[20,
24] sts between markers.
Once the location of the pattern is established, you can
finish the mitt following
the charts and instructions
as for RIGHT HAND.
|