![Read exactly what FREE PATTERNS really means...respect our designers and authors rights [and thank you]](../images/OFFnavLEGAL.gif)
![Read exactly what FREE PATTERNS really means...respect our designers and authors rights [and thank you]](../images/OFFnavLYS.gif)

 
|
|
 <click for more! <click for more!
|
 |
|
 |
|
This issue of Knitty is printer friendly. To print, simply click the option you wish from the buttons on the right: print all text, images, charts and schematics OR print all text, charts and schematics and just the first pattern image, to save paper and ink. |
|
 |
|
 |
|
|

|
|
 |
|
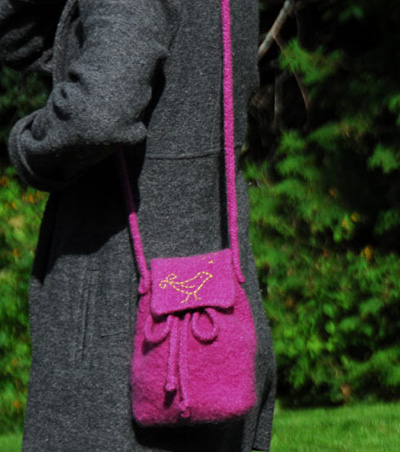
by Mags Kandis

When it comes to my addiction to all things textilicious… my
love of felted bags is
second only to scarves!
I cringe when I admit… I stopped counting my “felted
friends” years ago.
The idea for this little
day caddy came to me in
line for coffee. The cavernous
tote I had grabbed that morning--- yes, felted---
refused to surrender my wallet!
Well, my lovelies, the Mother
of Invention is a knitter!
This
pouch is a perfect fit for
my simple daily needs: wallet,
keys, glasses, lipstick,
iPod, small notebook and
pen!
All necessities are safely
kept in place by a prettily
gathered drawstring top and sweetly stitched flap.
For stitching ideas, I
found great inspiration
by flipping through Aimee
Ray’s
book, Doodle Stitching [Lark Books, 2007].
This felting project is
super quick and easy to
whip up. This Holiday Season,
I just might be merrily crafting an entire flock for those
on my gift list…. |
|
One |
Unfelted, before sewing gusset:
Height: 16 inches
Width: 9 inches
Strap length: 60 inches
After sewing gusset and felting:
Height: 9 inches
Width: 7 inches
Depth: 3 inches
Strap length: 46 inches |
| |
 Brown
Sheep Lamb’s Pride Worsted [100% wool; 190yd/173m per
4oz/ 113g skein] color:
#M102 Orchid Thistle; 2
skeins Brown
Sheep Lamb’s Pride Worsted [100% wool; 190yd/173m per
4oz/ 113g skein] color:
#M102 Orchid Thistle; 2
skeins
Recommended needle size:
1
pair US #10/6 mm needles
[always use a needle size that gives you the gauge listed below -- every knitter's gauge is unique]
Tapestry
needle
Embroidery needle
DMC Embroidery Floss
[100 % cotton; 8.7yd/8m] color: #734; 1 skein
T-pins, safety pins or
straight pinsApprox. 1yd non-felting yarn (cotton, acrylic,
superwash wool)
|
| |
15 sts/20 rows = 4 inches in stockinette
st, before felting |
| |
[Knitty's list of standard abbreviations and techniques can be found here.] |
| |
BAG
CO 90 sts.
Work in stockinette st
until work measures 15 inches, ending with a WS row.
Eyelet Row [RS]: K13,
[yo, k2tog, k7] seven times, yo, k2tog, k12.
Work 5 rows in stockinette
st, beginning with a WS row. BO all sts.
FLAP
CO 24 sts.
Work in stockinette st
until work measures 6.5 inches.
BO all sts.
STRAP
CO 5 sts.
Work in stockinette st
until work measures 60 inches.
BO all sts.
DRAWSTRINGS (Make 2):
CO 94 sts. BO all sts.
|
Weave in ends.
Sew together
side edges of bag piece,
forming a tube. Centering seam at
what will become the back
of the bag, sew CO edge together, forming a flat pocket.
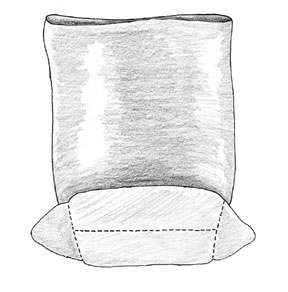
Form Gusset
With bag inside out, flatten
bag bottom --> so that
the middle of the base
seam is centered and faces
up. Sew a seam across each
corner, forming triangular 'ears'. Fold these ears toward
center of bag base and lightly sew in place.
Loosely thread non-felting
yarn through eyelets at top of bag, and knot ends together.
Felting:
Place all pieces in a net
laundry bag. Add a small amount of mild detergent and
run through washer cycle set for small load with hot wash
and cold rinse. For added agitation, you may wish to add
an old pair of jeans or towel to the mix. Stop the washer
periodically to check the progress of the felting. Run
additional cycles if necessary to achieve desired size
and density. Bag shown was felted until stitches were
no longer visible.
When pieces are felted,
remove from washer, rinse if necessary, pull into shape
and lay flat to dry.
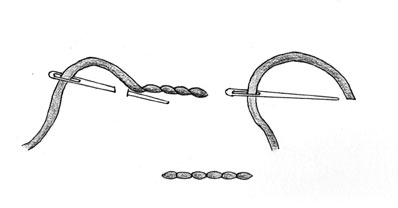
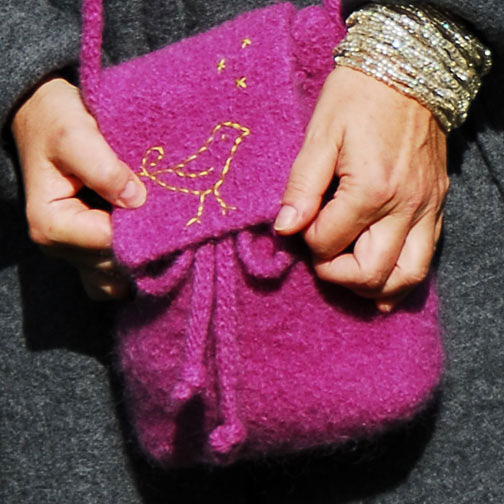
Assembly:
Using embroidery floss
and needle and referring to photo as a guide, work stitching
on flap as desired.
Use backstitch --> to attach flap
to back of bag, centered
between drawstring holes.
Knot one end of each drawstring.
Beginning at edge of flap,
thread un-knotted end of
first drawstring through
four eyelets towards center
front of bag. Repeat with
second drawstring. Knot ends,
trimming if necessary.
Use pins to attach strap
to bag, centered between first and second eyelets on each
side (counting forward from flap). Try on bag, and trim
to adjust strap length as necessary. Stitch strap firmly
to bag.
|
|
Mags Kandis is a writer of books, designer of things and
maker of stuff.
You can keep up with
her comings and goings
on her blog.
|
| Pattern & images © 2008
Mags Kandis. Contact Mags |
|
|
|
|
|