 Judy’s
Magic Cast on: instructions can be found here. Judy’s
Magic Cast on: instructions can be found here.
W&T on right side:
Bring working yarn to front, slip stitch as if to knit,
bring working yarn to back, slip stitch as if to purl back
to left needle. Turn work.
W&T on wrong side: Bring
working yarn to back, slip stitch as if to purl, bring working
yarn to front, slip stitch as if to purl back to left needle.
Turn work.
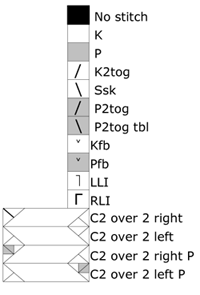
LLI: Left Leaning
Increase. Pick
up second stitch down on
right needle with left
needle, knit stitch through
back loop.
RLI: Right Leaning Increase. Pick up stitch
below current stitch on left needle, place stitch on left
needle, knit stitch.
C2 over 2 right P: Sl 2 to cn, hold in
back. k2, p2 from cn
C2 over 2 left P: Sl 2 to cn, hold in
front. p2, k2 from cn
C2 over 2 right: Sl 2 to cn, hold in back.
k2, k2 from cn
C2 over 2 left: Sl 2 to cn, hold in front.
k2, k2 from cn
Working with Magic Loop or Two Circular Needles:
Although the instructions are written for working with double
point needles, this pattern can be easily be worked using
the Magic Loop or Two Circular method, and some may find
it easier to do the instep cables in this method.
Elizabeth Zimmermann’s
sewn bind off: instructions
can be found here.
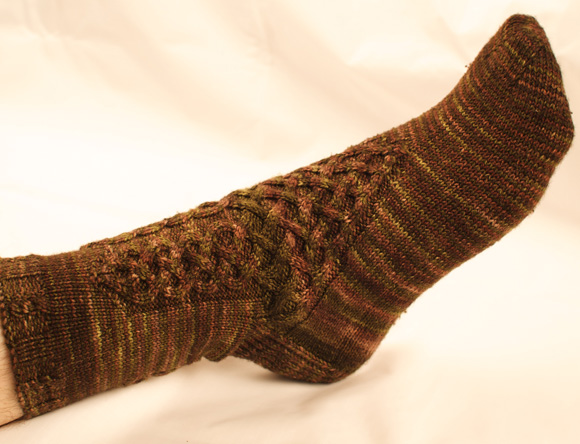
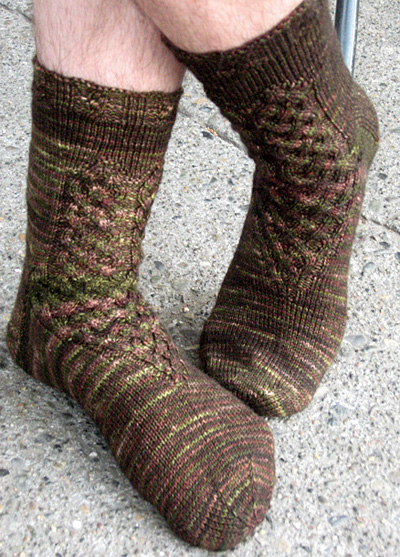
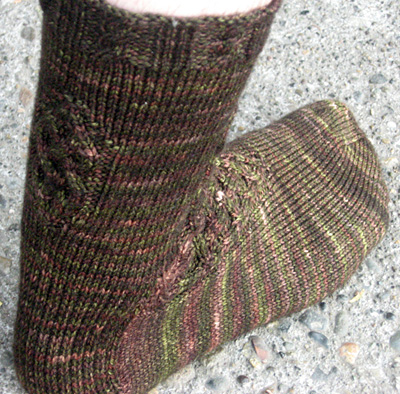
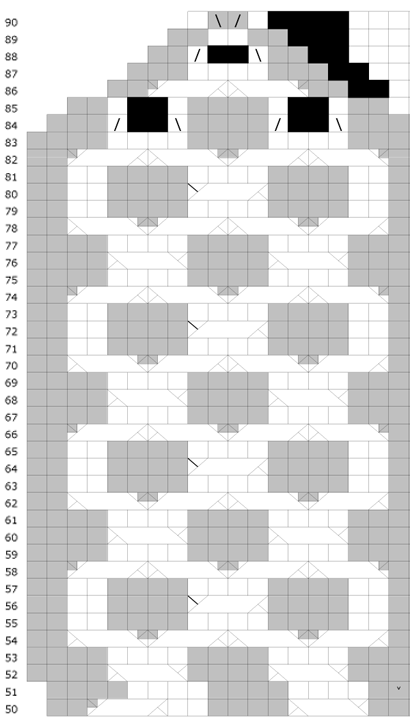
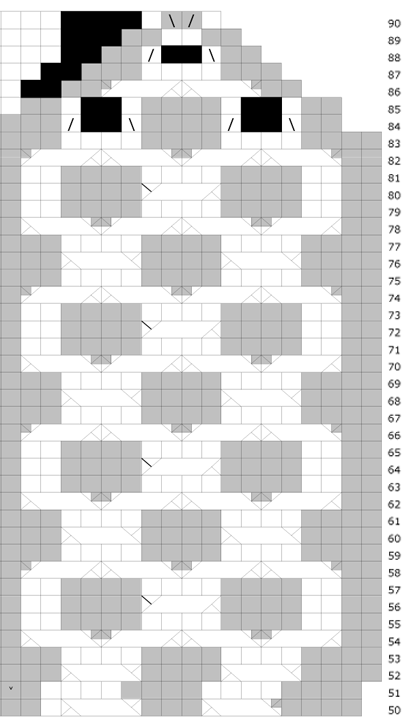
Main Chart for
the front of the sock is
rather large, so we've
broken it into 4 parts
to make it printable. Please
download each part of the chart
and assemble them, left
to right, top to bottom
as follows, to produce
the complete Main Chart:
1a 1b
2a 2b
|
Toe
CO 6 sts, 3 on each needle,
using Judy’s Magic Cast on, ensuring you leave at
least a 6 inch tail.
Knit 1 round using both tail and working yarn held together
for every st. Each loop on your needles is counted
as a single st. 12 sts
total.
Knit 1 round.
Redistribute sts, 3 onto each dpn. Place markers between
sts 2 and 3, between sts 4 and 5, between sts 8 and 9, and
between sts 10 and 11. Needles 1 & 2 are instep,
3 & 4 are sole.
Toe increase rounds
Round 1: RLI,
k to first marker,
RLI, k to second marker
RLI, k to end of needle
2; RLI, k to third
marker, RLI, k to fourth
marker, k to end.
Round 2: K
to end.
Repeat these two rounds until there are 66 sts total. Remove
stitch markers.
Work in Stockinette until sock measures 4 inches. (For a
shorter foot, work 3.5 inches, for a longer foot, work 4.5
inches.)
Foot
Setup Round 1:
K16, pfb, k to end.
Setup Round 2:
K15, p4, k to end.
Begin working Main Chart
[download
the four parts and
assemble as instructed
in Pattern Notes
above]
starting on the center
4 purl stitches,
adding purl stitches
outside of chart,
or increasing on
each side as per
chart. Stitches that
are not part of the
chart are worked
in stockinette. End
after round 49.
107 sts
total, 74 on instep needles,
33 on sole needles.
Heel turn setup
Heel setup, worked
on insetp sts on needles
1 &2: [K2,
RLI] 7 times, k2, place
marker, k3, work chart
Round 50, k3, place
marker, [K2, LLI] 7
times, k2. 121 sts.
Heel Turn
Continuing on same
round as before, working
on needles 3 & 4...
Row
1 [RS]: K3
[sl 1, k1] until 2
sts remain, w&t.
From here, you'll work
back and forth only on
the 33 sts on needles
3 & 4, leave
sts on needles 1 & 2 on hold.
Row 2 [WS]:
P until 2 sts remain,
w&t.
Row 3 [RS]:
[K1, sl 1] until 3 sts
remain, w&t.
Row 4 [WS]:
P until 3 sts remain,
w&t.
Row 5 [RS]:
[Sl 1, k1] until 4 sts
remain, w&t.
Row 6 [WS]:
P until 4 sts remain,
w&t.
Row 7 [RS]:
[K1, sl 1] until 5 sts
remain, w&t.
Row 8 [WS]:
P until 5 sts remain,
w&t.
Row 9 [RS]:
[Sl 1, k1] until 6 sts
remain, w&t.
Row 10 [WS]:
P until 6 sts remain,
w&t.
Row 11 [RS]:
[K1, sl 1] until 7 sts
remain, w&t.
Row 12 [WS]:
P until 7 sts remain,
w&t.
Row 13 [RS]:
[Sl 1, k1] until 8 sts
remain, w&t.
Row 14 [WS]:
P until 8 sts remain,
w&t.
Row 15 [RS]:
[K1, sl 1] until 9 sts
remain, w&t.
Row 16 [WS]:
P until 9 sts remain,
w&t.
Row 17 [RS]:
[Sl 1, k1] until 10 sts
remain, w&t.
Row 18 [WS]:
P until 10 sts remain,
w&t.
Row 19 [RS]
[K1, sl 1] until first
wrapped stitch. Using
right needle or cable
needle, pick up wrap
and lift it up over the
left needle, placing
wrap to the left of the
wrapped stitch, ssk stitch
and wrap together. Repeat
for each wrapped stitch
until two stitches remain,
lift wrap as before,
then ssk last two stitches
and wrap together.
Row 20 [WS]: Sl 1, p until 1st wrapped stitch. Using right needle
or cable needle, pick up wrap lift it up over the left needle, placing
wrap to the left of wrapped stitch, p stitch and wrap together. Repeat
for each wrapped stitch until last two stitches remain, lift wrap as
before, then p last two stitches and wrap together.
Move all stitches before
the stitch marker from needle 1 to needle 4, and slip all
stitches after the stitch marker on needle 2 to a free
needle. Working yarn will be on needle 3, you will
start row 1 with needle 5.
Row 1 [RS]: [Sl 1, k1] 15 times, ssk.
Row 2 [WS]:
Sl 1, p29, p2tog.
Repeat these 2 rows until 35 stitches remain on needles
3 & 4.
Next Row [RS]: [Sl 1, k1] 15 times, ssk, k1.
At this point, you'll resume knitting in the round.
Next round: K3, place marker, resume round 51 of
main chart, place marker after end of chart, k3 to end of
needle 2. At start of needle 3, k1, k2tog, k to end
of needle 4.
Leg
Continue working stockinette
in the round outside of stitch markers, and main chart
inside stitch markers, ending after round 59.
Next round: Work in pattern as established until Chart is
complete, then k16, pfb, k to end.
Following round: Work
in pattern as established until Chart is complete, then k15,
p4, k to end.
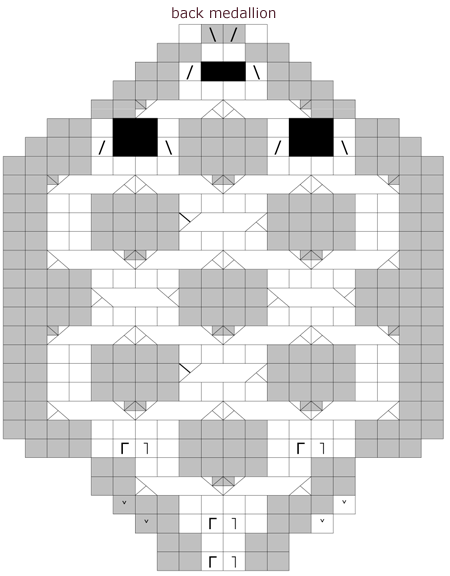
Continue working leg, following main chart for needles 1 & 2,
and working back medallion chart on needles 3 & 4, starting
on center 4 purl sts. As with front, stitches that
are not part of the chart are worked in stockinette.
After final round of both charts, there will be 28 stitches
each on needles 1 & 2, and 38 each stitches on needles
3 & 4. Shift 5 stitches from needle 4 to needle 1, and
5 stitches from needle
3 to needle 2. 33 stitches on
needles 1 & 2, 33 stitches on needles 3 & 4. 132
sts. The end of needle
4 remains the end/beginning
of round.
Knit in stockinette for 1 inch.
Cuff
Rounds 1 & 2:
[K4, p2, k3, p2] to
end.
Round 3: [C2
over 2 right, p2, k3,
p2] to end.
Rounds 4,
5, 6: [K4, p2, k3,
p2] to end.
Round 7: [C2
over 2 right, p2, k3,
p2] to end.
Round 8, 9,
10: [K4, p2, k3, p2] to
end.
Round 11: [C2
over 2 right, p2, k3,
p2] to end.
Round 12:
[K4, p2, k3, p2] to
end.
Bind off using Elizabeth
Zimmermann’s sewn bind-off, or preferred
bind off method.
(For
a looser cuff, replace cable rounds with k4, p2, k3, p2
ribbing.)
|


