|
Have you ever bought yarn online and didn’t
like the color when it
arrived? But you tossed it in your stash anyway because
some day you might find the perfect project for those 10
skeins of bright orange cotton, right? Or maybe you found
your favorite 100% baby alpaca on sale for 75% off or available
for trade at a yarn swap,
but it’s in an awful kelly
green? Logic might dictate
sending the yarn back, or passing up the great bargain,
but we all know that when it comes to yarn most of us aren’t
all that logical. But don’t
just toss the yarn in your
stash and wait for the right project to come along. Get
proactive and change the yarn into what you want it to be! You
can alter the yarn itself by dyeing or bleaching, or create
different visual effects with colorwork, or even spin it
into a whole new yarn.
Dyeing is a very easy way to alter the color of any natural fiber yarn.
There are many great online resources for dyeing, so I’m not going
to cover the process in detail in this article. Wool, silk and other protein
fibers can be dyed with acid dyes, kool-aid, fiber-reactive dyes, and of
course natural dyes. Cotton and other cellulose fibers can be dyed with
fiber-reactive dyes and natural dyes. Synthetics are very difficult (and
sometimes impossible) to dye at home, but you can experiment with blends
of synthetic and natural fiber. For example, if the yarn is a 50% cotton/50%
acrylic, the cotton will take the dye and the acrylic won't, creating
an interesting new color, possibly somewhat heathered in appearance. There
is a lot of information about dyeing online, including the following articles
in Knitty:
Dyeing with
acid dyes • Dyeing
with Kool Aid • Dyeing
with Food Color • Dyeing
plant fibers with Fiber Reactive Dyes
Dharma Trading Company is one of my favorite resources for both dyes and
instructions. For each type of dye they offer, they provide basic instructions
(look for the “instructions” link under “Quick Links” at
the upper right of the page when you have found the dye you are interested
in. Additionally, they have created the following special tutorials:
Acid
Dyed Yarn • Hand
Painted (aka space dyed) Cotton Yarn
This just barely scratches the surface of the dyeing information that is
available online. There are also very active dyeing discussion groups on
Ravelry and Craftster that are well worth your time whether you’re
new to dyeing or a seasoned pro.

When overdyeing an already dyed yarn, you will need
to consider how the colors will blend. Is the original yarn a light tan
or ecru color? Then you can probably dye it almost any color you want.
Is it bright turquoise? Then you probably won’t be able to dye it
yellow. The turquoise might show through the overdye job in some way. It
might blend with the new color, and it might show through as a sortof subtle
highlight. For example, if you dye a bright turquoise with a bright red
dye, you’ll probably
end up with purple yarn. Or, depending on how the dye reacts, it might
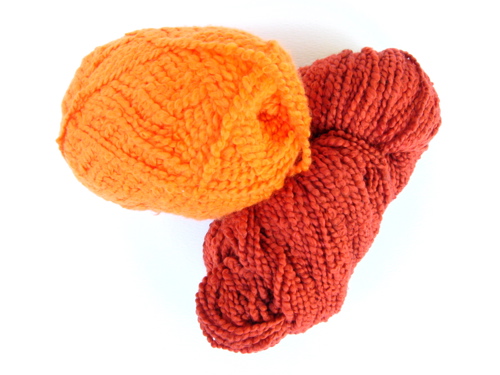
be a very reddish purple, with very blue highlights. The yarn in the photo
above started out as the bright orange on the left. I overdyed it
with a bright red-brown, and the orange definitely had an impact in creating
the finished orange-brown color you see on the right. Experimenting and
being willing to accept unexpected results are key here, but if it’s
precision you want you will need to test swatches and measure your dyes
meticulously. Personally I think part of the fun is tossing it in the dye
pot and seeing what happens, but precision is (sort of) possible if you
become familiar with the dyeing process.
Bleaching or dye removal is another way to change the color of the yarn. Regular
household bleach will destroy protein fibers, and can have harsh effects
on cellulose fibers. Special dye removers such as Rit Color Remover may
be a more gentle way to go about bleaching, but may still damage your yarn.
Dyeing is probably the best way to preserve the integrity of your yarn,
but if you are desperate for a lighter color, dye removal is worth considering.
Removing
dye is covered fairly well online so I won’t go into detail
here. Dharma Trading Company also offers a dye
remover, and the instructions
suggest it can even remove the dye from polyester.
Just
as for overdyeing, you need to take the original color into account. You
might not be able to remove all the color, but you may be able to lighten
the color somewhat. Just as with dyeing, the removal of color can be an
unpredictable process so if you’re interested in precision, test
it on swatches first.
You don’t have to change the color of your yarn to change the overall
look of your finished work. Consider all of the possibilities presented
by colorwork. Carrying another yarn with your original yarn, striping,
intarsia, fair isle, and edging the finished work in a different yarn are
all ways to change the look of the original yarn. I refer to knitting in
these examples, but I’m sure the concepts would work fairly well
with crochet as well.

Carrying another yarn with the original yarn as you knit will give you
a sort of heathered look and change the overall color of the finished
piece. You don’t have to use the same type or brand of yarn. Consider
carrying a yarn that’s much thinner, thicker, or a completely different
texture than the original. You can work your project in stripes with
another yarn for a whole new effect. You can try striping with yarns
of different weights, textures, and colors, and you can experiment with
the number of rows you work with each yarn.
Striping will not drastically
change the color, but the overall effect will be much different than
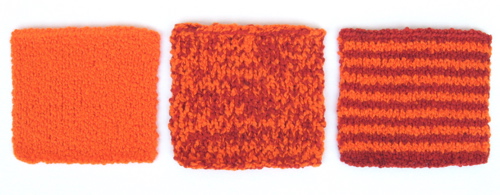
knitting the piece entirely in the original yarn. See the photographs
of the examples in orange above. The bright orange swatch is too bright
for most projects. Knitting it together with the same yarn that I overdyed,
or striping it with that yarn opens up more possibilities. Of course
you don't have to stick with the same type or brand of yarn. You can
mix wool and cotton, thick and thin, novelty and luxury yarns, and so
on. The possibilities are endless.

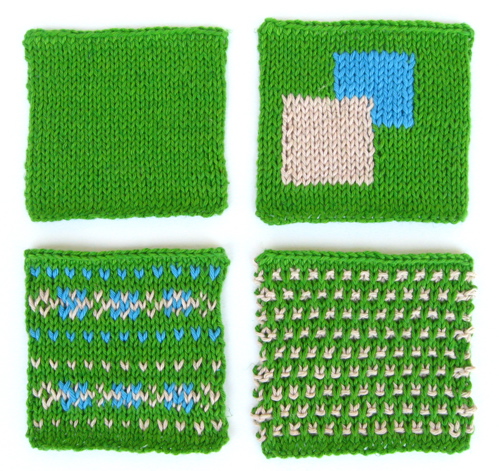
Other colorwork such as intarsia or fairisle can be
used to break up a harsh color, such as in the examples knit in green
above. The green is a rather nice color, but on its own, it’s overwhelming.
It becomes more pleasant as a background for colorwork. You can even
peruse your favorite stitch dictionaries for stitches that are suited
to colorwork, such as the Speckled Rib used in the sample on the bottom
right, from The
Harmony Guides.
 
Edging your project with a different yarn doesn’t
have the same impact as all of the above methods, but it is still something
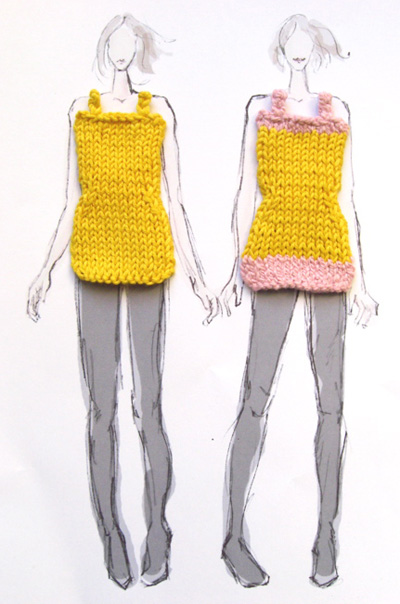
to consider for certain purposes. For example, I love the color orange
but it makes me look pale if I wear it close to my face. If I really
want to knit an orange top, I can work the edges in a different, more
flattering color, such as pink. The pink would be closest to my face,
making me look just a bit less pale. This is a subtle way to remedy the
bad effects of an unsuitable color. The drawing with swatches --> illustrates
this idea, albeit very conceptually. The model on the left looks a bit
washed-out in her very yellow dress. The model on the right looks a bit
more lively in her yellow dress edged in flattering pink.
Any colorwork will involve experimentation with different color combinations.
A color wheel might be useful to you, to determine which colors will
look good together. Color theory is a whole different can of worms that
I’m
not going to cover here, but don’t be intimidated if you think
you don’t "get" color. Swatching is your friend. If
you like the swatch, then go for it. Or you can do a bit of sketching
first to save yourself some time. It’s not exactly the same as
seeing the actual knitted swatch, but you can experiment with a lot of
different colors before swatching, by sketching by hand or even on the
computer. Your sketches don’t have to be sophisticated. Trace a
figure from a fashion magazine and then color in your garment idea. Or
print out some graph paper and color the boxes in your proposed fairisle
or intarsia pattern. Stripes are easiest of all. A few lines is all you
need to decide whether or not your colors will work together. If you
know how to use a drawing program on your computer, draw an outline of
whatever you’re
knitting and color it in or print it out to color it by hand.
If you know how to spin, you might even consider the various possibilities
that presents. You can spin the yarn into a new yarn, either by spinning
it with different fibers or roving, or by overspinning the original yarn,
and plying it with another yarn that has been overspun. Spinning the
yarn into something entirely new is probably the most labor intensive
of all of the options, but it is an option that provides a lot of creative
control. As with dyeing, it is not my aim to go into detail about spinning,
but rather to suggest the possibility to get your creativity flowing.
If you would like to learn to spin, plenty of information about spinning
can be found online, with ample help available in the spinning discussion
boards on Ravelry and Craftster. Try your local public library for books
and videos, or consider a subscription to Spin-Off Magazine. Lexi
Boeger has developed several techniques that combine commercial
yarn with spinning, which you can find in her books Handspun
Revolution and Intertwined.
I hope this brief article has inspired you to break out all those odd-colored
yarns from your stash and give them a chance. By experimenting with dyeing
and the removal of dye, colorwork, and even spinning, you can create
something completely unique. You no longer have to regret your online
purchase that didn’t quite match the picture, and you don’t have to pass
up that bargain that doesn’t suit your skin tone. I hope this inspires
you to think of even more possibilities for changing the yarn you sortof
like into a yarn you will love.
|

