Why knitters need a (crochet) hook.
I always keep a crochet hook
in my knitting bag...
to make picking
up dropped stitches easier
or sometimes to pick
up stitches for knitting.
But crochet hooks can
be put to even more good
uses by learning a few
basic crochet techniques!
Today we’ll
be looking at crochet
borders added to the
edges of a finished knits
and joining two knitted
pieces together.
Holding the hook.
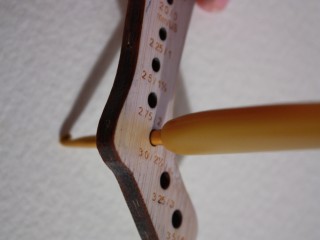
First let’s take a moment to look at a crochet hook.
Crochet hooks have a somewhat
confusing sizing system,
with both numbers, letters
and millimeters represented.
For knitter’s
purposes, the important thing
is that the crochet hook
is approximately the same
size as the knitting needle
that you’ve
used to knit with. You can
use a needle gauge to check
the gauge of your crochet
hook.
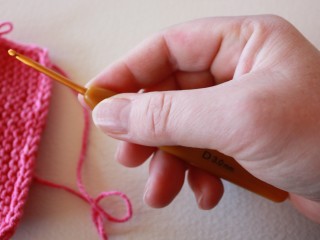
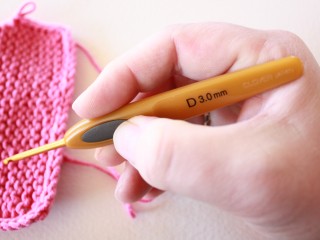
I hold the crochet hook
like I do a knitting needle
in my dominant (for me
that’s
the right) hand...
but the fastest crocheters
I know hold the hook like
I hold a pencil...
I hold the working yarn
in my left hand, using
my left thumb and forefinger
to stabilize what I’m crocheting into and
my left middle finger to
control tension.
You should find some way
to hold the crochet hook
that is comfortable for YOU.
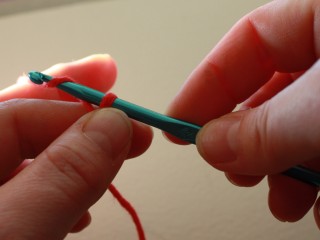
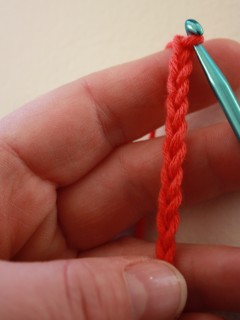
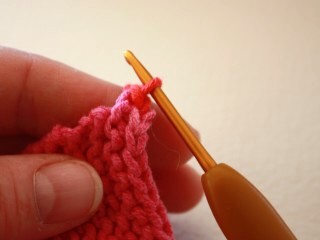
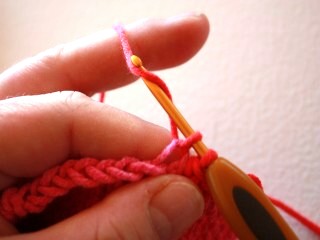
The basic stitch in crochet
is a chain. Everything else
builds on this chain. To
build the chain, make a slip
knot on your crochet hook, then just grab the yarn (as in
the picture above) and pull it through the loop on the hook.
Repeat, repeat, repeat.
Making a crocheted chain
is the equivalent to casting
on in knitting.

Adding borders to knitted edges
Slip stitch crochet is basically
making a basic crochet
chain and attaching it
to your knitting at the same time.
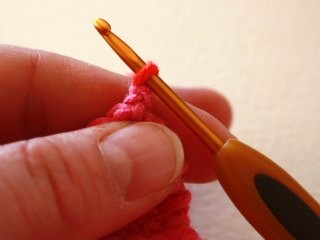
First insert the hook into
the edge of your knitting,
then grab the yarn with
the hook and pull it through. This stitch replaces the
first slip knot of the crocheted chain.
(Here you see one loop
of yarn on the hook after
pulling it through the
bump at the end of a garter
stitch row. You can also
insert the hook into the
front or back of the V
of a selvedge stitch, between
two stitches, completely
through the knitting or through the cast-on or bound-off
edge, etc.)
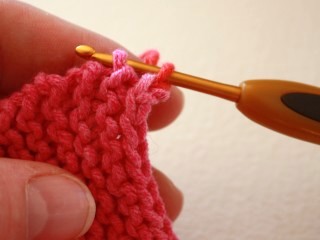
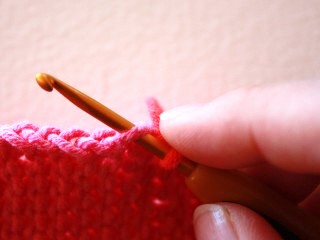
*Then insert the hook again
into the knitting to the
left of the loop you just picked up ...
You now have two loops
on the crochet hook, one
with the working yarn and one picked up stitch.
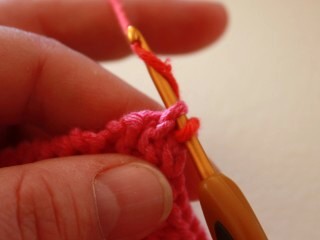
Grab the yarn with the
hook again ...
and pull it through BOTH the loops on the crochet hook.*
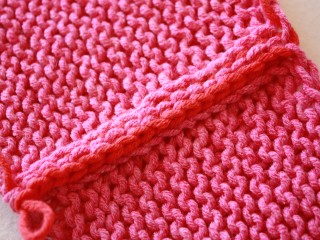
Repeat from * to * until the end and you’ll wind
up with a lovely chained edging ...
Slip stitch crochet makes a very good, stable edging. But
adding stability sacrifices stretchiness, so use with caution
in places that need to stretch like neck edges for children’s
sweaters.
You’ll also need to be careful about gauge – you
want the edging to match
the gauge of the knitting so that it lies flat and even.
Fortunately crochet is incredibly easy to remove (just pull
the yarn and WHOOSH! the crochet undoes itself) and fairly
fast to work, but it’s a
good idea to lay the work
on a flat surface every now and then to see how you’re
doing.
If the slip stitch edging is too long - making the
edge wavy - try either
picking up fewer stitches per inch along the edge by skipping
a stitch now and then or use a smaller crochet hook. If
the edging is too short - making the knitting pucker – use
a larger hook or pick up
more stitches along the edge.
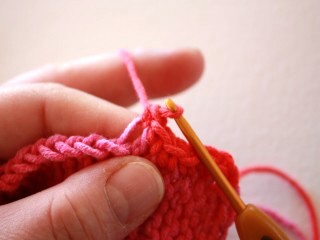
Single crochet is just
like slip stitch crochet,
with one extra step. It
makes a slightly wider, more
decorative edging. A round
of single crochet probably
won’t
keep edges that are already
curling from doing so by
itself, but two rounds
of single crochet might.
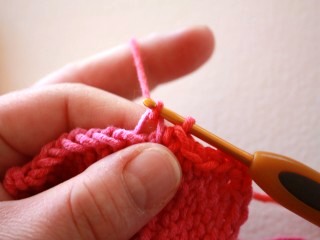
To work single crochet, first insert the hook into the
edge of your knitting, then grab the yarn with the hook
and pull it through (as above). You now have one loop on
the crochet hook. *Then insert the hook again into the knitting
to the left of the loop you just picked up ...
(Here I’m inserting the hook through the front loop
of a selvedge stitch.)
And pull the yarn through the edge of the knitting. You
now have two stitches on the crochet hook. This is where
single crochet differs from slip stitch crochet!
Now grab the yarn AGAIN ...
and pull it through both the loops on the crochet hook.
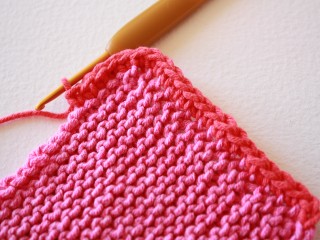
The results of single crochet look like this:
If you are crocheting around corners (like on a square
piece of knitting) you’ll want to pick up a couple
of extra stitches at the
corners to keep the edges
from rolling towards the front.
If you want to make a second
round of single crochet,
just continue on when you’ve
come back to where you started. When you’re finished
simply break the yarn and pull it through the final loop
and fasten down securely like you would any other yarn tail.
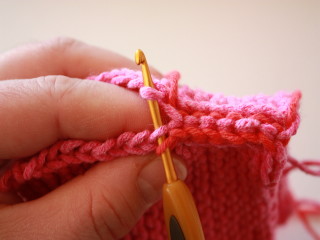
Joining with crochet
You can use either of the two techniques above to join
two pieces of knitting
together with crochet.
The seam will not be invisible
(as it would be with mattress
stitch)
but sometimes a little
architectural interest
is just what you’re after.
To join, hold the pieces together with either right sides
or wrong sides facing and
instead of inserting the
crochet hook into one edge,
insert it into both pieces
at the same time.
Here I’m using the back loops of a selvedge stitch
to join.
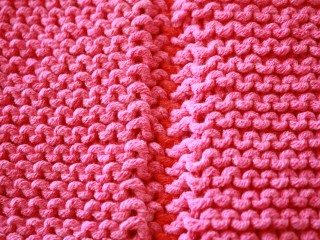
The result of slip stitch joining looks like this on the
sides that are held together:
and like this on the other side:
In the next issue, we’ll look at more decorative
edgings and crocheted button
loops!
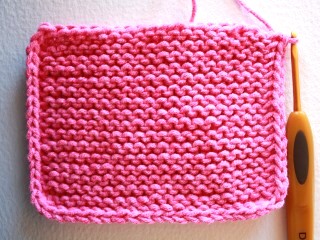
Credits:
Garter stitch blanket with
crocheted join is ”Knitted Garter Stitch Blanket” from
Elizabeth Zimmerman’s The Opinionated Knitter
Fabulous customized needle gauge by Karat
Stix.
References:
Vogue
Knitting (Sixth & Spring Books; ISBN: 193154316X)
The
Knitter’s Book of Finishing Techniques (Martingale
and Company; ISBN: 156477452X)
Stitch
'N Bitch: The Knitter's Handbook (Workman Publishing
Company; ISBN: 0761128182)
|