Welcome back to another round
of ‘what we can do
with a little food coloring
and some fiber?’ Recently
I purchased a spinning
wheel and began learning
to spin. Being a color
addict, and dyeing my
own yarns regularly,
it was natural for me
to move on to dyeing
raw fiber. This is intended as a continuation of my previous
opus (using fiber instead of
yarn), so I will not be
going into as much gory
detail as I did last time.
Safety First
No matter the type of dye you use, it’s a good idea to keep your
dying gear: pots, stirrers, etc separate from eating and cooking equipment. |
I have a couple of reasons for using
vinegar and food coloring to dye protein fibers, I have
a small child and a small house. There is nowhere to work
other than my kitchen, and the idea of working with toxic
chemicals in the same place I prepare food makes me crazy.
Add in a small child who gets into everything AND is more
susceptible to toxins than an adult, well, it’s
food coloring as dye for me.
To dye protein fibers, you need four things:
Colorant (food color),
acid (vinegar), heat (usually the oven, sometimes the
stove, microwave, dishwasher, you name it), and water.
All these things are either in your house already, or
easy to find at the grocery store. Yet another reason
to love this method, besides the safety issues.
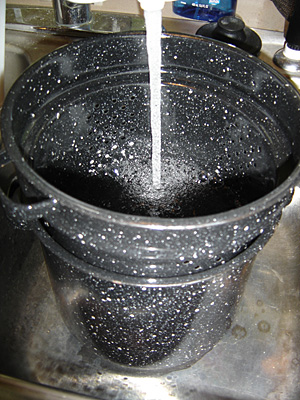
One last thing that is uber-handy
for dyeing is a lobster
pot [see left]. By ‘lobster pot’, I
mean a fairly large (1
gallon/4 liter) pot with
a draining insert that fits
inside it, and a lid. Normally
these are used to steam or
boil shellfish; you fill
the pot with water, put the
insert in, then put in your
shellfish. When your shellfish
is done,
you pull out the insert and
voila, yummy shellfish right
there cooked and drained.
One day, looking around for something
to soak a pile of wool in, there it was. After putting
the wool in the pot, I filled it with water, THEN put
the in the insert and pushed it down. This squooshes out
all of the air in the wool and allows it to suck up water
faster. I’ve cut my soak
time in half with this little trick. It’s also great
for dyeing loose fiber; in place of stirring, you can work
the liner like a plunger a couple times to swoosh the water
and dye through the fiber. Then, when you’re finished,
you can put the liner back
in AGAIN, and turn the whole shebang over in the sink (minus
the lid) and let the water drain as long as needed. Truly,
a glorious tool for dyers. Especially if you can pick one
up at a yard sale for a buck.
Food
Coloring
In terms of food coloring,
I have been reading
up (teaching myself
some chemistry, a sign
of the apocalypse for
sure) and found some
other, fairly safe,
chemical dyes related
to food coloring that
can be used. Unfortunately
I only know the US
Government’s
terminology and classification,
not any other country’s
terms. You overseas
folks may have to do
some research.
In the US, food
colorants are referred
to by the code “FD&C”.
That stands for “food,
drug, and cosmetiic”,
meaning it is safe
for all those uses.
However, there
is a second class
of dyes, called “D&C” meaning “drug
and cosmetic”.
In a nutshell,
they are chemically
similar to the
FD&C colors,
but for various
reasons are considered
safe in small doses,
but larger doses
are to be avoided.
Since we’re
not going to be
drinking the dyes,
they’re as
safe as the FD&C
colors for our
purposes. |
WOOL AND OTHER HAIR FIBERS:
These can all be dyed with the same methods
used in my
first
article about dyeing yarn,
with a few modifications
to allow for the fiber
being loose. I suggest
using white or natural
light-colored roving of
whatever protein fibers
you prefer (wool, alpaca, silk, angora,
mohair…)
Everything shown here is
a very lovely natural merino
roving from my buddies
at Kendig Cottage.
All rovings, regardless
of fiber, need to be soaked in water and
vinegar. I use about 250ml/1
cup of vinegar per 100g/3.5 oz of fiber. Time depends
on both soaking method
and fiber; wool with the lobster-pot-squish method can be
as short as a couple hours, silk has to DEFINITELY soak
overnight (and probably longer, depending). For most purposes,
I suggest overnight.
Felt warning! Remember when dyeing feltable fibers the
worst possible things you can do are heat shocks, and agitation.
So avoid both at all costs. (You can boil wool; I do regularly.
You just have to gradually raise the temperature.)
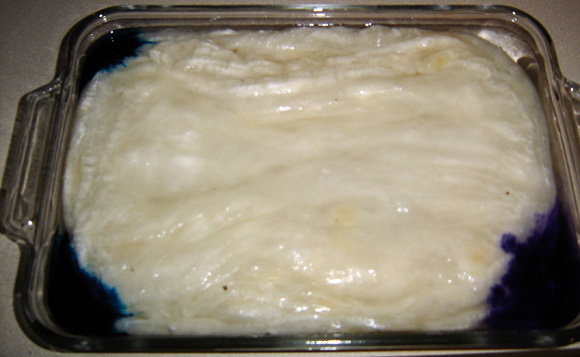
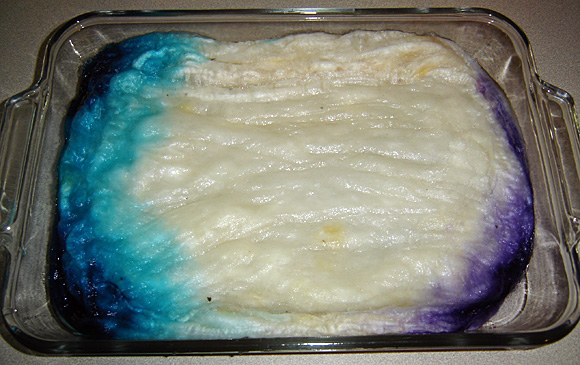
SOLIDS: For solidish
colors (there will always
be a bit of variation in
color, when hand dyeing,
even if you use only one
color of dye), add the
food coloring to some liquid
(if using a paste dye, this is easier in hot or at least
warm water), stir it up, and then pour it into the container
you’re
soaking your wool in. For
this method, you should
soak your wool in an ovenproof
container, like a glass
baking dish or a lobster
pot. Stir in the color
as much as possible (you
can gently prod the wool with a wooden spoon to move the
dye around), and let it sit as long as needed for the dye
to move through the fiber.
Glass baking dishes are
great for this, because you can see all the layers of fiber.
Pop the dish into the oven
at 120C/250F for an hour,
then check to see if the
dye is exhausted; the water
should be clear and all
the dye sucked into the
fiber. If not, pop it back
in at 175C/350F for half an hour. Any dye left after that probably
isn’t
going to stick.
IF YOU ARE DYEING
ROVING WITH SILK CONTENT,
be aware that temperatures
over about 82C/180F will
ruin the luster of the
fiber. Put
it in the oven at about
80C/175F for as long as
it takes; silk usually
takes up dyes quickly,
especially if the silk
is degummed, which is
normally the case with wooly/silk blends and silk rovings.
Let the fiber cool in the liquid
for a couple hours, pour off the liquid, and put the fiber
(carefully) into a colander. Pour or run water over the
fiber until the water out the other side runs clear; try
not to let the running water pound on the fiber, because
that can cause felting. Leave the fiber to drain in the
colander (or you can squish the water out with your hand;
I do, but it risks felting). Turn it out onto a towel
and leave it for several hours. The towel will wick the
water out of the wool. After that it won’t be dry, but it’ll
be dry enough that you can hang it up to finish the drying
process.
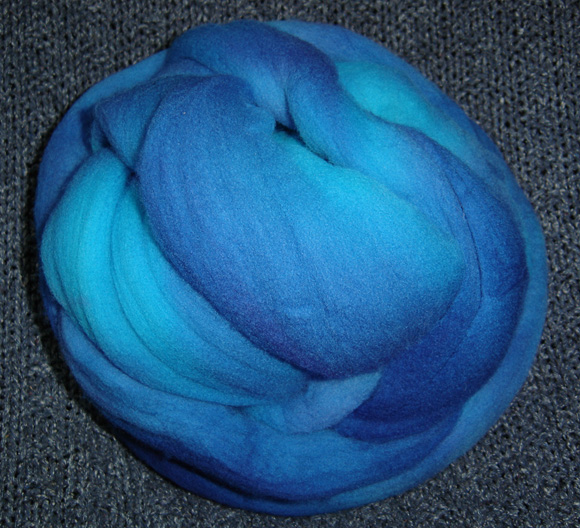
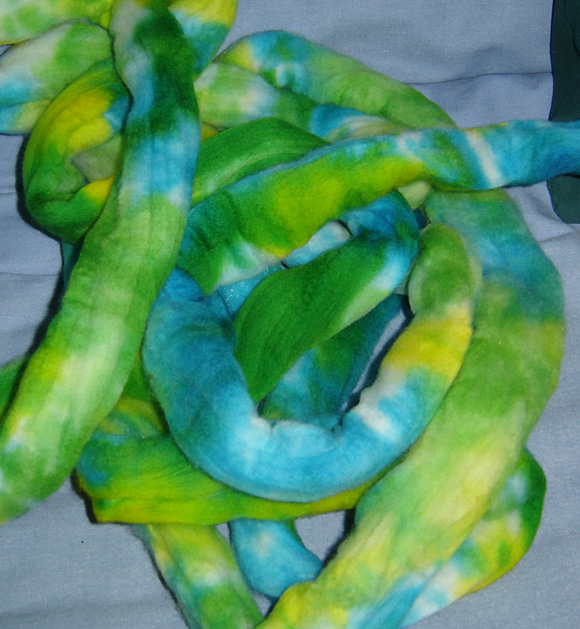
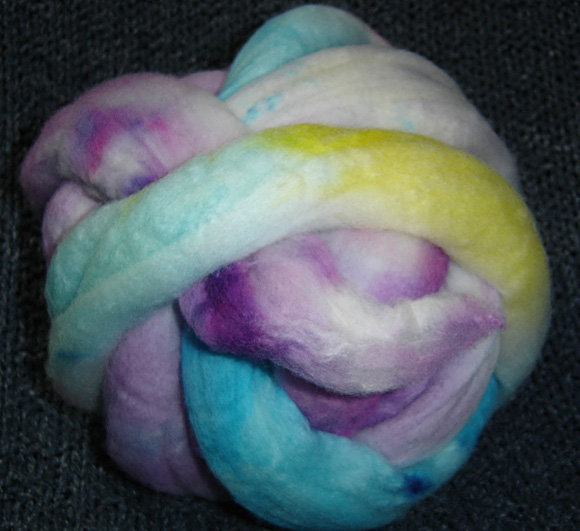
You’ll wind up with something
like this:
VARIEGATED 1: A quick,
easy variation on the solid
color method is to pour
in more than one color
of dye, not stir, allow
the colors to soak in,
and pop the fiber in the
oven. How you place the
roving in the pot has a
great deal of impact on the final
result.
Soak
overnight, pour in whatever
dyes you like, put in the oven at 120C/250F for an hour,
then if needed 175C/350F for half an hour. Drain, rinse,
and dry as above.
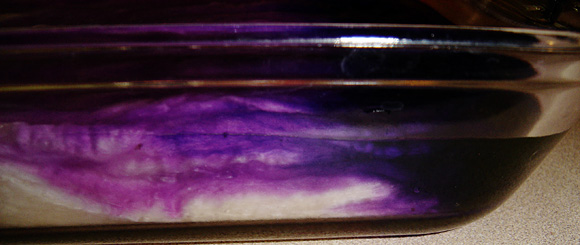
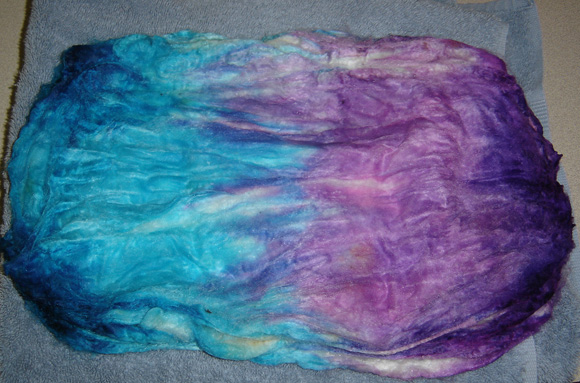
USE ANALOGOUS COLORS.
See the colors of
the examples above? They’re all colors that mix
together well and sit
next to each other on
the color wheel: blue-green-yellow,
pink-purple-blue. If
you mix complementary
colors – yellow/purple,
red/green, blue/orange – you will get mud. By mixing
complements, you are introducing
all three primary colors
to the pot. For instance,
the yellow/purple combo:
yellow is a primary, purple
is made up of primaries
red and blue. All three.
Mud. That is almost always
a bad thing, unless you’re
going for gray-brown colors. [
photos: bluepurple in progress
and finished.]
But you want to use complements? Something
that’ll pop your
eyes out? Okay. We can
do that.
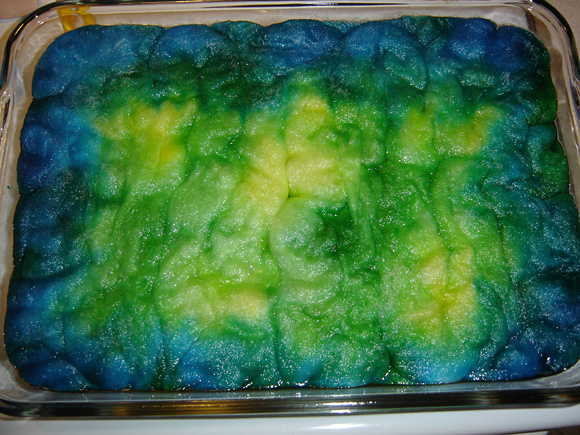
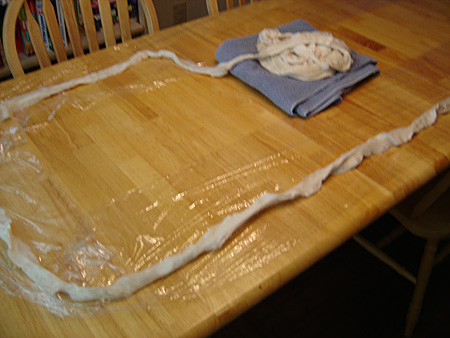
VARIEGATED 2: In this
case, it doesn’t matter what
you soak your wool in,
but you’ll need some
kind of baking dish to
heat it in. Soak the fiber
overnight, then drain it,
first in a colander, then
on a towel for a while
until it’s
barely damp. (If you don’t
do this, the fiber will
be too full of water to
take the dye.) Lay out
the fiber on some plastic
wrap...
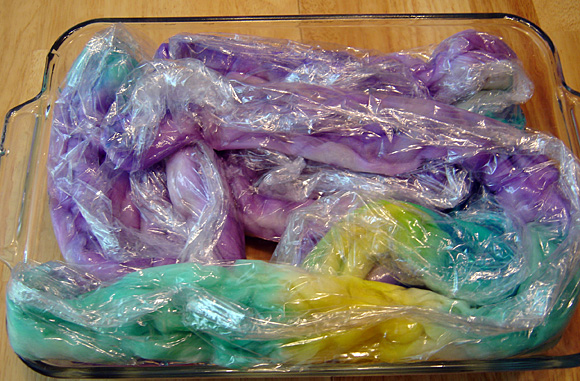
and
CAREFULLY pour your dyes
onto the fiber. Squoosh
it in gently with your
hand, either wearing a
rubber glove, or bare. (We can
get away with bare because
we’re
using safe dyes, but it’ll turn your fingernails odd
colors. If you’re using this method with regular acid
dyes, you’ve GOT to use gloves.)
Let it sit a while if you
want the dyes to soak in,
then wrap it up in the
plastic wrap...
put it all in a baking
dish, and pop it in the
oven. Try to keep your
lighter colors and yellow
shades on the top of the
pile of fiber, so if the
dyes run (odds are good
they will), darker colors
won’t
run into your light colors
and mess ‘em up.
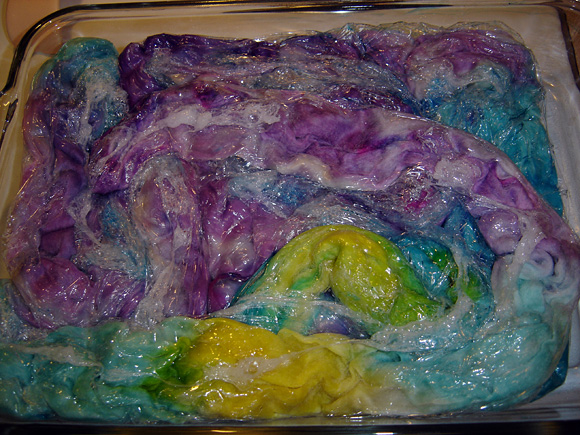
Do the usual, in the oven at 120C/250F for an hour, then
175C/350F for an hour. This is safe to do IF you use the
Saran Wrap brand; some of the cheap stuff will melt onto
the wool, but Saran Wrap just melts; it can still be cut
off the wool.
Rinse and dry as for
the other two methods.
Then you get something like this:
SILK HANKIES AND
CAPS: And this
brings us to the oddball
of protein fiber dyeing: silk hankies and caps.
For those who aren’t into sericulture,
silk hankies and caps are
the spinnable version of
silkworm cocoons. They’re
soaked in hot water and
about half-degummed, then
stretched out over a frame
and allowed to dry. They
are stretched one over
the other, so they are
purchased by weight and
sold in a stack.
Because of how these fibers
are processed, they require
some special handling.
The big problem with dyeing silk
hankies and caps is worm
snot. See above where I say they HALF de-gum the cocoons?
Yeah. The other half is still on the fiber. It’s the
gook the silk worm produces
to make the silk fibers stick together into a cocoon. In
a way it’s great, because
it adds a lot of strength
to the silk, making it
much easier to spin and draft. And in a way it totally sucks,
because getting the gummy fiber to soak up water and/or
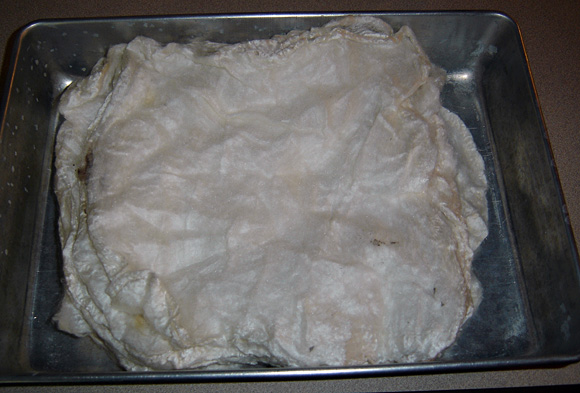
dye is a big fat pain in the butt. See this?
That is water SITTING ON
TOP of a stack of silk
hankies. The other fun thing is to watch the silk float
on the surface of the water. For hours. Arg. Very frustrating.
Put your silk hankies into a flat
dish (this works for
caps too, I’m just going to refer to them all as hankies
because I’m tired of typing out the whole phrase),
and pour in the water and
vinegar. Then weigh it
down with something heavy.
Soup cans (full), a pot
(I've used the lobster
pot in the photo above),
another, smaller baking
dish, whatever. Smoosh
it all down into the water.
Leave it like that until
it’s
at least half submerged.
(This usually takes at
least an hour.) After that,
take the weight off, reach
in with your hands, and
start smooshing the air
out of the silk. Place
your hands flat in the
center of the hankie, and
work it out toward the
edge. This is silk, not
wool; we can handle it
as much as we like and
it’ll
never felt. Keep that up
every half hour or so for
as long as you can stand
it, and then leave it to
soak at least overnight.
Pour in your dye.
Remember the bit above
about analogous colors.
You can allow the silk
to sit until the dye soaks
through the hankies on
its own, which can take
days, or you can help with
gentle smooshing.
The more silk you dye at once, the longer
it takes to soak, of course.
Once you’re happy with it, put
it in the oven at about
80C/175F for as long as
it takes. Once it’s done,
let it cool until you can
handle it, then pull the
whole stack of hankies
out of the drink, and hang
it over something so the
water can run out. (I use
the center partition of
my two-drain kitchen sink.)
Spray on water as needed
to rinse out the dye, then
leave it to drain as long
as you can stand it, or
a couple hours, whichever comes first. Pull the hankie into
thinner layers (thickness doesn’t
matter, it just aids drying)
and lay it out flat to
finish drying.
There you have it. Silk hankies, dyed by your own hand.
A word of caution, the bigger stack
you dye, the less chance there is of the dye soaking all
the way through the stack of hankies.
The stack in these photos
is about two ounces, and you can see
it didn’t get
close to all the way through. I don’t mind, I like
how it spins up with the
colors just around the
edge. But if you DO want
the color all the way through, dye in much smaller batches,
from one-quarter to half an ounce.
QUICK
REFERENCE CHEAT
SHEET:
Most
protein fibers:
-250ml/1 cup of vinegar
per 100g/3.5 oz of
fiber
-120C/250F for an
hour, then check
to see if the dye
is exhausted; the
water should be clear
and all the dye stuck
to the fiber. If
not, pop it back
in at 175C/350F for
half an hour
Silk:
-250ml/1 cup of vinegar
per 100g/3.5 oz
of fiber
-plan to soak overnight
-use hands to push
air bubbles out of
hankies and caps
-avoid temps over
80C/180F |
SOURCES:
FD&C
fact sheets
To search for potential health hazards
of specific chemicals,
go
here.
D&C colorants are most easily found in craft stores
in the soap-making sections; all the colorants available
are either FD&C or D&C certified, and usually clearly
labeled.
|