


Patch Me Up, a free knitting pattern from Knitty.com.
INTRODUCTION
Patch Me Up
by Candi Jensen

Lately I have become very interested in the patching and mending of garments — recycle/restyle, you could call it! It’s such a wonderful way to add creativity and color to a well-loved garment that may be languishing in your closet. I was inspired to figure out a way to put woven patches on a new sweater without needing holes! It proved to be a little more challenging than I first anticipated since I wanted to work them directly on the sweater, but once I figured a way to make it stable on the garment I couldn’t stop.
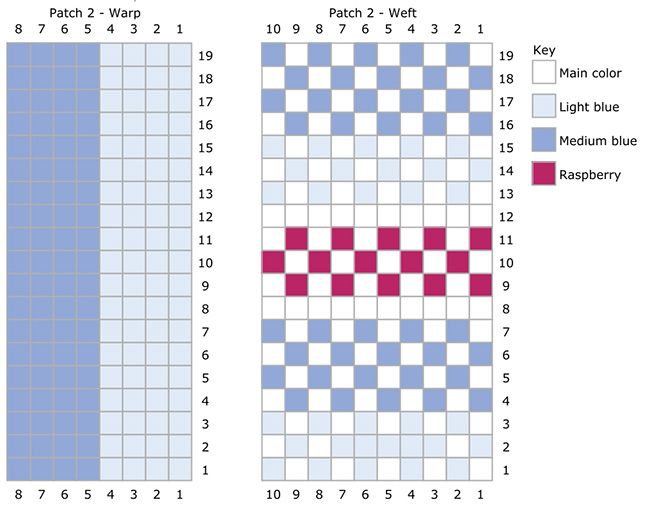
The weaving process of the patches is actually pretty straight forward: the warp (vertical threads) are worked first, then you weave in the weft (horizontal threads) in an under-over method.
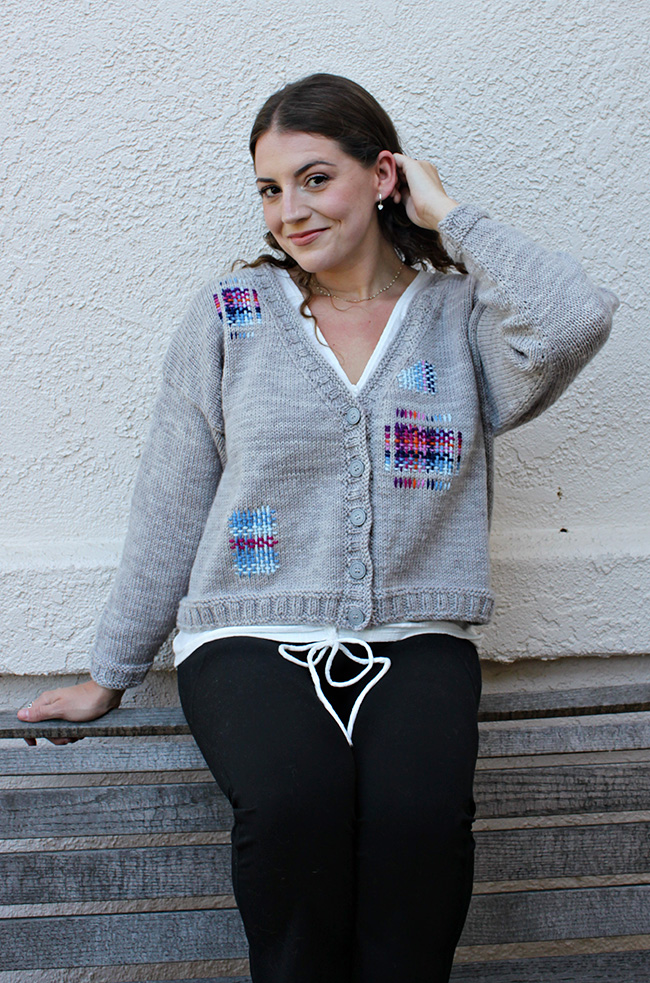
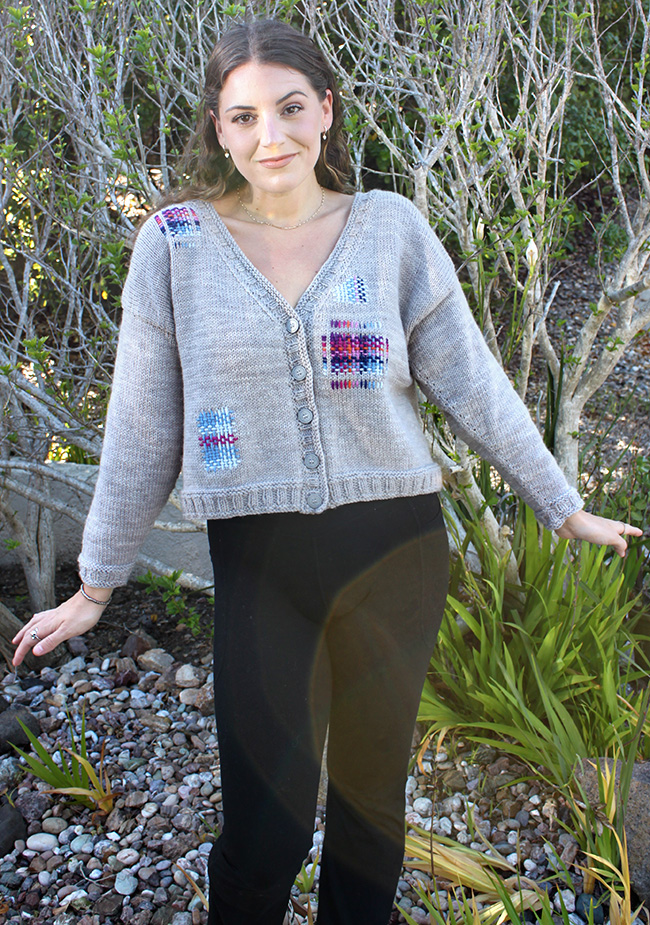
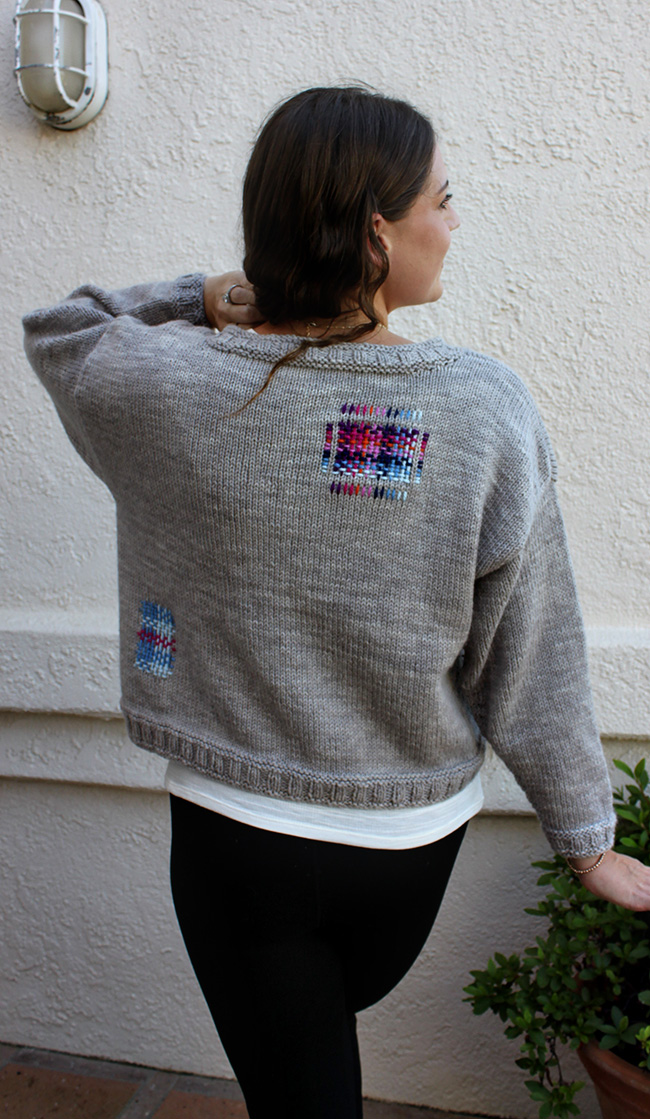
Although the patches were my initial inspiration, I wanted to design a nice comfy cardigan to go with them and the Miss Babs Intrepid Targhee wool is perfect. It has a soft hand and the shadowing effect on the yarn is stunning. The ribbing and button band has a few rows of garter stitch and then a two-by-two rib, topped by another few rows of garter stitch. This provides a perfect accent for the sweater which is a bit oversized and has dropped shoulders.
There are complete instructions on how to weave the patches, as well as color charts for each of the four different patches. Once you get the hang of the patches, you might want to add a few to the sleeves or other places.
 model: Hilda Skvagerson
photos: Lena Skvagerson


SIZE
Women's XS[S, M, L, 1X, 2X, 3X, 4X, 5X]
shown in size M, with 4 inches/10 cm positive ease at upper bust
FINISHED MEASUREMENTS
Chest circumference at underarm: 32.75[36.75, 40.75, 44.75, 48.75, 52.75, 56.75, 60.75, 64.75] inches / 83[93.5, 103.5, 113.5, 124, 134, 144, 154.5, 164.5] cm
Length: 20[20.5, 21, 21.5, 22, 22, 22.5, 22.5, 23] inches/ 51[52, 53.5, 54.5, 56, 56, 57, 57, 58.5] cm
MATERIALS
Yarn
![]() Miss Babs Intrepid [100% Targhee Wool; 280 yd/255 m per 4oz/115g skein]; Color: Fleur de Sel; 4[4, 5, 5, 6, 6, 6, 7, 7] skeins
Miss Babs Intrepid [100% Targhee Wool; 280 yd/255 m per 4oz/115g skein]; Color: Fleur de Sel; 4[4, 5, 5, 6, 6, 6, 7, 7] skeins
![]() Embellishment: approx 6 yds/5.5 m each of worsted weight wool. This is perfect for leftover and scrap yarns; use scraps similar in weight to the sweater yarn.
Embellishment: approx 6 yds/5.5 m each of worsted weight wool. This is perfect for leftover and scrap yarns; use scraps similar in weight to the sweater yarn.
Colors: light blue, med blue, dark blue, med orange, bright pink, raspberry, dark purple
Yarn Characteristics
![]() The sample shown uses a worsted-weight 2-ply 100% wool. The yarn is hand dyed and has a very subtle color variation that gives it a nice shadow effect. It has a nice soft hand but keeps its structure.
The sample shown uses a worsted-weight 2-ply 100% wool. The yarn is hand dyed and has a very subtle color variation that gives it a nice shadow effect. It has a nice soft hand but keeps its structure.
Recommended needle size
[always use a needle size that gives you the gauge listed below - every knitter's gauge is unique]
![]() US #7/4.5mm needles for working flat
US #7/4.5mm needles for working flat
![]() US #6/5mm needles for working flat
US #6/5mm needles for working flat
![]() US #6/5mm circular needle, 36 inches/91cm
US #6/5mm circular needle, 36 inches/91cm
Notions
![]() 4 stitch markers
4 stitch markers
![]() 6 large stitch holders
6 large stitch holders
![]() 5 0.75 inch/19 mm buttons
5 0.75 inch/19 mm buttons
![]() yarn needle
yarn needle
GAUGE
20 sts/24 rows = 4 inches/10 cm in stockinette stitch on larger needles
Note: gauge is always taken after blocking.
PATTERN NOTES
[Knitty's list of standard abbreviations and techniques can be found here.]
Construction method:
The body of this pullover is worked seamlessly from the hem up to the armholes, then worked right front, left front, back. Drop-shoulder sleeves are sewn in and the shoulders use a 3-needle bind off. The button band is picked up on circular needles and worked from bottom right, around neck and down the left side.
The woven embellishments are worked onto the garment before finishing.
Techniques:
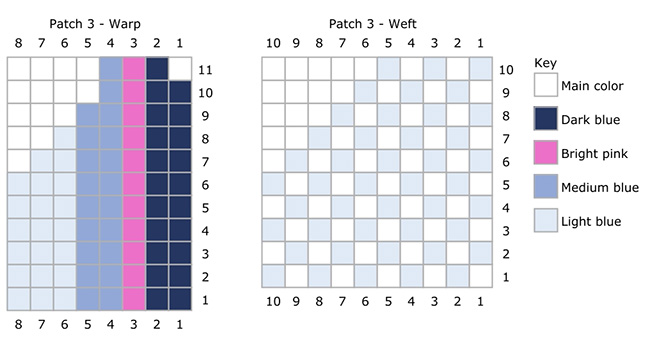
Embellishments are woven directly on top of the garment's knitted fabric. Detailed pictures and charts are at the end of the pattern. Weaving is the technique in which two distinct sets of yarns or threads – called the warp and the weft – are interlaced with each other to form a fabric or cloth. The warp runs vertically up and down and the weft is the yarn that passes horizontally across the warp. Refer to the color and placement charts.
The woven patches for this project are worked directly on the sweater and do not require a loom. The instructions in the pattern are for Patch #1. All patches are worked in the same manner with variations on size and colors. For each patch, cut approx 12 inches/30.5 cm of each yarn color for the warp, and the same amount for the weft. You will use a yarn needle with a large eye to weave. The tension should be the same as the stitches you are weaving over. Do not pull too tight or leave loose.
Rib Pattern (worked flat; multiple of 4 sts)
Row 1-4: Knit.
Row 5-8: *K2, p2; rep from * to end of row.
Row 9-12: Repeat Rows 1-4.
CHARTS


DIRECTIONS

Body
With smaller needles, cast on 156[176, 196, 216, 236, 256, 276, 296, 316] sts.
Work in Rib pattern for 12 rows.
Change to larger needles and work in St st until piece measures 11[11.5, 12, 12.5, 13, 13, 13.5, 13.5, 14] inches / 28[29, 30.5, 31.75, 33, 33, 34.25, 34.25, 35.5] cm, or to desired length, ending ready to work a WS row.
Divide for fronts and back:
Next row [WS]: P 38[43, 48, 53, 58, 63, 68, 73, 78] sts and place on holder for left front, p 80[90, 100, 110, 120, 130, 140, 150, 160] sts and place on holder for back, p 38[43, 48, 53, 58, 63, 68, 73, 78] sts for right front.
Right Front
Row 1 [RS]: K1, ssk, knit to end of row. 1 st decreased. You will now be working on just these sts.
Row 2 [WS]: Purl to end of row.
Repeat Rows 1-2 13[14, 12, 13, 11, 15, 14, 16, 14] more times. 24[28, 35, 39, 46, 47, 53, 56, 63] sts.
Work 2 rows in St st, then work Rows 1-2.
Repeat the last 4 rows 2[2, 4, 4, 6, 4, 5, 4, 6] more times. 21[25, 30, 34, 39, 42, 47, 51, 56] sts.
Work in St st until piece measures 20[20.5, 21, 21.5, 22, 22, 22.5, 22.5, 23] inches/ 51[52, 53.5, 54.5, 56, 56, 57, 57, 58.5] cm from cast on edge.
Next row: BO all sts.
Back
Pick up the 80[90, 100, 110, 120, 130, 140, 150, 160] sts on the back holder.
Row 1 [RS]: Join yarn, knit to end.
Row 2 [WS]: Purl to end.
Repeat the last 2 rows until piece measures 20[20.5, 21, 21.5, 22, 22, 22.5, 22.5, 23] inches/ 51[52, 53.5, 54.5, 56, 56, 57, 57, 58.5] cm, ending after a WS row.
Next row [RS] K 21[25, 30, 34, 39, 42, 47, 51, 56] sts, BO 38[40, 40, 42, 42, 46, 46, 48, 48] sts, knit to the end of the row.
Place each set of 21[25, 30, 34, 39, 42, 47, 51, 56] sts on st holders.
Left Front
Pick up the 38[43, 48, 53, 58, 63, 68, 73, 78] sts on the right front holder.
Row 1 [RS]: Join yarn, knit to last 3 sts, k2tog, k1. 1 st decreased.
Row 2 [WS]: Purl
Repeat Rows 1-2 13[14, 12, 13, 11, 15, 14, 16, 14] more times. 24[28, 35, 39, 46, 47, 53, 56, 63] sts.
Work 2 rows in St st, then work Rows 1-2.
Repeat the last 4 rows 2[2, 4, 4, 6, 4, 5, 4, 6] more times. 21[25, 30, 34, 39, 42, 47, 51, 56] sts.
Work in St st until piece measures 20[20.5, 21, 21.5, 22, 22, 22.5, 22.5, 23] inches / 51[52, 53.5, 54.5, 56, 56, 57, 57, 58.5] cm from cast on edge.
Next row: Bind off.
Sleeves (work 2)
Using smaller straight needles, cast on 36[40, 40, 40, 44, 44, 44, 48, 52] sts.
Work in Rib Pattern for 12 rows.
Change to larger needles. Working in St st, increase as follows:
Row 1 [RS]: Knit to end.
Row 2 [WS]: Purl to end.
Row 3: K1, kfb, work to last 2 sts, kfb, k1. 2 sts increased.
Row 4: Purl
Repeat Rows 3-4 2[2, 6, 12, 12, 13, 19, 17, 18] more times. 42[46, 54, 66, 70, 72, 84, 84, 90] sts.
Repeat Rows 1-4 17[17, 15, 12, 12, 11, 8, 8, 7] more times. 76[80, 84, 90, 94, 94, 100, 100, 104] sts.
Work even until piece measures 17[17, 17, 17, 17, 16.5, 16.5, 16, 15.5] inches/ 43[43, 43, 43, 43, 42, 42, 40.5, 39.5] cm. Bind off all sts.
PATCHES
Note: see Pattern Notes for more detailed instruction for this technique
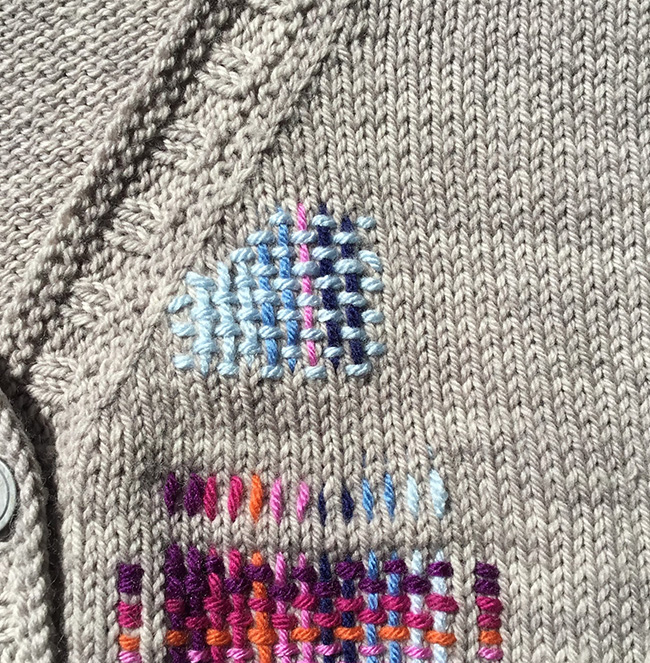
It is easiest to weave the patches before you join the shoulders on the body or seam and sew in the sleeves. Placement of the patches is shown in the photos, however it is up to you if you want them placed elsewhere.
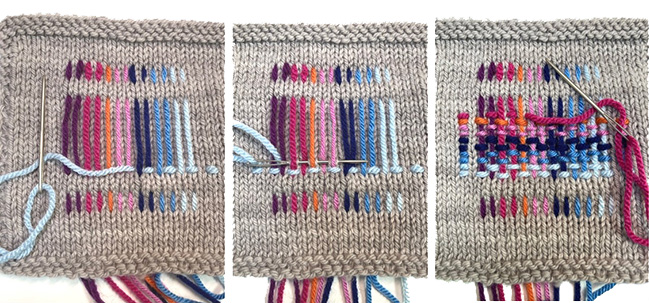
Warp Instructions (photos below show Patch #1)
Working from the Warp chart and with light blue yarn in the yarn needle, start at the bottom right corner of the patch and bring the needle through the work in and pull through, leaving about a 2-inch/5-cm tail.
1. Count up 3 sts as on chart, insert yarn through the st and pull through to the back of the work.
2. Skip 2 sts and bring yarn through the work to the front.
3. Skip 13 sts and bring yarn through the work to the back.
4. Skip 2 sts and bring yarn through the work to the front.
5. Skip 3 sts and bring yarn through the work to the back (see image below left) .
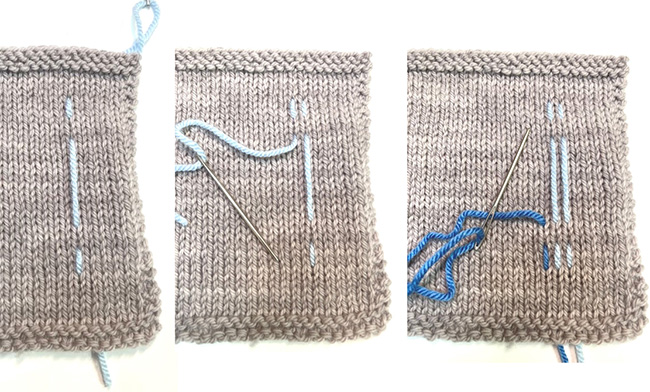
Bring the yarn to the front in the next column of stitches to the left, following the chart. Skip 3 sts and bring yarn through the work to the back.
Skip 2 sts and bring yarn through the work to the front (see image above center).
Working as in the previous row, skip 13 sts, move the yarn to the back, skip 2 sts, move yarn to the front, skip 3 sts and move the yarn to the back of the work. Cut yarn, leaving a long tail.
Join the medium blue as for the light blue and repeat the steps, following the chart (see image above right).
Continue in pattern for each following color except when you get to the medium orange, which only has one row instead of two.
Weft Instructions (photos below show Patch #1)
Add the light blue yarn on Row 6 of the Weft color chart. Bring the yarn through the work from back to front and then take it back to the back of the work over 1 st.
Bring yarn up to the front of work and over the first warp thread.
Go under the next warp thread and to the back of the work.
Working across the warp threads, alternate the over/under process, passing the warp yarn from the front to the back of the fabric. Continue until you reach the end of the warp threads..
After going over the last warp thread, take the yarn to the back of the work and under the next st. Skip 1 st and bring yarn to front of work and over next st to the back of the work, as shown.
Next row: Bring the yarn up one row, working over the first st. Take yarn under 1 stitch, and under the first warp thread.
Continue across the row working over/under the warp threads as done on the previous row, following the chart.
When you reach the end of the second row, join the next color according to the chart and continue to work across the rows as you did for the first weft row
Continue working the weft rows, following the Weft chart
Following the chart for Patch #1, there will only be one row of the medium orange. You will be adding the next color on the left side of the weaving instead of the right, but working in the same established over/under method as described above.
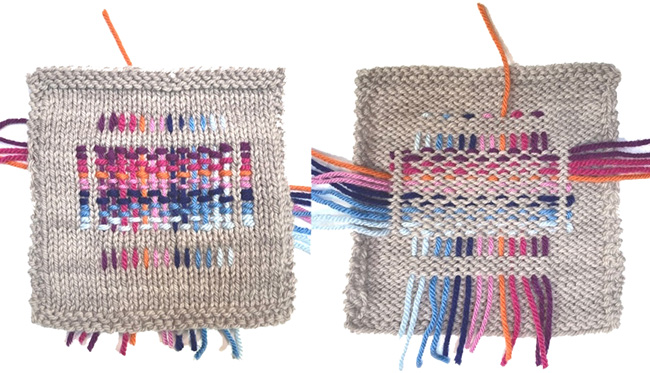
finished patch #1 front view (left) and back view (right)
FINISHING
Join Shoulders
With WS facing, join Fronts and Back at shoulders using 3-Needle Bind Off.
Seam the sleeves from wrist to top, then sew top of sleeves to armholes, being sure to match top center of sleeves to each shoulder seam in the armholes.
Buttonband
With RS facing, place a marker at the beginning of the v-neck shaping, and a marker at each shoulder seam.
Using a long circ, and starting at lower right front corner, pick up and knit 54 sts up Right Front edge, 45[48, 50, 53, 55, 55, 59, 60, 62] sts along Right Front v-neck, 42[44, 44, 46, 46, 50, 50, 52, 52] sts along Back neck, 45[48, 50, 53, 55, 55, 59, 60, 62] sts down Left Front v-neck, 54 sts down Left Front edge 240[248, 252, 260, 264, 268, 276, 280, 284] total sts.
Rows 1-4: Knit
Row 5 [RS]: *K2, p2; rep from * to end.
Row 6 [WS]: *K2, p2; rep from * to Right Front v-neck marker, *[BO 2, p1, work 8 sts in pattern]; rep from * 3 more times, BO 2, p1, k2.
Row 7: K2, *(cast on 2 sts with e-wrap cast on, work in pattern to next buttonhole); rep from * 4 more times, work in pattern to end of row.
Row 8: Work in pattern to end of row.
Rows 9-11: Knit to end of row.
Row 12: BO in knit.
Weave in remaining ends. Block seams and button band. Sew on buttons to correspond to buttonholes.
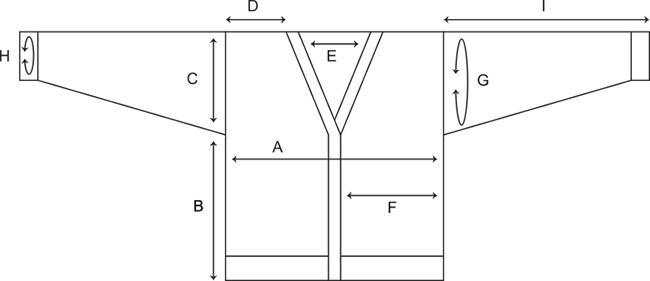
A – Back width at chest: 16[18, 20, 22, 24, 26, 28, 30, 32] inches/ 40.5[45.5, 51, 56, 61, 66, 71, 76, 81.5] cm
B – Body length: 11[11.5, 12, 12.5, 13, 13, 13.5, 13.5, 14] inches/ 28[29, 30.5, 32, 33, 33, 34.5, 34.5, 35.5] cm
C – Armhole depth: 8[8.5, 9, 9.5, 10, 10, 10.5, 10.5, 11] inches/ 20.5[21.5, 23, 24, 25.5, 25.5, 26.5, 26.5, 28] cm
D – Shoulder width: 4.25[5, 6, 6.75, 7.75, 8.5, 9.5, 10.25, 11.25] inches/ 11[12.5, 15, 17, 19.5, 21.5, 24, 26, 28.5] cm
E – Back neck width: 7.5[8, 8, 8.5, 8.5, 9.25, 9.25, 9.5, 9.5] inches/ 19[20.5, 20.5, 21.5, 21.5, 23.5, 23.5, 24, 24] cm
F – Front width at chest (not including selvedge or button band): 7.5[8.5, 9.5, 10.5, 11.5, 12.5, 13.5, 14.5, 15.5] inches/ 19[21.4, 24, 26.5, 29, 32, 34.5, 37, 39.5] cm
G – Upper arm circumference: 15.25[16, 16.75, 18, 18.75, 18.75, 20, 20, 20.75] inches/ 38.5[40.5, 42.5, 45.5, 47.5, 47.5, 51, 51, 52.5] cm
H – Wrist circumference: 7.25[8, 8, 8, 8.75, 8.75, 8.75, 9.5, 10.5] inches/ 18.5[20.5, 20.5, 20.5, 22, 22, 22, 24, 26.5] cm
I – Sleeve length: 17[17, 17, 17, 17, 16.5, 16.5, 16, 15.5] inches/ 43[43, 43, 43, 43, 42, 42, 40.5, 39.5] cm
ABOUT THE DESIGNER
 Candi learned to knit and crochet as a child but it wasn’t until she had children that she put the skill to use creating colorful sweaters, so she could find them at the crowded playground. Once she started it was hard to turn off the creative urge and thus began her career in knit and crochet design. Her designs have been featured in many popular magazines including Vogue Knitting, Martha Stewart and Better Homes and Gardens. She has published 15 books and is the Founder and Executive Producer of the PBS TV show Knit and Crochet Now.
She lives in Sebastopol, California, with her husband, and two grown children and 5 grandchildren live close by. In her spare time she helps her husband with his hobby vineyard. He makes excellent wine!
Pattern & images © 2024 Candi Jensen