


Yellowstone or Yosemite?, a free knitting pattern from Knitty.com.
INTRODUCTION
Yellowstone or Yosemite?
 by Destiny Itano

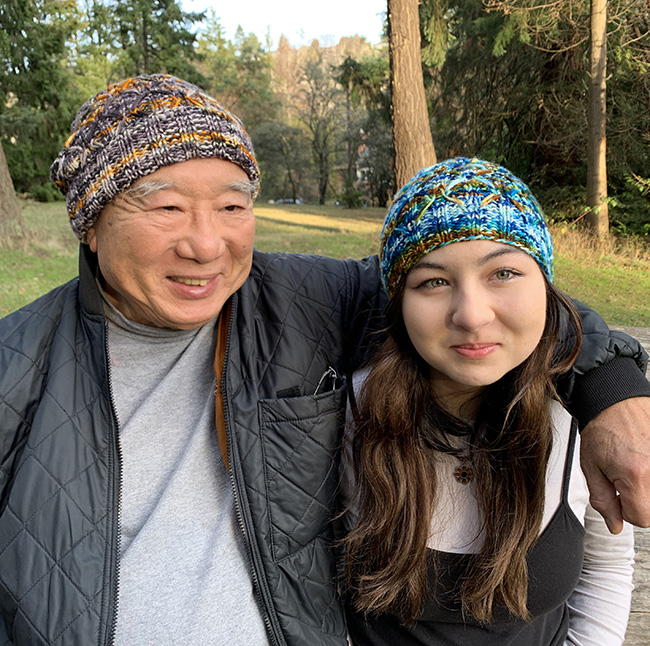
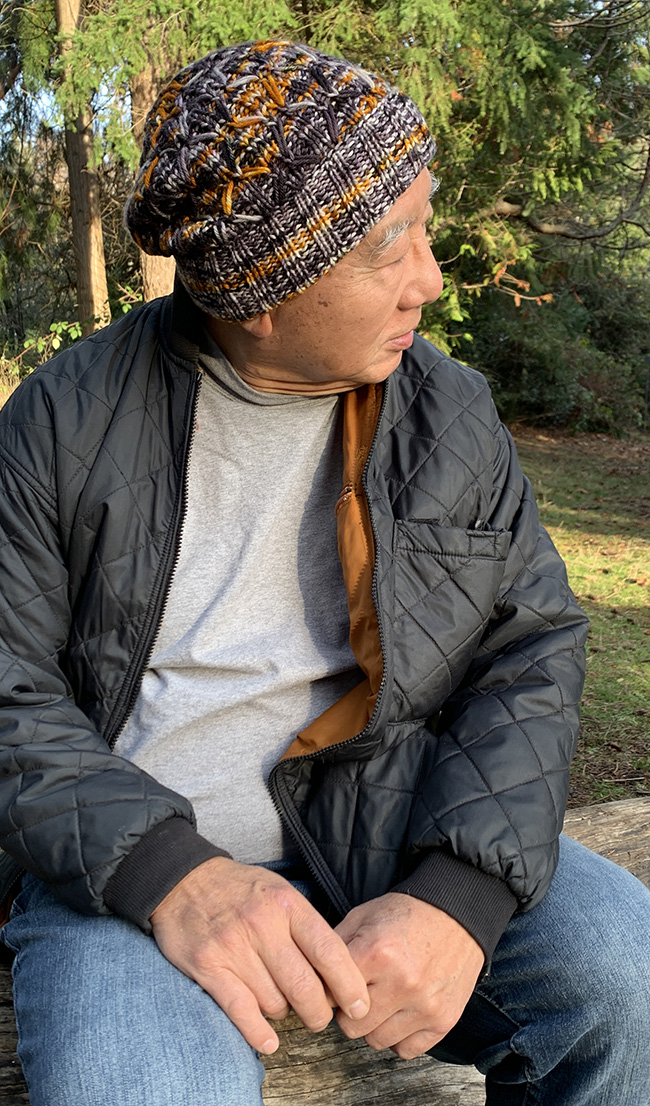
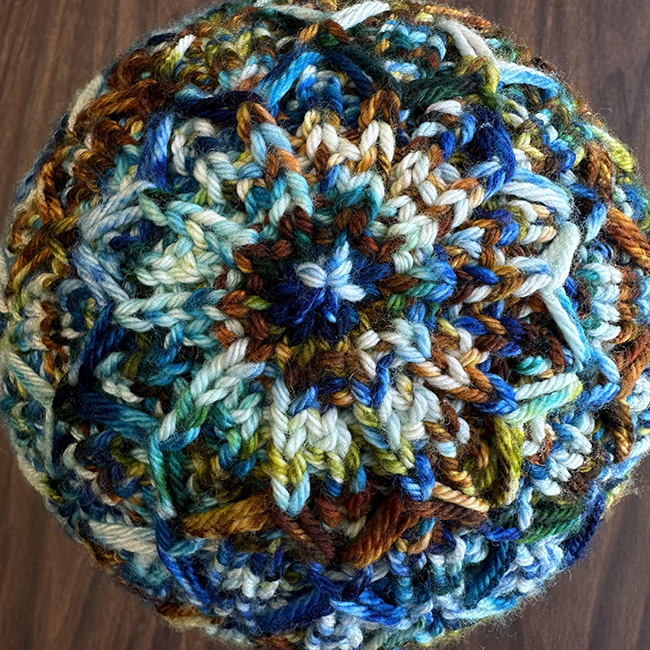
This hat uses dip stitches so that lifted strands create an interesting textured pattern that works wonderfully with highly variegated yarns. I originally created this design for my father, and it's named for the time he made plans for us to go to Yosemite National Park, but it turned out he'd wanted to go to Yellowstone National Park. It was a mistake, but we had a wonderful time anyway!
I have written the pattern with two different brim styles – a short brim, and a larger, folded brim, and two main body styles – a shorter beanie stye, and a fuller slouch style. You can mix and match brim and main body styles, so you really have four possible hats you can knit!
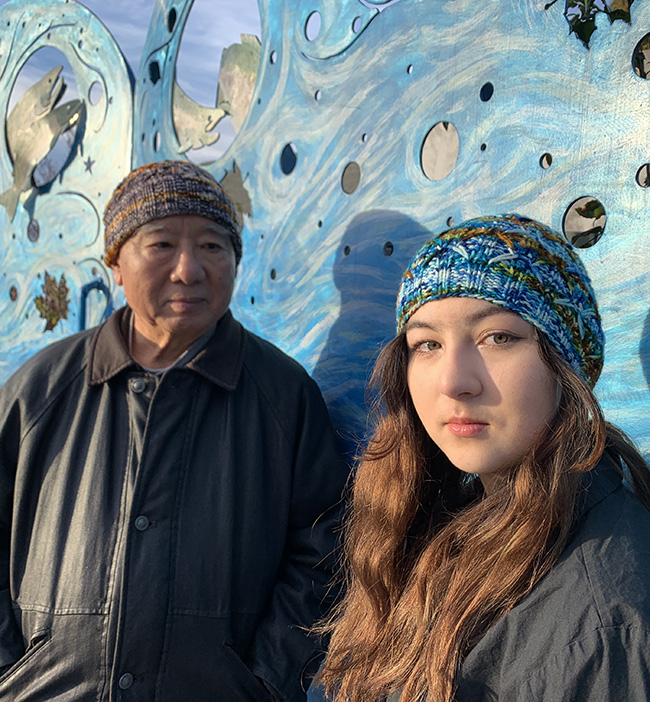
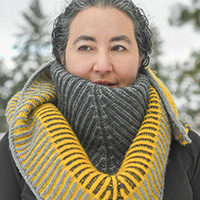
 model: Steve Itano and Eudora Itano Parsons
photos: Destiny Itano


SIZE
Adult S[M, L, XL]
short brim beanie sample shown in size M; folded brim slouch sample shown in size L
FINISHED MEASUREMENTS
Finished circumference: 16[18, 19.5, 21] inches/ 40.5[45.5, 49.5, 53.5] cm.
Depth: 8.75[8.75, 9.75, 10.75] inches/ 22.5[22.5, 25, 27.5] cm for beanie style; 10.75[10.75, 11.75, 12.75] inches/ 22.25[22.5, 30, 32.5] cm for slouch style; adjustable to preference and by brim style
choose a size approximately 1-3 inches/3 to 9 cm smaller than your actual head circumference
MATERIALS
Yarn
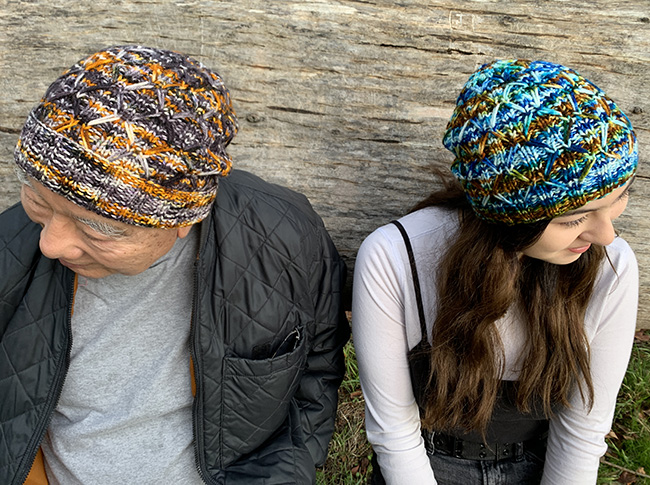
![]() Knitted Wit Worsted [100% superwash Merino wool; 200yd per 4 oz skein]; Short brim beanie sample shown in "Yellowstone" (blue version); folded brim slouch sample shown in "Yosemite" (rust/brown version); 1[1, 2, 2] skeins.
Knitted Wit Worsted [100% superwash Merino wool; 200yd per 4 oz skein]; Short brim beanie sample shown in "Yellowstone" (blue version); folded brim slouch sample shown in "Yosemite" (rust/brown version); 1[1, 2, 2] skeins.
Yarn Characteristics
![]() The samples shown use a worsted-weight 4-ply superwash merino wool. The samples shown use a variegated yarn with mostly long runs of color – between 8 inches/20 cm and 20 inches/50 cm. A variegated yarn with shorter color runs will look attractive, but different.
The samples shown use a worsted-weight 4-ply superwash merino wool. The samples shown use a variegated yarn with mostly long runs of color – between 8 inches/20 cm and 20 inches/50 cm. A variegated yarn with shorter color runs will look attractive, but different.
Recommended needle size
[always use a needle size that gives you the gauge listed below - every knitter's gauge is unique]
![]() 1 US #6 (4 mm)16 inch/40 cm circular needle
1 US #6 (4 mm)16 inch/40 cm circular needle
![]() US #8 (5 mm) 16 inch/40 cm circular needle, or whatever size you need to achieve gauge
US #8 (5 mm) 16 inch/40 cm circular needle, or whatever size you need to achieve gauge
![]() US #8 (5 mm) needles for small circumference in the round for the crown decrease, or whatever size you need to achieve gauge
US #8 (5 mm) needles for small circumference in the round for the crown decrease, or whatever size you need to achieve gauge
Notions
![]() stitch markers
stitch markers
![]() yarn needle
yarn needle
GAUGE
18 sts/28 rounds = 4 inches/10 cm in stockinette stitch on larger needle
18 sts/30 rounds = 4 inches/10 cm in Dip Stitch Pattern on larger needle
PATTERN NOTES
[Knitty's list of standard abbreviations and techniques can be found here.]
Construction method: This hat is knit in the round, from the ribbed brim up to the crown.
Dip Stitches: Instructions are written as "Dip" then a number L or R (left or right) and a number Dn (down). This tells you how many stitches to count to the left or right of the current stitch, and then how many rows to drop below. Then you insert your needle through the center of the indicated stitch to the back of the work, wrap the working yarn around your needle, and pull it through, placing the long loop of yarn onto the right-hand needle.
When you reach a dip stitch in the pattern, count the number of stitches left or right that the instructions tell you. Then, from that stitch, *not counting the stitch on the needle*, count the number of rows down that the instructions tell you. So, for example, if the instructions say Dip3R5Dn, you count 3 stitches to the right of the current stitch, and then 5 rows down from there. Insert your needle through the stitch, pull a loop through, and place the loop on your right-hand needle. When working these dip stitches, don't pull them too tight, otherwise you'll pucker the fabric of your knitting.
Sl 1: All stitches are slipped purlwise with yarn held in back.
CHARTS
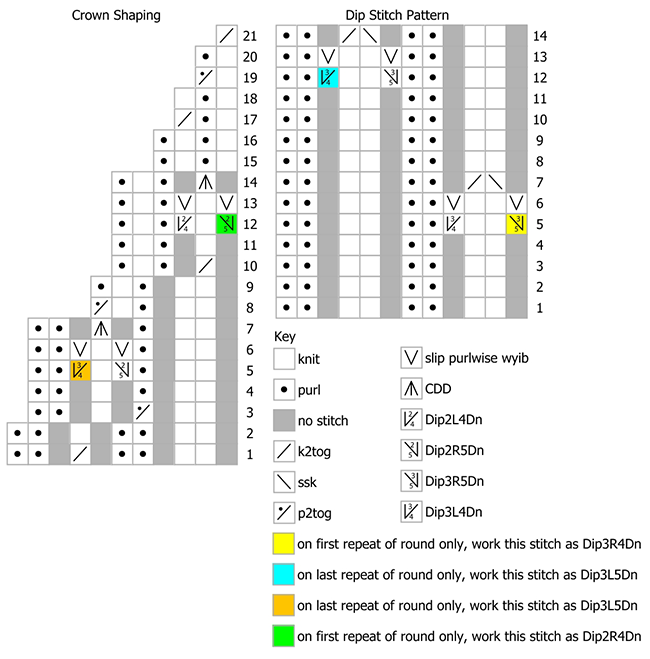
Dip Stitch Pattern
Rounds 1 - 4: (K2, p2) around.
Round 5: Dip3R4Dn, k2, Dip3L4Dn, p2, k2, p2, [Dip3R5Dn, k2, Dip3L4Dn, p2, k2, p2] to end. 10 sts per repeat.
Round 6: [Sl 1, k2, sl 1, p2, k2, p2] around.
Round 7: [Ssk, k2tog, p2, k2, p2] around. 8 sts per repeat.
Rounds 8 - 11: (K2, p2) around.
Round 12: [K2, p2, Dip3R5Dn, k2, Dip3L4Dn, p2] to last 8 sts; k2, p2, Dip3R5Dn, k2, Dip3L5Dn, p2. 10 sts per repeat.
Round 13: [K2, p2, sl 1, k2, sl 1, p2] around.
Round 14: [K2, p2, ssk, k2tog, p2] around. 8 sts per repeat.
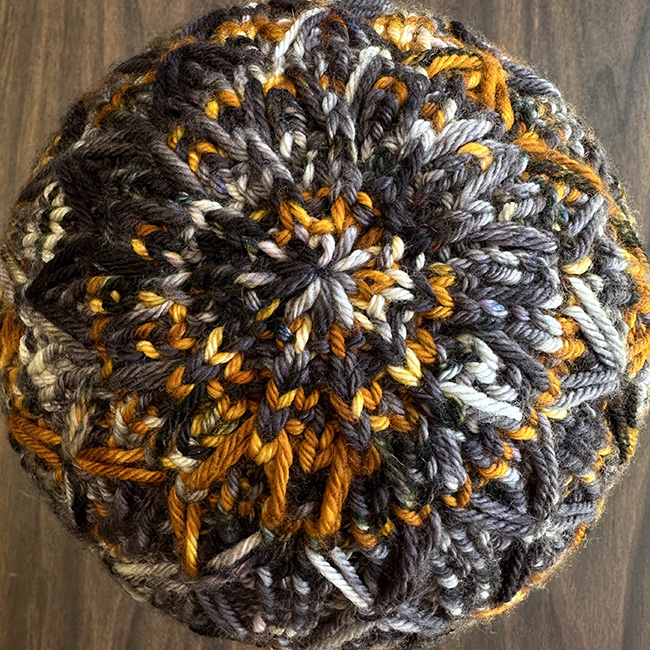
Crown Shaping
Round 1: [K2, p2, k2tog, p2] around. 7 sts per repeat.
Round 2: [K2, p2, k1, p2] around.
Round 3: [K2, p2tog, k1, p2] around. 6 sts per repeat.
Round 4: [K2, p1, k1, p2] around.
Round 5: [K2, p1, Dip2R5Dn, k1, Dip3L4Dn, p2] to last 6 sts of round; k2, p1, Dip2R5Dn, k1, Dip3L5Dn, p2. 8 sts per repeat.
Round 6: [K2, p1, sl 1, k1, sl 1, p2] around.
Round 7: [K2, p1, cdd, p2] around. 6 sts per repeat.
Round 8: [K2, p1, k1, p2tog] around. 5 sts per repeat.
Round 9: [K2, p1, k1, p1] around.
Round 10: [K2tog, p1, k1, p1] around. 4 sts per repeat.
Round 11: (K1, p1) around.
Round 12: Dip2R4Dn, k1, Dip2L4Dn, p1, k1, p1, [Dip2R5Dn, k1, Dip2L4Dn, p1, k1, p1] to end of round. 6 sts per repeat.
Round 13: [Sl 1, k1, sl 1, p1, k1, p1] around.
Round 14: [Cdd, p1, k1, p1] around. 4 sts per repeat.
Rounds 15 - 16: (K1, p1) around.
Round 17: [K1, p1, k2tog] around. 3 sts per repeat.
Round 18: [K1, p1, k1] around.
Round 19: [K1, p2tog] around. 2 sts per repeat.
Round 20: (K1, p1) around.
Round 21: K2tog around. 1 st per repeat.
DIRECTIONS
Cast-On
With smaller needle, using long-tail cast-on or other stretchy cast-on of your choice, CO 72[80, 88, 96] sts. Join to work in the round, being careful not to twist. Mark or note beginning of round.
Brim
Ribbing round: [K2, p2] around.
For short brim:
Work ribbing as set for 10[10, 14, 14] rounds.
For folded brim:
Work ribbing as set for 24[24, 30, 30] rounds.
Hat Main Body
Change to larger needles.
Body round: Work Dip Stitch pattern 9[10, 11, 12] times around.
Tip: You may wish to place markers to note the pattern repeats.
Note: On round 5, the first dip stitch is worked differently, and on round 12, the last dip stitch is worked differently – this is noted on the chart and in the instructions.
Sizes S and M:
For a beanie style, work rounds 1-14 of Dip Stitch pattern 2 times total, then work rounds 1-7 once more.
For a slouchy style, work rounds 1-14 of Dip Stitch pattern 3 times total, then work rounds 1-7 once more.
Size L:
For a beanie style, work rounds 8-14 of Dip Stitch pattern once, then work rounds 1-14 of Dip Stitch pattern 2 times total, then work rounds 1-7 once more.
For a slouchy style, work rounds 8-14 of Dip Stitch pattern once, work rounds 1-14 of Dip Stitch pattern 3 times total, then work rounds 1-7 once more.
Size XL:
For a beanie style, work rounds 1-14 of Dip Stitch pattern 3 times total, then work rounds 1-7 once more.
For a slouchy style, work rounds 1-14 of Dip Stitch pattern 4 times total, then work rounds 1-7 once more.
To adjust length, work more or fewer rounds here, always ending with Round 7 of the Dip Stitch pattern.
Crown
Crown round: Work Crown pattern 9[10, 11, 12] times around.
Note: On round 5, the first dip stitch is worked differently, and on round 12, the last dip stitch is worked differently – this is noted on the chart and in the instructions.
As work gets too small for circular needle, change to your preferred needles for small circumference.
Once chart is complete, 9[10, 11, 12] sts rem.
Break yarn and draw through remaining stitches to close the crown.
FINISHING
Weave in ends.
Wet block by soaking hat in room temperature water with a gentle wool wash. Press in a towel to remove excess water, then lay flat to dry. For slouch, I recommend blocking the body of the hat wider than your head circumference to give the hat fullness. For my slouch sample, I stretched the body of the hat approximately 2.5 inches/6.5 cm wider than the brim. If you wish, you can use a balloon to stretch the body of the hat for a nice, round, slouchy look. Inflate a balloon inside the hat, ensuring that you do not stretch the ribbing, only the body of the hat, and let dry.
ABOUT THE DESIGNER
 Destiny Itano has had a variety of careers, from working in film, to pursuing a Ph.D. in English, to working as a free-lance writer, but now she is a full-time knitter, instructor, designer, and owner of Seattle Yarn. In her scant spare time, she likes to lift weights, drink good coffee, watch movies, and read.
Find her on Ravelry and Instagram.
Pattern & images © 2024 Destiny Itano