


Moby Richard, a free knitting pattern from Knitty.com.
INTRODUCTION
Moby Richard
by Frances Gillespie

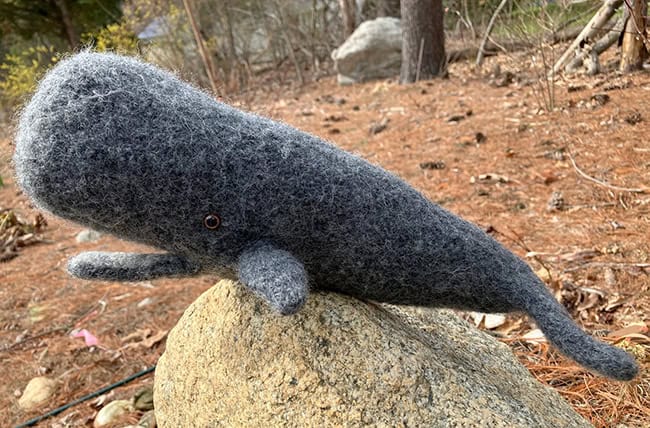
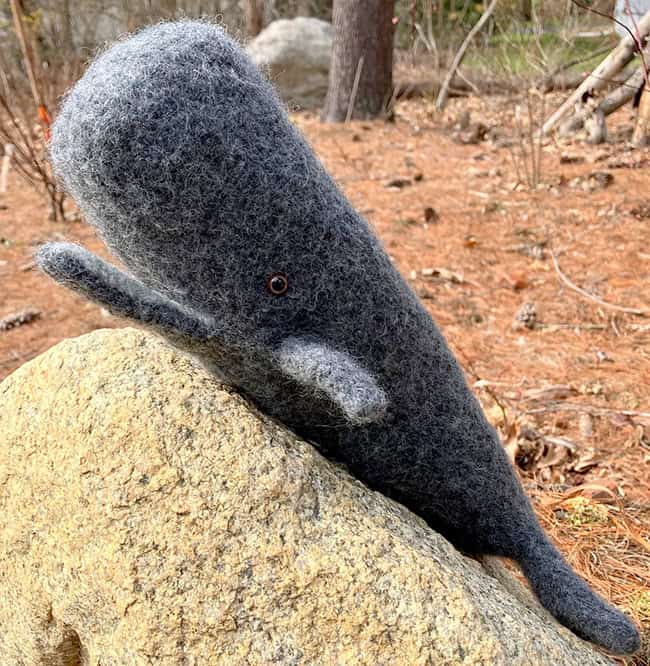
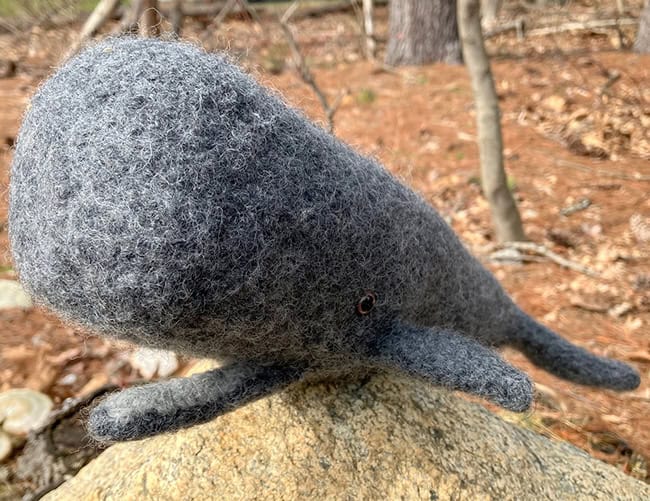
Thar she blows! Channel your inner Ahab and knit your own great white whale. (I've knit him in a realistic shade of gray, but white is an option for literary classics buffs). Moby is knit in stockinette st in the round from worsted weight non-superwash wool; then felted and filled with polyester.
This is not a difficult knit but there are a lot of steps, hence the 'tangy' designation.
 model: Moby himself
photos: Frances Gillespie


SIZE
One
FINISHED MEASUREMENTS
Moby is approximately 14 inches/35 cm long after felting.
MATERIALS
Yarn
Patons Classic Wool [100% wool; 210 yd/192 m per 100g skein];
![]() [MC] Dark Gray Mix; 1 skein
[MC] Dark Gray Mix; 1 skein
![]() [CC] Light Gray Mix; about 5 yards
[CC] Light Gray Mix; about 5 yards
Yarn Characteristics
![]() This is a worsted weight 100% wool yarn that felts easily and the colors do not run when felted. You may use other worsted weight non-superwash yarns, but please knit and felt a test swatch first.
This is a worsted weight 100% wool yarn that felts easily and the colors do not run when felted. You may use other worsted weight non-superwash yarns, but please knit and felt a test swatch first.
Recommended needle size
[always use a needle size that gives you the gauge listed below - every knitter's gauge is unique]
![]() US #9/5.5mm needles for small circumference in the round
US #9/5.5mm needles for small circumference in the round
![]() US #9/5.5mm needles for working flat – optional, see note below
US #9/5.5mm needles for working flat – optional, see note below
Note: most of the whale is worked in the round, but small portions are worked flat; you can use the same needles, without joining, or if you prefer, use separate needles for working flat.
Notions
![]() stitch markers
stitch markers
![]() stitch holders (or short lengths of waste yarn)
stitch holders (or short lengths of waste yarn)
![]() sewing needle, matching thread
sewing needle, matching thread
![]() two 9mm brown animal safety eyes
two 9mm brown animal safety eyes
![]() polyester fiberfill
polyester fiberfill
![]() yarn needle
yarn needle
GAUGE
Gauge is not critical but should be loose enough to allow for shrinkage after felting.
Sample gauge prefelting was 14 sts/18 rounds = 4 inches/10cm in stockinette stitch
PATTERN NOTES
[Knitty's list of standard abbreviations and techniques can be found here.]
Construction method: Begin at the tail end and work toward the head. The tail, flippers and jaw are added after knitting the body. The whale is then felted, dried and stuffed.
Techniques:
- RLPI [Right Lifted Increase, purlwise]: With right needle lift the stitch below the next stitch, and purl it. 1 stitch increased.
- RLI [Right Lifted Increase]: With right needle lift the stitch below the next stitch, and knit it. 1 stitch increased.
DIRECTIONS
Note: Use MC for all sections except the mouth lining, as noted, which is worked in CC.
Body
Using MC CO 32 st, distribute sts across needles as you prefer and join to work in the round.
Rounds 1-9: (P1, k7) 4 times around.
This establishes 4 panels of k st with 4 columns of p st, which will form the top, sides, and bottom of the whale's body and head.
Round 10: (P1, RLI, k7, RLI) around. 40 sts.
Round 11-20 (10 rounds): (P1, k9) around.
Round 21: (P1, RLI, k9, RLI) around. 48 sts.
Round 22-32 (11 rounds): (P1, k11) around.
Round 33: (P1, RLI, k11, RLI) around. 56 sts
Round 34-51 (18 rounds): (P1, k13) around.
Round 52, create jaw opening: (P1, k13) twice, p1, k2. Put next 9 sts on waste yarn or a holder for lower jaw. Using the backwards loop method, CO 9 st; k2, p1, k13. The first 14 sts form the top of the head, the second set of 14 sts form the left side of the head; the last 14 sts form the right side of the head.
Round 53-75 (23 rounds): (P1, k13) around.
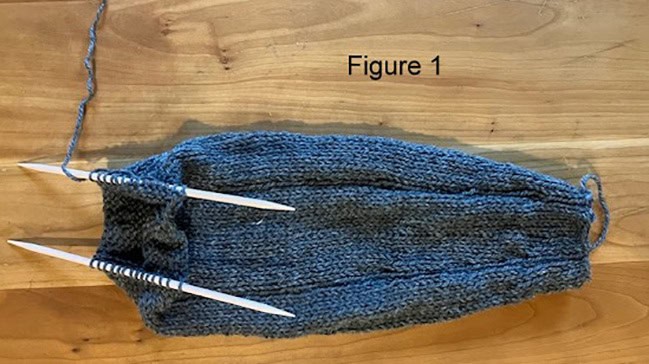
Round 76: K2tog twice – there are now 2 sts on the right-hand needle; lift the first of these over the second to bind it off. Bind off the next 7 sts, then k2tog twice, pass first k2tog over second. (The remaining st on the right needle should be directly over a p column). K13. Place the 14 just-worked sts on waste yarn or holder. Repeat from * once more.
You will have two sets of 14 sts remaining; the first will form the left side of the head, and are on holder; the second set of 14 sts forms the right side of the head, and you will continue to work only on those, back and forth in rows. See Figure 1 below.
Turn work so that WS is facing.
Row 1 [WS]: Purl.
Row 2 [RS]: Knit.
Repeat the last 2 rows, twice more. Bind off.
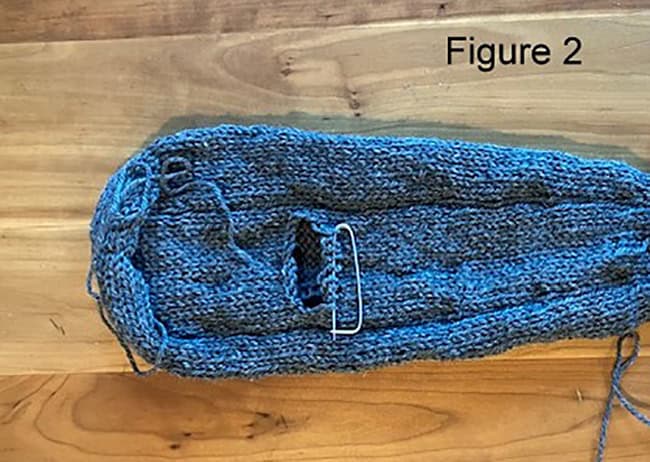
Place the sts from the holder back on a needle, rejoin MC with WS facing; work 6 rows in stockinette as for the first section and bind off. With RS facing, seam these two edges together. This seam is in the middle of the front forehead. Sew the openings at the top and bottom of the head to the forehead. See Figure 2 below.
Lower Jaw
Return the 9 held sts of the lower jaw to your needles. Rejoin MC at start of RS row.
Row 1 [RS]: Knit.
Row 2 [WS]: Purl.
Row 3: K2tog, k5, k2tog. 7 sts.
Row 4: Purl.
Row 5: K2tog, k3, k2tog. 5 sts.
Starting with a purl row, work even in stockinette stitch for 14 more rows.
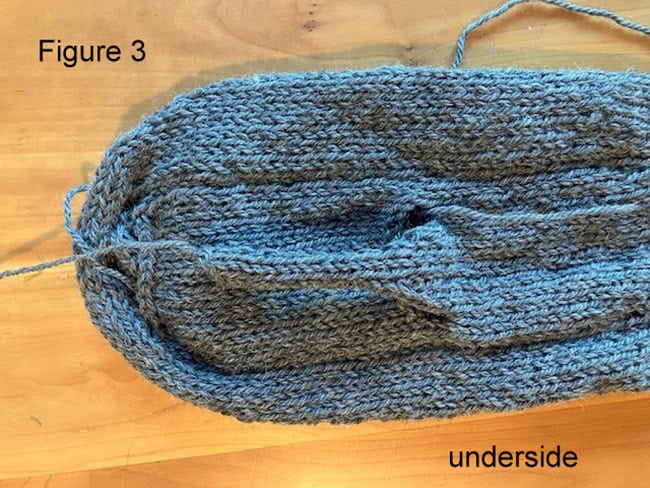
Bind off, leaving a 12-inch/30-cm tail. See Figure 3 below.
Tail
Return to the 32 st at the cast on end of the body. With RS facing rejoin MC and pick up and knit 16 st from the top of the tail. Using a second needle, pick up and knit 16 st from the bottom of the tail: transfer these sts to a holder. You will work back and forth on the first 16 sts.
Row 1 [RS]: K across.
Row 2 [WS]: (RLI, p1) twice, p12, (RLI, p1) twice.
Row 3: K1, RLI, k to last st, RLI, k1. 22 sts.
Row 4: Purl.
Row 5: K1, RLI, k to last st, RLI, k1. 24 sts.
Row 6: P1, RLPI, p10, bind off next 2 sts, p to last 2 st, RLPI, p1. 24 sts – 12 each side of the bind-off gap.
You will now divide the stitches into two sections, for the two extensions of the tail, and continue only on the last 12 sts worked to shape the right side of the tail fluke.
Row 7 [RS]: K1, RLI, k to last 2 sts, k2tog.
Row 8 [WS]: P2tog, p to end. 1 st decreased.
Rows 9-10: Repeat Rows 1-2 once more. 10 sts.
Row 11: Repeat Row 1.
Row 12: Bind off 2 sts, p to end. 8 sts.
Row 13: Repeat Row 1.
Row 14: Bind off 3 sts, p to end. 5 sts.
Bind off remaining sts, leaving a 12-inch/30-cm long tail.
Work on the other group of 12 st to shape the left side of the tail fluke: join MC yarn to wrong side of work.
Row 8 [WS]: P1, RLPI, p to last 2 sts, p2tog.
Row 9 [RS]: K2tog, k to end. 1 st decreased.
Repeat Rows 1-2 once more. 10 sts.
Row 12: Work Row 8 once more.
Row 13: Bind off 2 sts, k to end. 8 sts.
Row 14: Repeat Row 1.
Row 15: Bind off 3 sts, k to end. 5 sts.
Bind off remaining sts, leaving a 12-inch/30-cm long tail.
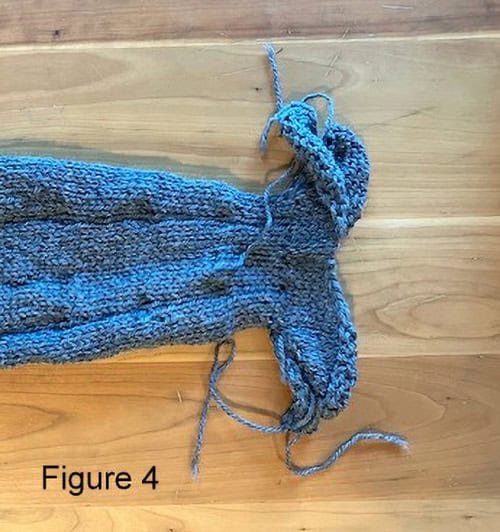
You have now completed the bottom half of the tail. Return to the other 16 st picked-up sts, and return them to a needle. Repeat from Row 1 to complete the top half of the tail. See Figure 4 below.
Seam the two halves of the tail together using the yarn ends.
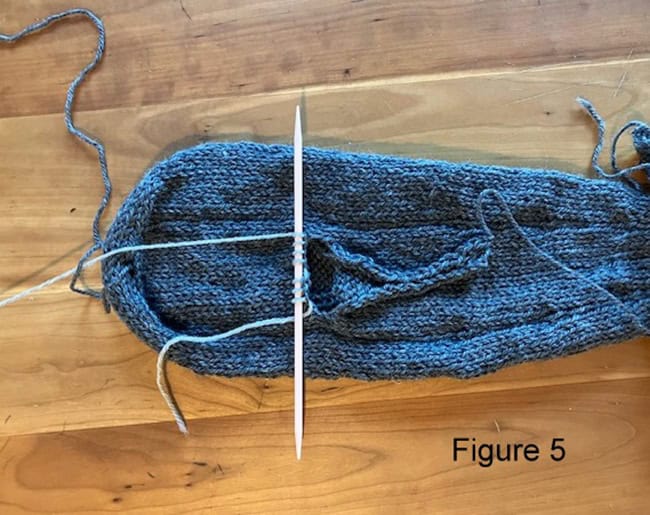
Mouth Lining.
Turn whale on its back with the head end facing you. With RS facing, join CC, pick up and knit 7 st from the st cast on over the jaw gap. Turn so that WS is facing. See Figure 5 below.
Row 1 [WS]: Purl.
Row 2 [RS]: K2tog, k3, k2tog. 5 sts.
Row 3: Purl.
Row 4: K1, k2tog, k2. 4 sts.
Starting with a purl row, work 12 rows even in stockinette stitch.
Bind off, leaving a 12-inch/30-cm long tail. See Figure 6 below.
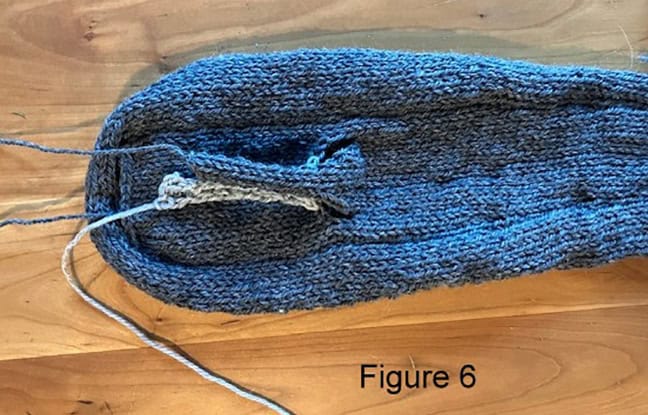
Sew the mouth lining to the lower jaw.
Side Flippers – Make 2.
Using MC, CO 10 sts.
Row 1 [RS]: Knit.
Row 2 [WS]: Purl
Row 3: (RLI, k4, RLI, k1) twice. 14 sts.
Row 4-7: Work 4 rows even in stockinette, starting with a purl row.
Row 8: [P2tog, p3, p2tog] twice. 10 sts.
Row 9: Knit.
Row 10: [P2tog, p1, p2tog] twice. 6 sts.
Work 2 rows even in stockinette stitch, starting with a knit row.
Bind off, leaving a 12-inch/30-cm long tail.
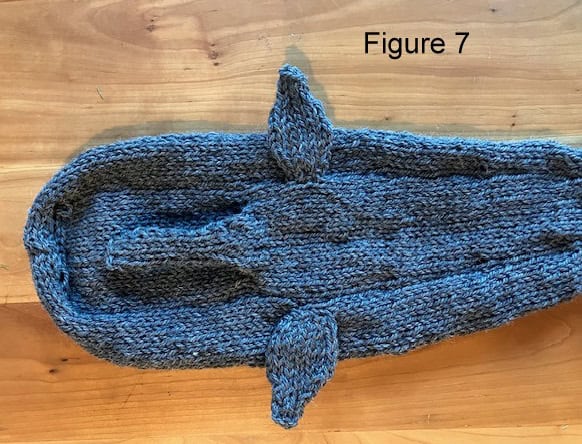
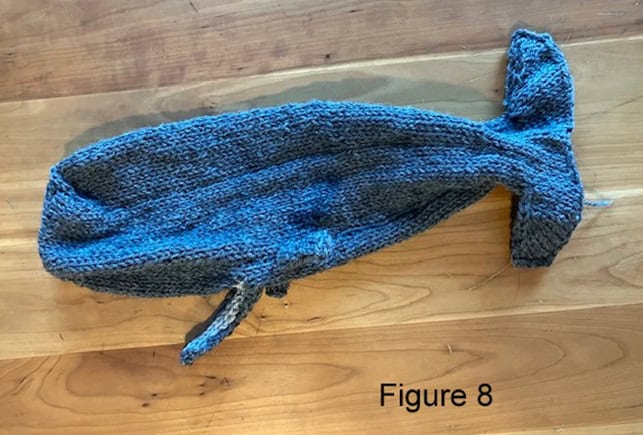
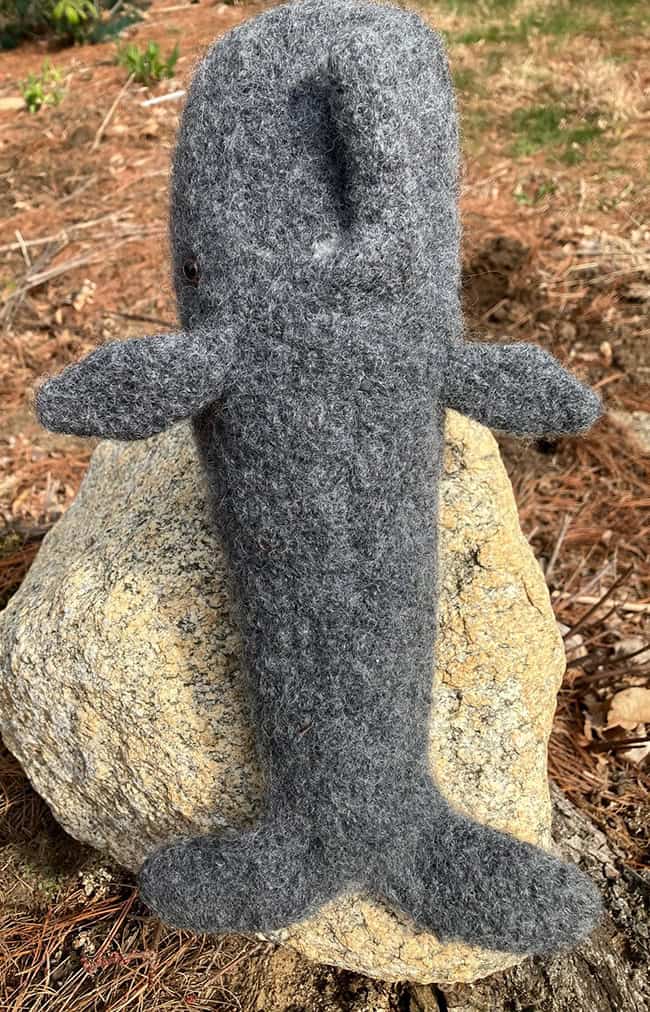
Fold flipper in half lengthwise and seam. Sew to the whale's sides using photo as a guide. See Figures 7 and 8 below.
FINISHING
Fasten off all yarn ends. You are now ready to felt your whale.
There is no opening for stuffing it – you will cut an opening after felting.
Place him in a mesh bag in your washing machine; set on extra small load and hot water, and add a tiny pinch of laundry detergent. Start the machine. Check every five minutes or so until it reaches the desired level of felting. (Be careful not to let it go through the spin cycle or he may get creases).
If you have a front-loading machine, use as short a cycle as you can, with a hot wash and a cold rinse. You might need to run it through more than once. Check after each cycle before repeating.
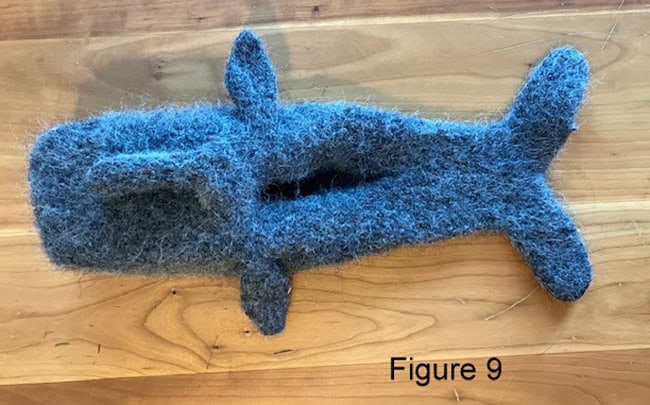
Remove the whale from the bag and cut a slit in its belly for stuffing. See Figure 9 below.
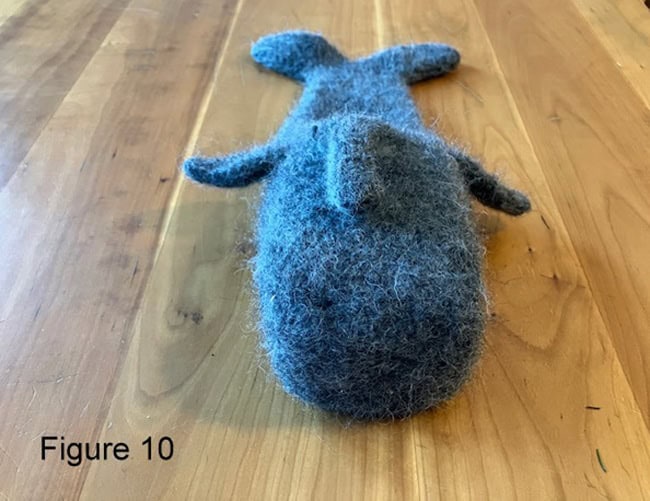
Important step! Loosely stuff the whale with newspaper to keep its shape; pat the whale's head into a boxy shape so it is more square than rounded. See Figure 10 below to see the square head shape you are aiming for. Set whale somewhere warm to dry completely.
When he is dry, remove the newspaper and attach the safety eyes, using photos as a guide for placement. Stuff whale firmly with polyester filling, and sew shut with matching thread. You may also need to secure any seams with needle and thread that did not completely close during felting.
ABOUT THE DESIGNER
 Frances is a longtime knitter who branched out into felting about 25 years ago. She's fascinated with the process of designing the unusual, weird, and unloved critters.
Find her here on Ravelry.
Pattern & images © 2025 Frances Gillespie