


Thriambus, a free knitting pattern from Knitty.com. Free knitting pattern for a tightly twisted cabled sock.
INTRODUCTION
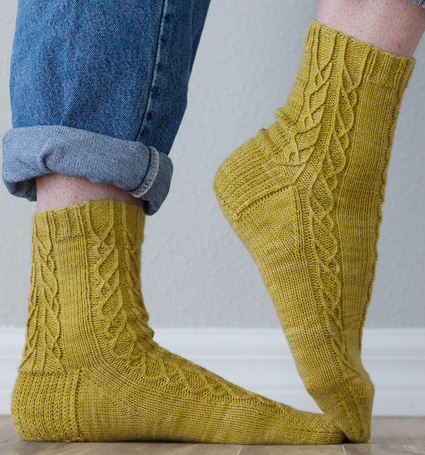
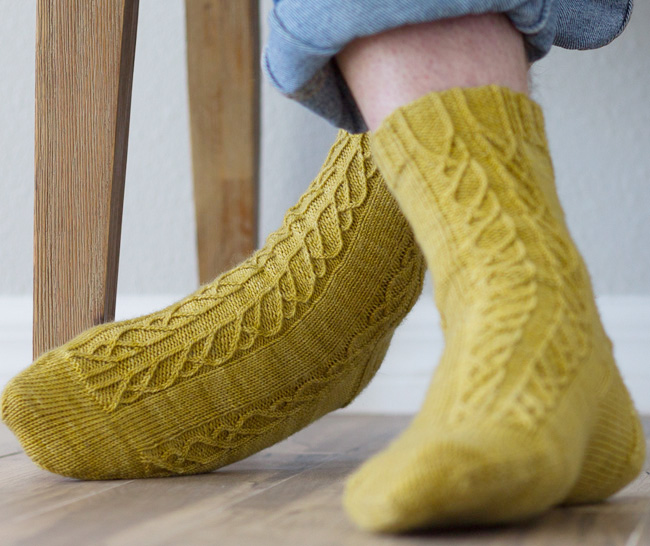
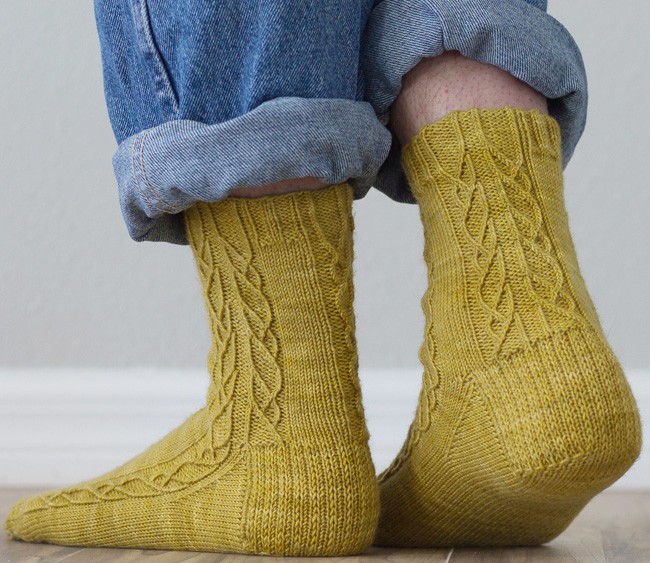
Thriambus

It may come as a surprise to some, but I am not a fan of cold weather. I know that seems odd given that winter is the time for knitters to shine. Maybe it’s the lack of natural insulation I have on top of my head, or perhaps the aches, which get more pronounced every year, I feel in my joints. In fact I dislike the cold so much that I moved to a subtropical climate.
Because of this dislike of cold, I always feel like celebrating once Spring arrives. The air is warm, the sun is shining, and flowers are blooming. It’s enough to make one want to sing a song of triumph.
Ancient Greeks liked to sing songs of triumph too. They would sing a thriambus, which honored the god Dionysus. I celebrate sunshine. Ancient Greeks celebrated alcohol. To each his own.
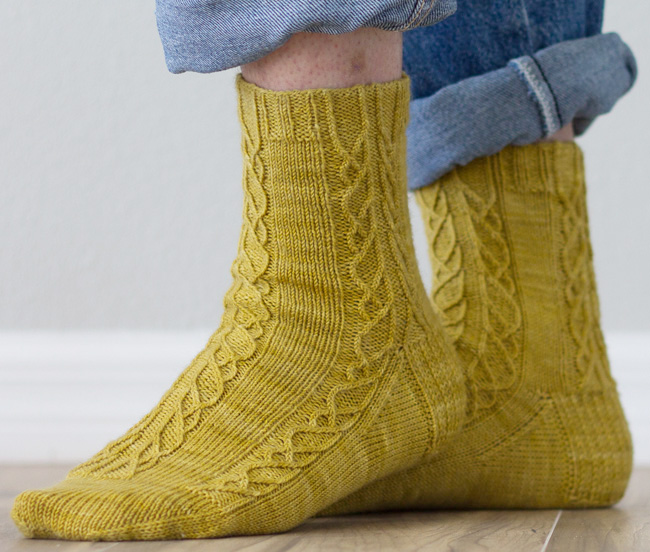
The Thriambus sock is a cuff down sock. While the completed socks are mirrored, both socks begin following the same instructions. The beginning of the round shifts ever so slightly before working the heel flap to adjust the positioning of the cables.
 photos: Rich Ensor


SIZE
Adult S[M, L]
FINISHED MEASUREMENTS
Foot Circumference: 8[9, 10] inches/ 20[22, 25] cm
Foot Length: adjustable to fit
Leg Length: adjustable to fit
Choose a size with approximately 1 inches/2.5cm negative ease in the foot circumference.
MATERIALS
Yarn
![]() Miss Babs Hot Shot [80% Superwash Merino Wool, 20% Nylon; 400 yd/366m per 4oz/114g skein]; color: Kaffir Lime; 1 skein
Miss Babs Hot Shot [80% Superwash Merino Wool, 20% Nylon; 400 yd/366m per 4oz/114g skein]; color: Kaffir Lime; 1 skein
Recommended needle size
[always use a needle size that gives you the gauge listed below - every knitter's gauge is unique]
![]() US #1.5/2.5mm needles for small circumference in the round
US #1.5/2.5mm needles for small circumference in the round
Notions
![]() cable needle
cable needle
![]() yarn needle
yarn needle
GAUGE
28 sts/48 rounds = 4 inches/10 cm in stockinette stitch
30 sts/48 rounds = 4 inches/10 cm in pattern stitch
PATTERN NOTES
[Knitty's list of standard abbreviations and techniques can be found here.]
Working the Cables with a cable needle:
T2L: Sl next st to cn and hold in front of work; k1 tbl, then k1 tbl from cn.
TP2L: Sl next st to cn and hold in front of work; p1, then k1 tbl from cn.
T2R: Sl next st to cn and hold in back of work; k1 tbl, then k1 tbl from cn.
TP2R: Sl next st to cn and hold in back of work; k1 tbl, then p1 from cn.
Working the Cables without a cable needle:
T2L: With the right-hand needle in back of the work, skip the first stitch on the left-hand needle and insert the tip of the needle into the back leg of the second stitch. Drop both of the stitches off of the left-hand needle. The first stitch will fall free. Insert the left needle into the dropped knit stitch, then slide the other stitch back onto the left needle. Knit the first stitch through the back loop, then knit the second stitch through the back loop.
TP2L: With the right-hand needle in back of the work, skip the first stitch on the left-hand needle and insert the tip of the needle into the back leg of the second stitch. Drop both of the stitches off of the left-hand needle. The first stitch will fall free. Insert the left needle into the dropped knit stitch, then slide the other stitch back onto the left needle. Purl the first stitch, then knit the second stitch through the back loop.
T2R: With the right-hand needle in front of the work, skip the first stitch on the left-hand needle and insert the tip of the needle into the second stitch purlwise. Drop both of the stitches off of the left needle. The first stitch will fall free. Insert the left needle into the dropped stitch, then slide the other stitch back onto the left needle. Knit the first stitch through the back loop, then knit the second stitch through the back loop.
TP2R: With the right-hand needle in front of the work, skip the first stitch on the left-hand needle and insert the tip of the needle into the second stitch purlwise. Drop both of the stitches off of the left needle. The first stitch will fall free. Insert the left needle into the dropped stitch, then slide the other stitch back onto the left needle. Knit the first stitch through the back loop, then purl the second stitch.
Techniques:
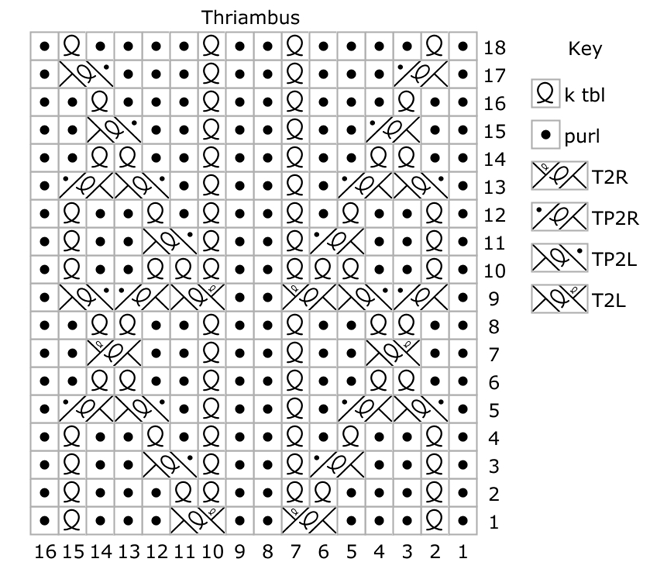
CHART
DIRECTIONS
Cuff
With your favorite stretchy method, CO 60[66, 72] stitches.
Distribute stitches across needles as you prefer and join for working in the round.
Cuff Round: *(K 1[2, 1] , p2, k 1[2, 1] ) 1[1, 2] times, work row 18 of Thriambus Chart; rep from * twice more to end of round.
Repeat Cuff Round for a total of 12 rounds to desired length of cuff, working Row 18 of the chart for each round.
Leg
Leg round: *K 4[6, 8] , work Thriambus Chart beginning at row 1; rep from * twice more to end of round.
Work Leg Round to desired length of leg ending on an even numbered row of the chart.
Heel Set Up
Right Sock: Work 12[14, 16] stitches in pattern as set.
Left Sock: K 2[3, 4] .
Heel Flap
The heel flap is knit back and forth on a total of 30[33, 36] stitches. Turn work so that wrong side is facing. Rem 30[33, 36] stitches will be held for instep.
Turn work so that wrong side is facing.
Row 1 [WS]: Sl 1 wyif, p 29[32, 35] ; turn.
Row 2 [RS]: (Sl 1 wyib, k1) 15[16, 18] times, k 0[1, 0] , turn.
Repeat these 2 rows 14[16, 17] more times for a total of 30[34, 36] rows in the heel flap.
Turn the Heel:
Row 1 [WS]: Sl 1 wyif, p 16[17, 20] , p2tog, p1, turn.
Row 2 [RS]: Sl 1 wyib, k 5[4, 7] , ssk, k1, turn.
Row 3 [WS]: Sl 1 wyif, p 6[5, 8] , p2tog, p1, turn.
Row 4 [RS]: Sl 1 wyib, k 7[6, 9] , ssk, k1, turn.
Row 5 [WS]: Sl 1 wyif, p 8[7, 10] , p2tog, p1, turn.
Row 6 [RS]: Sl 1 wyib, k 9[8, 11] , ssk, k1, turn.
Row 7 [WS]: Sl 1 wyif, p 10[9, 12] , p2tog, p1, turn.
Row 8 [RS]: Sl 1 wyib, k 11[10, 13] , ssk, k1, turn.
Row 9 [WS]: Sl 1 wyif, p 12[11, 14] , p2tog, p1, turn.
Row 10 [RS]: Sl 1 wyib, k 13[12, 15] , ssk, k1, turn.
Row 11 [WS]: Sl 1 wyif, p 14[13, 16] , p2tog, p1, turn.
Row 12 [RS]: Sl 1 wyib, k 15[14, 17] , ssk, k1.
Small Size Only: 18 sts rem. Proceed to Gusset.
Row 13 [WS]: Sl 1 wyif, p -[15, 18] , p2tog, p1, turn.
Row 14 [RS]: Sl 1 wyib, k -[16, 19] , ssk, k1. -[19, 22] sts rem.
Gusset
Note: On the instep, the cables are worked in pattern as set. As a result, only half of the chart is worked at either the beginning (right sock) or end (left sock) of the instep.
Gusset Set Up Round: With right side facing, pick up and knit 15[17, 18] stitches along the first side of the heel flap. Work the next 30[33, 36] stitches in pattern as set. Pick up and knit 15[17, 18] along the second side of the heel flap, knit across heel stitches and first set of gusset stitches. This is the new start of round, the start of the instep. 78[86, 94] sts.
Gusset Round 1: Work the next 30[33, 36] stitches in pattern as set; k1, ssk, k to 3 sts before end of round, k2tog, k1. 2 sts decreased.
Gusset Round 2: Work the next 30[33, 36] stitches in pattern as set; k to end of round.
Repeat Gusset Rounds 1 and 2 8[9, 10] times more. 60[66, 72] sts.
Foot
Continue working the instep in pattern as set and knitting the sole stitches to the foot length is approximately 1.5[1.5, 1.75] inches/ 4[4, 4.5] cm short of desired length.
Toe
Toe Round 1: K1, ssk, k to 3 sts before end of instep, k2tog, k1; k1, ssk, k to 3 sts before end of round, k2tog, k1. 4 sts decreased.
Toe Round 2: K all sts.
Repeat Toe Rounds 1-2 until 28[30, 36] total stitches remain. Repeat Toe Round 1 (decreasing every round) until 16[18, 24] total stitches remain.
FINISHING
Cut the yarn leaving a 12-inch/30cm tail and graft the rem sts together. Block and weave in all ends.
ABOUT THE DESIGNER
 Rich started knitting as a way to relieve stress. His first two projects were sweaters, since there was no one to tell him that perhaps a scarf would be a better starting point. At some point, Rich got it into his shiny, bald head that knitting socks might be a good idea.
Rich lives in Tampa, Florida with three cats who think that stitch markers solely exist to entertain them. He can be found online and on Ravelry.
Pattern & images © 2018 Rich Ensor.