


Bidicot Shawl, a free knitting pattern from Knitty.com. Free knitting pattern for an asymmetrical striped shawl. This shawl was named by a Neural Net.
INTRODUCTION
Bidicot
 by Stephanie Shiman

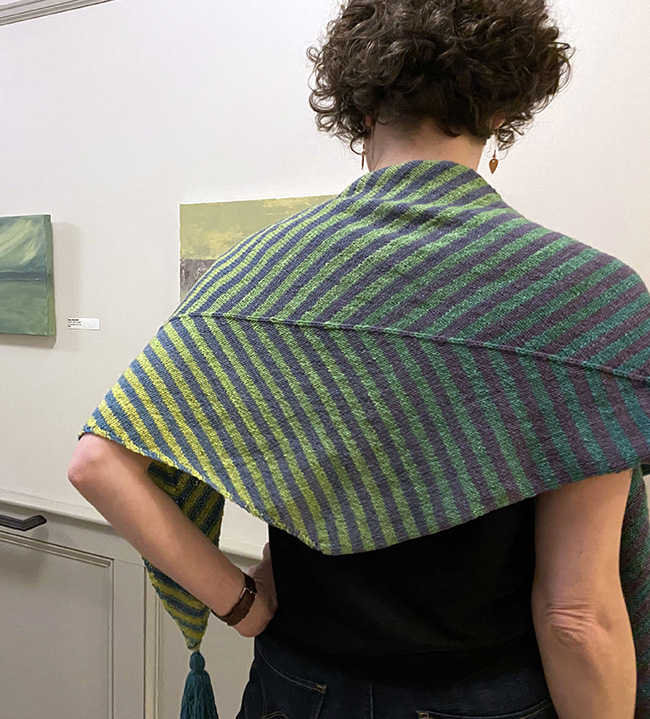
This is a shawl inspired by a yarn, a yarn that is inspired by flowers. "Blossoms" are dyed as knitted blanks. Dyes are washed over the blank, building layer upon layer, creating seamless shifts from one color to another. Colors blend and overlap and a complex, cohesive colorway is developed. Striping two different colorways together allows the colors to shift and interact as you knit.
To start, Bidicot begins as a "V" shape—with my favorite decrease—a CDD (centered doubled decrease) creating a defined line from the cast-on that continues to the bind off. Once the width is reached, stitches will be "moved" from one side of the CDD to the other, turning the "V" into an elongated triangle. Tassels polish it off.
 model: Mesa Kennedy, Amara Cunningham
photos: Stephanie Shiman


SIZE
One
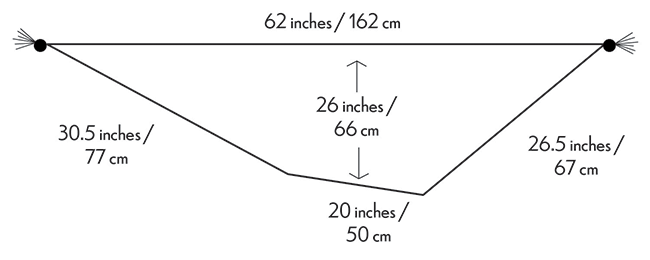
FINISHED MEASUREMENTS
Width: 64 inches/ 163cm
Length: 26 inches/ 66cm
MATERIALS
Yarn
![]() Wonderland Yarns "Blossoms" [80% superwash merino, 20% nylon; 425 yds/389m per 4 oz/ 113g cake];
Wonderland Yarns "Blossoms" [80% superwash merino, 20% nylon; 425 yds/389m per 4 oz/ 113g cake];
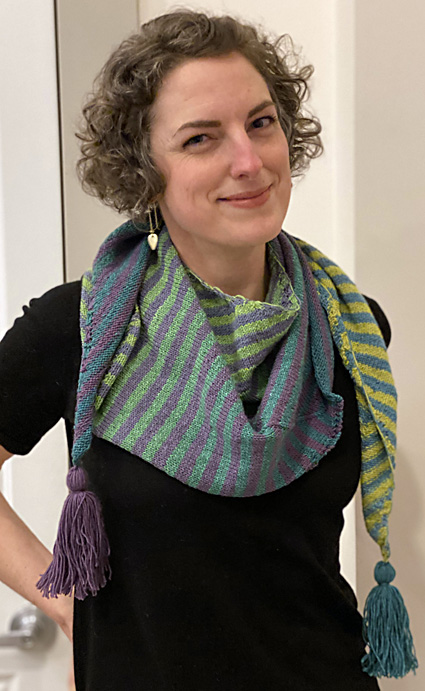
Version one – yellow-green to purple (shown above):
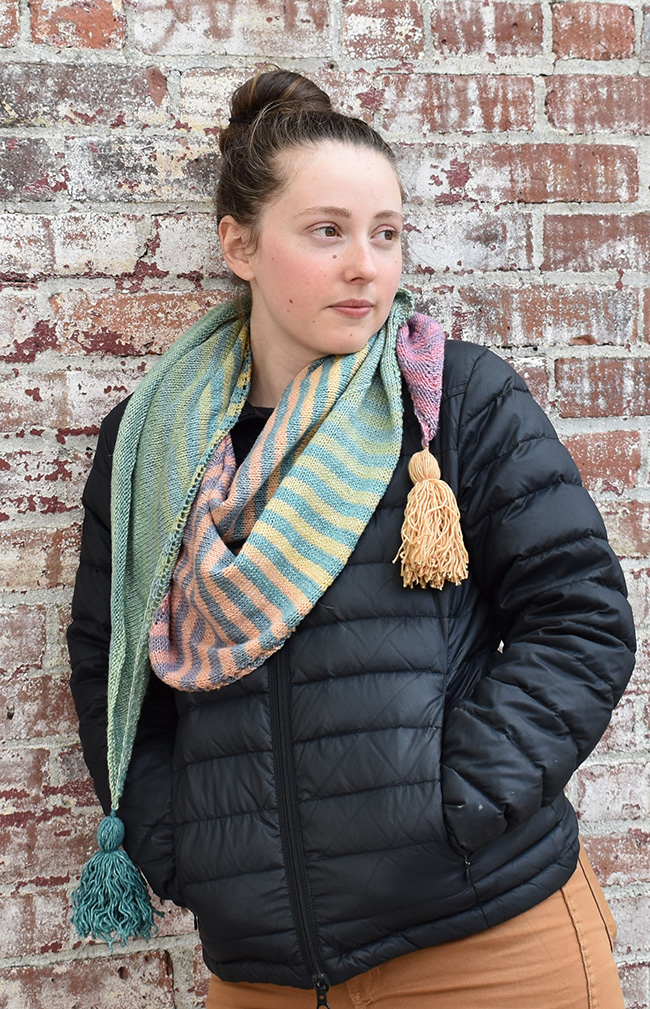
Version two – pink to green (shown below):
Recommended needle size
[always use a needle size that gives you the gauge listed below - every knitter's gauge is unique]
![]() US #4/3.5mm needles for working flat – a long circular is recommended
US #4/3.5mm needles for working flat – a long circular is recommended
Notions
![]() yarn needle
yarn needle
![]() cardboard or something sturdy (and waterproof) for wrapping and blocking tassels, stitch marker
cardboard or something sturdy (and waterproof) for wrapping and blocking tassels, stitch marker
![]() a single needle 2 or 3 sizes larger, for binding off
a single needle 2 or 3 sizes larger, for binding off
GAUGE
24 sts/35 rows = 4 inches/10 cm in stockinette stitch
PATTERN NOTES
[Knitty's list of standard abbreviations and techniques can be found here.]
This shawl starts as a "V" shape; section two will "move" the stitches to the other side of the center decrease. By decreasing stitches on one side of the center and increasing stitches on the other side of the center, the shawl's shape is created.
For the stripes, you will be carrying the waiting yarn up the side. If you tend to have tight edges, use this trick to keep your edges loose: on RS rows add a YO after knitting the first stitch. Then drop the YO when you work back to it on WS . Be sure not to forget to drop the YO or you will accidentally increase.
CDD: Slip 2 stitches together (as if to k2tog), k1, then pass slipped stitch over.
Note: If you want tassels in the same color as your starting cast-on, be sure to reserve enough. Or make a tassel with the start of the MC yarn before casting-on. Tassel instructions are at the end of the pattern.
It's very easy to adjust the size of this shawl – just keep working Section One until it's the size you want, and then you'll work more repeats of the rows of Section Two until it hits the end.
DIRECTIONS
Section One
With MC, CO 3 sts.
Set-up row [RS]: K1, yo, k1, yo, k1. 5 sts.
Row 1 [WS]: K2, yo, pm, p1, yo, k2. 7 sts.
Row 2 [RS]: K2, yo, CDD (removing and replacing marker after decrease), yo, k2.
Row 3 [WS]: K2, yo, p to last 2 sts, yo, k2. 9 sts.
Join CC.
Note: From here, you will work four-row stripes of each color, carrying unused yarn loosely up the side as you go.
Row 4 [RS]: With CC, K2, yo, k to last 2 sts before marker, CDD (removing and replacing marker after decrease), k to last 2 sts, yo, k2.
Row 5: With MC, K2, yo, p to last 2 sts, yo, k2. 2 sts increased.
Row 6: With CC, K2, yo, k to last 2 sts before marker, CDD (removing and replacing marker after decrease), k to last 2 sts, yo, k2.
Row 7: With MC, K2, yo, p to last 2 sts, yo, k2. 2 sts increased.
Repeat Rows 4-7, changing yarn every 4 rows, until you have 161 sts.
Section Two
Note: In this section, you will "move" stitches from one side of CDD to the other. The stitch count will stay the same throughout.
Row 1 [RS]: K2, yo, k to 2 sts before marker, CDD (removing and replacing marker after decrease), k to last 2 sts, yo, k2.
Row 2: K2, yo, p to last 5 sts, p3tog, yo, k2.
Row 3: K2, yo, k to 2 sts before marker, CDD (removing and replacing marker after decrease), k to last 2 sts, yo, k2.
Row 4: K2, yo, p to last 5 sts, p3tog, yo, k2.
Repeat Rows 1-4, changing yarn every four rows, until there's only 4 sts before the marker, ending with a RS row.
With MC, knit 4 rows. Bind off loosely, using a larger needle. Weave in ends.
FINISHING
Because of the somewhat kinky nature of yarns that have been dyed as a blank, a thorough blocking will bring out the slinky drape and hand of the yarn. Soak your finished shawl in warm water, adding a bit of hair conditioner if desired. (Wool is a protein fiber, just like hair!) Let the shawl sit for an hour or so, ensuring it's soaked all the way through.
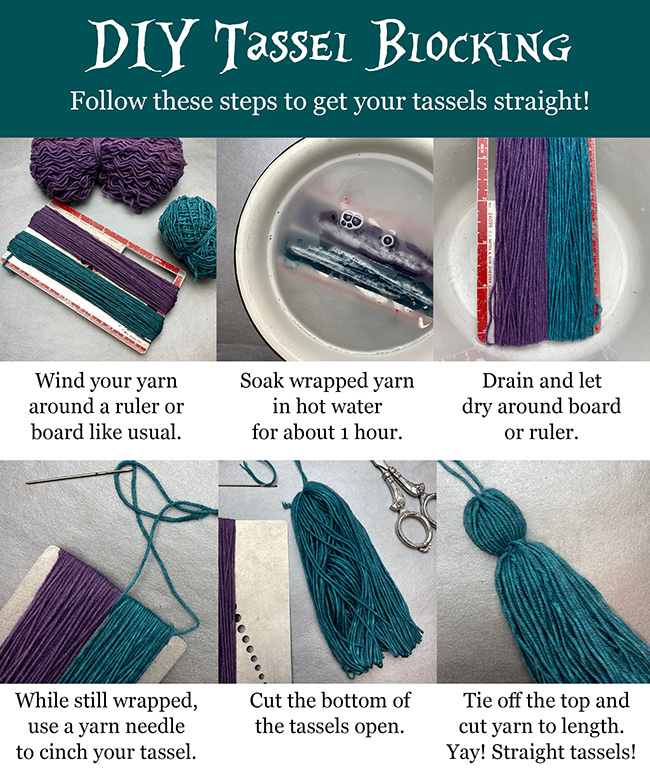
Tassel instructions: Because of the kinky nature of the Blossoms yarn, you may wish to wet block your tassel. To do so, choose something waterproof that's about the length you'd like your tassel to be—I used a 5" long metal needle gauge ruler. For tassels like the sample, wrap a 5" long waterproof object with 70 wraps. Soak the ruler and yarn in hot soapy water and leave it overnight. Squeeze out the excess water and leave to dry. Then tie the top of the tassel, leaving the yarn long enough to so that you can use it to attach the tassel to the shawl points. Wrap yarn around one end of the tassel to form the top knot and cut yarn at the other end. Make two or three and attached to desired points.
ABOUT THE DESIGNER
 Stephanie is the owner of frabjous fibers and Wonderland Yarns. When she's not up to her elbows in dye, she enjoys foolishness with her daughters, junk shops, making pottery, and all manner of fiber crafts. She lives with her daughters, darling, and dogs in southern Vermont.
You can find her show and tell on Instagram.
Pattern & images © 2020 Stephanie Shiman.